
Introduction to Caramel Apple Board
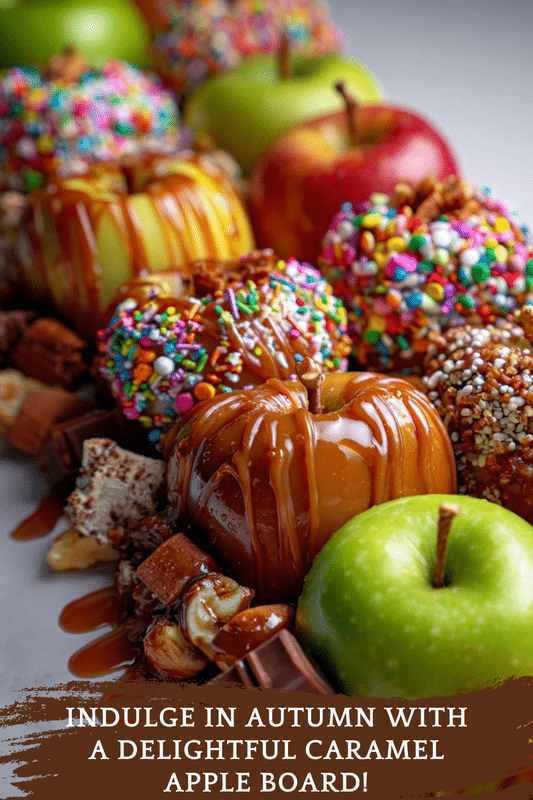
As the leaves turn and the air gets crisp, I find myself craving cozy treats that bring warmth to my home. That’s where the caramel apple board comes in! This delightful creation is not just a feast for the eyes; it’s a quick solution for busy days when you want to impress your loved ones without spending hours in the kitchen. Imagine gathering around a beautifully arranged board filled with caramel-coated apples and a variety of toppings. It’s the perfect way to celebrate fall and create sweet memories with family and friends.
PrintCaramel Apple Board: A Delicious Fall Treat Idea!
A delightful and visually appealing caramel apple board perfect for fall gatherings, featuring a variety of toppings and flavors.
- Prep Time: 15 minutes
- Cook Time: 5 minutes
- Total Time: 20 minutes
- Yield: 4 servings
- Category: Dessert
- Method: No-bake
- Cuisine: American
- Diet: Vegetarian
Ingredients
- 4 medium apples
- 1 cup caramel sauce
- 1/2 cup chopped nuts (e.g., peanuts, walnuts)
- 1/2 cup mini chocolate chips
- 1/2 cup sprinkles
- 1/2 cup shredded coconut
- 1/2 cup crushed graham crackers
- Wooden skewers or sticks
Instructions
- Wash and dry the apples thoroughly.
- Insert wooden skewers into the top of each apple.
- In a microwave-safe bowl, heat the caramel sauce until melted.
- Dip each apple into the melted caramel, ensuring it is fully coated.
- Roll the caramel-coated apples in your choice of toppings.
- Arrange the apples on a serving board with additional toppings around them.
- Serve immediately and enjoy!
Notes
- For a healthier option, use dark chocolate and nuts.
- Make sure the caramel is warm for easy dipping.
- Feel free to customize toppings based on personal preferences.
Why You’ll Love This Caramel Apple Board
This caramel apple board is a game-changer for busy moms and professionals alike. It’s incredibly easy to whip up, taking just 20 minutes from start to finish. The best part? You can customize it to suit everyone’s taste buds! Whether you prefer crunchy nuts or colorful sprinkles, this treat is sure to please. Plus, it’s a fun way to get the family involved in the kitchen, making memories while enjoying a delicious fall dessert.
Ingredients for Caramel Apple Board
Creating a caramel apple board is all about using fresh, quality ingredients that bring out the best flavors. Here’s what you’ll need:
- Apples: Choose medium-sized apples like Granny Smith or Honeycrisp for a perfect balance of sweet and tart.
- Caramel Sauce: A rich, gooey caramel sauce is the star of this dish. You can use store-bought or make your own for a personal touch.
- Chopped Nuts: Peanuts or walnuts add a delightful crunch. Feel free to swap in your favorite nuts or even go nut-free if needed.
- Mini Chocolate Chips: These little morsels bring a sweet, chocolatey flavor that pairs beautifully with caramel.
- Sprinkles: Add a pop of color and fun with sprinkles! They’re perfect for making the board visually appealing.
- Shredded Coconut: For a tropical twist, shredded coconut adds a chewy texture and a hint of sweetness.
- Crushed Graham Crackers: These provide a delightful crunch and a nod to classic s’mores flavors.
- Wooden Skewers or Sticks: Essential for dipping and serving, they make it easy to enjoy each caramel-coated apple.
For exact measurements, check the bottom of the article where you can find everything available for printing. Feel free to get creative with your toppings! The beauty of this caramel apple board is that it can be customized to fit your family’s preferences.
How to Make Caramel Apple Board
Making a caramel apple board is a delightful experience that’s as simple as it is fun! Follow these easy steps to create a beautiful and tasty treat that everyone will love.
Step 1: Prepare the Apples
Start by washing your apples thoroughly under cool running water. This removes any wax or residue. Once they’re clean, dry them completely with a soft towel. Dry apples help the caramel stick better, ensuring a perfect coating.
Step 2: Insert Skewers
Next, take your wooden skewers or sticks and gently insert them into the top of each apple. Aim for the center, pushing down about halfway. This makes it easy to dip and enjoy your caramel-coated apples without any mess!
Step 3: Melt the Caramel
Now, it’s time to melt the caramel sauce. Place it in a microwave-safe bowl and heat it in 30-second intervals, stirring in between. Keep an eye on it to avoid burning. You want it smooth and gooey, perfect for dipping!
Step 4: Dip the Apples
Once your caramel is melted, dip each apple into the warm caramel. Make sure to coat it fully, letting any excess drip off. This step is where the magic happens! The caramel should cling to the apple like a warm hug.
Step 5: Add Toppings
After dipping, it’s time to roll your caramel-coated apples in your chosen toppings. Whether you prefer crunchy nuts, mini chocolate chips, or colorful sprinkles, this is where you can get creative! Roll them gently to ensure an even coating.
Step 6: Arrange and Serve
Finally, arrange your beautifully coated apples on a serving board. Surround them with extra toppings for a stunning presentation. This caramel apple board is ready to impress! Serve immediately and watch everyone enjoy this delightful fall treat.
Tips for Success
- Use fresh, firm apples for the best texture and flavor.
- Warm the caramel sauce just enough to make it easy to dip, but not too hot to burn.
- Get the kids involved! Let them choose their favorite toppings.
- For a fun twist, try adding a drizzle of melted chocolate on top.
- Keep extra toppings nearby for guests to customize their apples.
Equipment Needed
- Microwave-safe bowl: For melting caramel. A small saucepan works too!
- Wooden skewers or sticks: Essential for dipping. You can use popsicle sticks as a fun alternative.
- Soft towel: For drying apples. A clean kitchen cloth will do just fine.
- Serving board: To display your caramel apple board. Any large platter works beautifully!
Variations
- Dark Chocolate Drizzle: Swap out the caramel for melted dark chocolate for a richer flavor.
- Nut-Free Option: Use seeds like sunflower or pumpkin seeds instead of nuts for a safe alternative.
- Vegan Caramel: Try a vegan caramel made from coconut milk and maple syrup for a dairy-free treat.
- Spiced Apples: Sprinkle cinnamon or nutmeg on the apples before dipping for an extra layer of flavor.
- Fruit Additions: Include slices of bananas or strawberries on the board for a colorful twist.
Serving Suggestions
- Hot Apple Cider: Pair your caramel apple board with warm apple cider for a cozy fall vibe.
- Cheese Platter: Add a selection of cheeses for a savory contrast to the sweet apples.
- Festive Decor: Use autumn leaves or mini pumpkins to enhance the presentation of your board.
- Family Style: Encourage everyone to customize their apples at the table for a fun, interactive experience.
FAQs about Caramel Apple Board
Can I make the caramel apple board ahead of time?
While it’s best to serve the caramel apple board fresh, you can prepare the toppings in advance. Just keep them stored in airtight containers. Dip the apples right before serving to ensure the caramel stays gooey and delicious!
What types of apples work best for this recipe?
I recommend using firm apples like Granny Smith or Honeycrisp. Their crisp texture holds up well against the caramel, and their tartness balances the sweetness beautifully.
Can I use store-bought caramel sauce?
Absolutely! Store-bought caramel sauce is a great time-saver. Just warm it up before dipping your apples for the best results.
How do I store leftover caramel apples?
If you have any leftovers, store them in an airtight container in the fridge. They’re best enjoyed within a day or two, as the caramel may harden over time.
Can I customize the toppings on my caramel apple board?
Definitely! The beauty of a caramel apple board is its versatility. Feel free to mix and match toppings based on your family’s preferences. Get creative and have fun!
Final Thoughts
Creating a caramel apple board is more than just making a dessert; it’s about bringing people together. The joy of watching family and friends customize their apples, laughing and sharing stories, is what makes this treat truly special. Each bite is a delightful combination of flavors and textures, evoking the warmth of fall. Plus, it’s a simple way to celebrate the season without the stress of complicated recipes. So, gather your loved ones, embrace the fun, and enjoy the sweet moments that come with this delicious caramel apple board. Happy fall, everyone!