
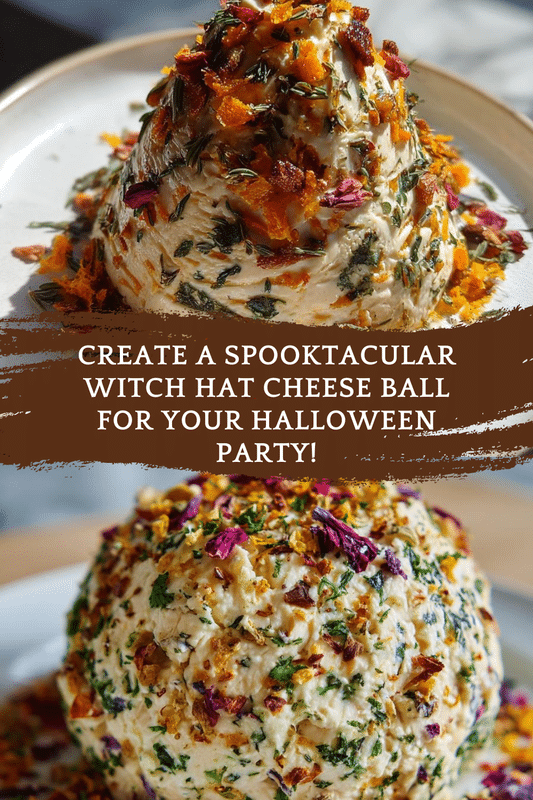
Introduction to WITCH HAT CHEESE BALL
As the leaves turn and the air gets crisp, I find myself dreaming up fun ways to celebrate Halloween. One of my favorite creations is the WITCH HAT CHEESE BALL. It’s not just a treat; it’s a conversation starter! This spooky delight is perfect for busy moms like us who want to impress our loved ones without spending hours in the kitchen. With just a few ingredients and minimal prep time, you can whip up this charming appetizer that will have everyone raving. Trust me, it’s a quick solution for a festive gathering!
PrintWITCH HAT CHEESE BALL: A Spooky Delight for Parties!
A fun and spooky cheese ball shaped like a witch’s hat, perfect for Halloween parties.
- Prep Time: 15 minutes
- Cook Time: 0 minutes
- Total Time: 30 minutes (including chilling time)
- Yield: 8 servings
- Category: Appetizer
- Method: No-cook
- Cuisine: American
- Diet: Vegetarian
Ingredients
- 8 oz cream cheese, softened
- 1 cup shredded cheddar cheese
- 1/2 cup grated Parmesan cheese
- 1/4 cup chopped green onions
- 1/4 cup chopped black olives
- 1 tsp garlic powder
- 1 tsp onion powder
- 1/2 tsp salt
- 1/2 tsp pepper
- 1 cup crushed black tortilla chips
- 1 small green bell pepper, cut into a stem shape
Instructions
- In a mixing bowl, combine cream cheese, cheddar cheese, Parmesan cheese, green onions, black olives, garlic powder, onion powder, salt, and pepper.
- Mix until well combined and smooth.
- Shape the mixture into a cone to resemble a witch’s hat.
- Roll the cheese ball in crushed black tortilla chips to coat the outside.
- Place the cheese ball on a serving platter.
- Insert the green bell pepper piece at the top to create the hat’s stem.
- Chill in the refrigerator for at least 30 minutes before serving.
Notes
- Serve with assorted crackers and vegetables.
- Can be made a day in advance and stored in the refrigerator.
- Feel free to customize the cheese mixture with your favorite herbs and spices.
Why You’ll Love This WITCH HAT CHEESE BALL
This WITCH HAT CHEESE BALL is a game-changer for your Halloween festivities! It’s incredibly easy to make, taking just 15 minutes of your time. Plus, it’s a no-cook recipe, which means less mess and more fun! The combination of creamy cheeses and savory spices creates a flavor explosion that will delight your taste buds. Your guests will be impressed, and you’ll feel like a culinary wizard without the hassle!
Ingredients for WITCH HAT CHEESE BALL
Gathering the right ingredients is the first step to creating your WITCH HAT CHEESE BALL. Here’s what you’ll need:
- Cream cheese: This is the base of our cheese ball, providing a creamy texture that binds everything together.
- Shredded cheddar cheese: Adds a sharp, tangy flavor that complements the creaminess of the cream cheese.
- Grated Parmesan cheese: A sprinkle of this brings a nutty richness to the mix.
- Chopped green onions: These add a fresh, mild onion flavor that brightens up the dish.
- Chopped black olives: For a touch of briny goodness and a pop of color.
- Garlic powder: A must for that savory depth; it’s like a little magic in the mix!
- Onion powder: Enhances the overall flavor profile without overpowering the other ingredients.
- Salt and pepper: Essential for seasoning; they bring all the flavors together.
- Crushed black tortilla chips: These give the cheese ball its spooky, witchy look and a satisfying crunch.
- Green bell pepper: Cut into a stem shape, it completes the witch hat look and adds a fresh crunch.
Feel free to customize your cheese mixture with your favorite herbs and spices! You can find the exact quantities for each ingredient at the bottom of the article, ready for printing.
How to Make WITCH HAT CHEESE BALL
Step 1: Combine the Ingredients
Start by grabbing a mixing bowl. Add the softened cream cheese, shredded cheddar, and grated Parmesan. Toss in the chopped green onions and black olives. Sprinkle in the garlic powder, onion powder, salt, and pepper. This is where the magic begins!
Step 2: Mix Until Smooth
Using a sturdy spatula or a hand mixer, blend everything together. You want a smooth, creamy mixture that’s well combined. Don’t rush this step; the flavors need to mingle like old friends at a reunion!
Step 3: Shape into a Hat
Now comes the fun part! With clean hands, take the cheese mixture and shape it into a cone. This will resemble a witch’s hat. Make sure the base is wider and the top is pointy. It doesn’t have to be perfect; a little rustic charm adds character!
Step 4: Coat with Tortilla Chips
Pour the crushed black tortilla chips onto a plate. Roll your cheese hat in the chips, ensuring it’s fully coated. This gives it that spooky, witchy look while adding a delightful crunch. It’s like dressing up your cheese ball for Halloween!
Step 5: Prepare for Serving
Place your witch hat cheese ball on a serving platter. Take the small green bell pepper and cut it into a stem shape. Gently insert it into the top of the cheese ball. Voilà! Your witch hat is complete and ready to cast a spell on your guests!
Step 6: Chill Before Serving
For the best flavor and texture, chill your cheese ball in the refrigerator for at least 30 minutes. This allows it to firm up and makes it easier to slice. Plus, it gives you time to prepare your party space. Win-win!
Tips for Success
- Make sure your cream cheese is softened for easy mixing.
- Use fresh ingredients for the best flavor; they really make a difference!
- Don’t be afraid to experiment with spices; add your favorites!
- Chill the cheese ball longer if you prefer a firmer texture.
- Serve with a variety of crackers and veggies for a colorful platter.
Equipment Needed
- Mixing bowl: A large bowl works best; you can also use a stand mixer for convenience.
- Spatula: A sturdy spatula is perfect for mixing; a wooden spoon will do in a pinch.
- Plate: Use a flat plate for rolling the cheese ball in tortilla chips.
- Serving platter: Any decorative platter will showcase your witch hat beautifully!
Variations
- Herb-Infused: Add fresh herbs like parsley or dill for a burst of flavor.
- Spicy Kick: Mix in some diced jalapeños or a dash of cayenne pepper for heat.
- Nutty Twist: Incorporate finely chopped nuts like walnuts or pecans for added crunch.
- Vegan Option: Substitute cream cheese with a plant-based alternative and use nutritional yeast for a cheesy flavor.
- Gluten-Free: Serve with gluten-free crackers or veggie sticks to keep it safe for everyone.
Serving Suggestions
- Pair your WITCH HAT CHEESE BALL with an assortment of colorful crackers for a delightful crunch.
- Fresh vegetable sticks like carrots, celery, and bell peppers add a healthy touch.
- Serve with a spooky-themed drink, like a dark grape soda or a witch’s brew punch.
- For a festive presentation, decorate the platter with faux spider webs or mini pumpkins.
FAQs about WITCH HAT CHEESE BALL
Can I make the WITCH HAT CHEESE BALL in advance?
Absolutely! This spooky cheese ball can be made a day ahead. Just store it in the refrigerator, and it will be ready to impress your guests when you need it!
What can I serve with the WITCH HAT CHEESE BALL?
Pair it with an assortment of crackers, fresh veggies, or even pretzel sticks. The crunch complements the creamy cheese ball perfectly!
Can I customize the flavors in the cheese ball?
Yes! Feel free to add your favorite herbs, spices, or even different types of cheese. This recipe is versatile and can be tailored to your taste!
Is the WITCH HAT CHEESE BALL suitable for vegetarians?
Yes, this cheese ball is vegetarian-friendly! It’s a delightful option for those who don’t eat meat.
How long can I keep the WITCH HAT CHEESE BALL in the fridge?
It can last up to a week in the refrigerator if stored properly. Just make sure to keep it covered to maintain freshness!
Final Thoughts
Creating the WITCH HAT CHEESE BALL is more than just making a snack; it’s about bringing joy and laughter to your Halloween gatherings. The smiles on your loved ones’ faces as they dig into this spooky treat are priceless. I love how this recipe combines simplicity with creativity, making it a perfect fit for busy moms like us. Plus, it’s a fantastic way to get the kids involved in the kitchen! So, gather your ingredients, unleash your inner witch, and let this delightful cheese ball cast a spell of happiness at your next party!