
Introduction to Halloween Baking Ideas
As the leaves turn and the air gets crisp, I find myself dreaming up delightful Halloween baking ideas that can bring a smile to my family and friends. With busy schedules, it’s essential to have quick and fun recipes that don’t skimp on flavor or festivity. This collection of spooky treats is perfect for impressing your loved ones without spending hours in the kitchen. Whether you’re hosting a Halloween party or just want to add a festive touch to your weeknight dessert, these baking ideas will surely enchant everyone who takes a bite!
PrintHalloween baking ideas that will delight your guests!
A collection of fun and spooky Halloween baking ideas that will impress your guests and add a festive touch to your celebrations.
- Prep Time: 20 minutes
- Cook Time: 30 minutes
- Total Time: 50 minutes
- Yield: 12 servings
- Category: Dessert
- Method: Baking
- Cuisine: American
- Diet: Vegetarian
Ingredients
- 2 cups all-purpose flour
- 1 cup granulated sugar
- 1/2 cup unsweetened cocoa powder
- 1 tsp baking powder
- 1/2 tsp baking soda
- 1/4 tsp salt
- 1 cup buttermilk
- 1/2 cup vegetable oil
- 2 large eggs
- 1 tsp vanilla extract
- 1 cup chocolate chips
- Decorative icing and sprinkles for decoration
Instructions
- Preheat your oven to 350°F (175°C) and grease a baking pan.
- In a large bowl, mix together the flour, sugar, cocoa powder, baking powder, baking soda, and salt.
- In another bowl, whisk together the buttermilk, vegetable oil, eggs, and vanilla extract.
- Combine the wet and dry ingredients, mixing until just combined. Fold in the chocolate chips.
- Pour the batter into the prepared baking pan and smooth the top.
- Bake for 25-30 minutes or until a toothpick inserted in the center comes out clean.
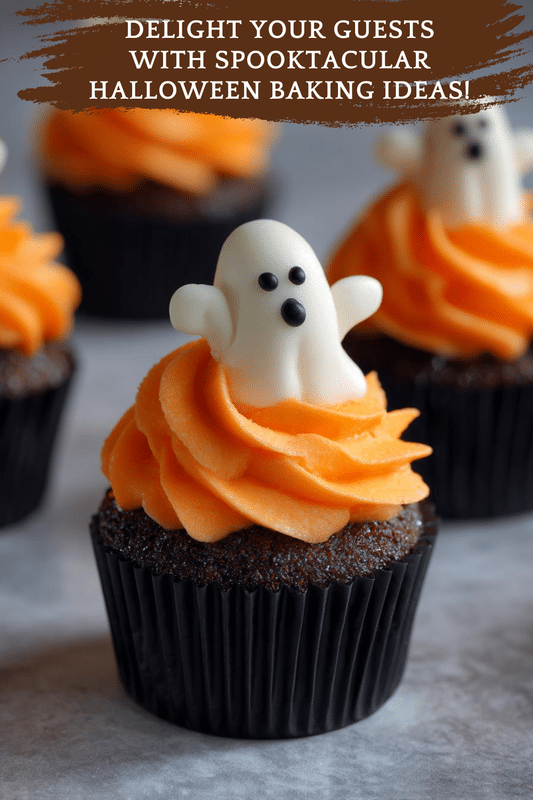
- Let cool before decorating with icing and sprinkles to create Halloween-themed designs.
Notes
- Feel free to customize the decorations based on your Halloween theme.
- For a more intense chocolate flavor, consider adding an extra 1/4 cup of cocoa powder.
- These treats can be made ahead of time and stored in an airtight container.
Why You’ll Love This Halloween Baking Ideas
These Halloween baking ideas are not just easy; they’re a delightful way to bring the spirit of the season into your home. With minimal prep time and simple ingredients, you can whip up these treats in no time. Plus, the rich chocolate flavor and festive decorations will have your guests raving. It’s a perfect solution for busy moms like me who want to create memorable moments without the stress of complicated recipes!
Ingredients for Halloween Baking Ideas
Gathering the right ingredients is the first step to creating these delightful Halloween baking ideas. Here’s what you’ll need:
- All-purpose flour: This is the backbone of your treats, providing structure and texture.
- Granulated sugar: Sweetness is key! It helps balance the rich cocoa flavor.
- Unsweetened cocoa powder: For that deep, chocolatey goodness that makes these treats irresistible.
- Baking powder: This leavening agent gives your baked goods a nice rise, making them fluffy.
- Baking soda: Another leavening agent that works with the acidity of buttermilk for a perfect texture.
- Salt: Just a pinch enhances the flavors and balances the sweetness.
- Buttermilk: This adds moisture and a slight tang, making your treats tender and delicious.
- Vegetable oil: Keeps your baked goods moist and adds richness without the heaviness of butter.
- Large eggs: They bind everything together and help with the rise.
- Vanilla extract: A splash of vanilla adds warmth and depth to the flavor profile.
- Chocolate chips: These little morsels of joy melt into the batter, creating pockets of gooey goodness.
- Decorative icing and sprinkles: The fun part! Use these to create spooky designs that will wow your guests.
Feel free to customize your ingredients based on what you have on hand or your dietary preferences. For instance, you can swap in whole wheat flour for a healthier twist or use dairy-free alternatives for a vegan version. The exact quantities for each ingredient are listed at the bottom of the article, ready for printing!
How to Make Halloween Baking Ideas
Step 1: Preheat and Prepare
First things first, preheat your oven to 350°F (175°C). This step is crucial because it ensures even baking. While the oven warms up, grease your baking pan. I like to use a bit of vegetable oil or cooking spray to prevent sticking. Trust me, there’s nothing worse than a delicious treat that won’t come out of the pan! A well-prepared pan sets the stage for your spooky creations.
Step 2: Mix Dry Ingredients
In a large bowl, combine your dry ingredients: flour, sugar, cocoa powder, baking powder, baking soda, and salt. Whisk them together until they’re well blended. This step is essential for achieving a uniform texture. If you skip this, you might end up with clumps of cocoa or flour in your treats. Mixing them thoroughly ensures that every bite is as delicious as the last!
Step 3: Combine Wet Ingredients
In another bowl, whisk together the buttermilk, vegetable oil, eggs, and vanilla extract. Make sure to mix them well until everything is combined. This step is important because it helps to create a smooth batter. The buttermilk adds moisture, while the eggs provide structure. A well-mixed wet mixture will lead to a fluffy, tender treat that everyone will love!
Step 4: Mix Wet and Dry Ingredients
Now, it’s time to combine the wet and dry ingredients. Pour the wet mixture into the bowl of dry ingredients and gently fold them together. Be careful not to overmix! A few lumps are okay. Overmixing can lead to tough treats, and we want them to be soft and tender. Just mix until you see no dry flour, then fold in those delightful chocolate chips!
Step 5: Bake the Mixture
Pour the batter into your prepared baking pan and smooth the top with a spatula. Bake in the preheated oven for 25-30 minutes. To check for doneness, insert a toothpick into the center. If it comes out clean or with a few moist crumbs, your treats are ready! Keep an eye on them, as every oven is a little different. You want them perfectly baked, not overdone!
Step 6: Cool and Decorate
Once baked, let your treats cool in the pan for about 10 minutes before transferring them to a wire rack. This cooling step is vital for easy decorating. Once they’re completely cool, unleash your creativity! Use decorative icing and sprinkles to create spooky designs. Whether it’s ghostly faces or pumpkin patches, the decorating is where the fun really begins!
Tips for Success
- Measure your ingredients accurately for the best results.
- Don’t skip the cooling step; it helps the icing set better.
- Experiment with different decorations to match your Halloween theme.
- Use a toothpick to check for doneness; it’s a reliable method.
- Store leftovers in an airtight container to keep them fresh.
Equipment Needed
- Baking pan: A 9×13 inch pan works great, but you can use any similar size.
- Mixing bowls: A set of various sizes is handy; you can also use a large pot.
- Whisk: Essential for mixing; a fork can work in a pinch.
- Spatula: For smoothing the batter; a wooden spoon is a good alternative.
- Cooling rack: Helps cool treats evenly; a plate can substitute if needed.
Variations on Halloween Baking Ideas
- Gluten-free: Substitute all-purpose flour with a gluten-free blend to accommodate dietary needs.
- Vegan: Replace eggs with flaxseed meal and use almond milk instead of buttermilk for a plant-based option.
- Spicy twist: Add a teaspoon of cinnamon or a pinch of cayenne pepper for a warm, spicy flavor that complements the chocolate.
- Nutty addition: Fold in chopped nuts like walnuts or pecans for added texture and flavor.
- Fruit infusion: Mix in some mashed bananas or applesauce for a fruity twist and extra moisture.
Serving Suggestions for Halloween Baking Ideas
- Pair your spooky treats with a warm cup of apple cider for a cozy fall vibe.
- Serve with a scoop of vanilla ice cream for a delightful contrast to the rich chocolate.
- Present on a festive platter adorned with Halloween-themed decorations for an eye-catching display.
- Offer a side of whipped cream for an extra touch of indulgence.
- Consider adding a sprinkle of edible glitter for a magical finish!
FAQs about Halloween Baking Ideas
Can I make these Halloween baking ideas ahead of time?
Absolutely! These spooky treats can be made a day or two in advance. Just store them in an airtight container to keep them fresh. This way, you can enjoy more time with your guests and less time in the kitchen!
What can I use instead of buttermilk?
If you don’t have buttermilk on hand, don’t worry! You can easily make a substitute by mixing one cup of milk with a tablespoon of vinegar or lemon juice. Let it sit for about 5 minutes, and you’ll have a perfect buttermilk replacement for your Halloween baking ideas.
How can I make these treats less sweet?
If you prefer a less sweet dessert, consider reducing the sugar by 1/4 cup. You can also use dark chocolate chips, which have a richer flavor and less sweetness. This way, you can still enjoy the festive spirit without overwhelming your taste buds!
Can I freeze these Halloween treats?
What decorations work best for Halloween baking ideas?
Get creative! Use colored icing, candy eyes, or themed sprinkles to bring your spooky designs to life. You can even use fruit or nuts to create fun shapes. The sky’s the limit when it comes to decorating your Halloween treats!
Final Thoughts
As I reflect on these Halloween baking ideas, I can’t help but smile at the joy they bring. The laughter shared while decorating and the delight in every bite create lasting memories. These treats are more than just desserts; they’re a way to connect with loved ones and celebrate the season. Whether you’re a busy mom or a professional, these spooky delights are a quick and fun way to add a festive touch to your celebrations. So, roll up your sleeves, unleash your creativity, and let the magic of Halloween fill your kitchen!