
Introduction to Halloween Brimstone Bread
As the leaves turn and the air gets crisp, I find myself dreaming of cozy kitchens and delightful aromas. This Halloween, why not whip up something truly special? Enter the Halloween Brimstone Bread—a spooky yet scrumptious treat that’s perfect for busy moms like us. It’s not just about the fun shapes; it’s about creating memories with your loved ones. Whether you’re hosting a Halloween party or just want to surprise your family, this bread is a quick solution that will impress everyone. Trust me, your kitchen will feel like a haunted bakery!
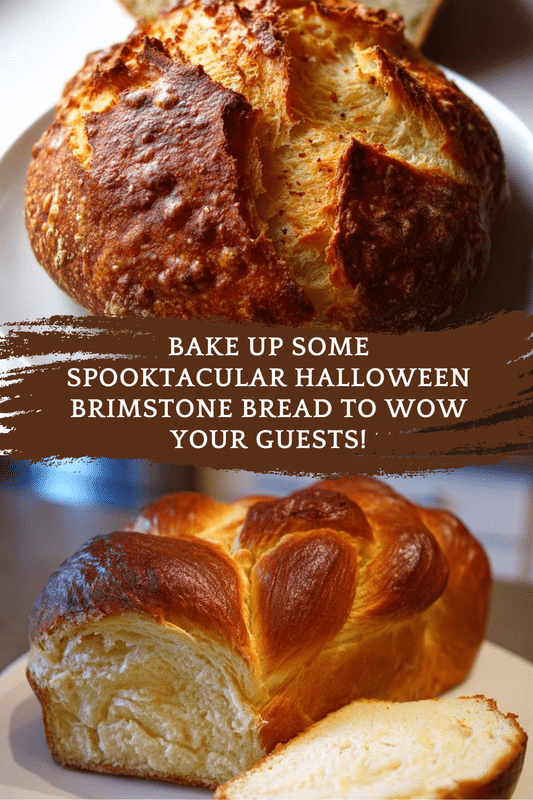
PrintHalloween Brimstone Bread: Bake Your Spookiest Treat!
A spooky and delicious bread perfect for Halloween celebrations, featuring a unique flavor and a fun, eerie appearance.
- Prep Time: 15 minutes
- Cook Time: 30 minutes
- Total Time: 1 hour 45 minutes
- Yield: 1 loaf
- Category: Baked Goods
- Method: Baking
- Cuisine: American
- Diet: Vegetarian
Ingredients
- 3 cups all-purpose flour
- 1 cup warm water
- 2 tablespoons sugar
- 1 tablespoon salt
- 2 teaspoons active dry yeast
- 1 tablespoon olive oil
- 1 teaspoon paprika
- 1 teaspoon garlic powder
- 1/2 teaspoon black pepper
- 1/2 cup shredded cheese (optional)
Instructions
- In a bowl, combine warm water, sugar, and yeast. Let it sit for 5-10 minutes until frothy.
- Add olive oil, salt, paprika, garlic powder, and black pepper to the yeast mixture.
- Gradually add flour, mixing until a dough forms.
- Knead the dough on a floured surface for about 10 minutes until smooth.
- Place the dough in a greased bowl, cover, and let it rise for 1 hour or until doubled in size.
- Punch down the dough and shape it into a loaf or spooky shapes.
- If using, sprinkle shredded cheese on top before baking.
- Preheat the oven to 375°F (190°C) and bake for 25-30 minutes until golden brown.
- Let cool before slicing and serving.
Notes
- For a more intense flavor, add herbs like rosemary or thyme.
- Can be served with a spooky dip or spread.
- Store leftovers in an airtight container for up to 3 days.
Why You’ll Love This Halloween Brimstone Bread
This Halloween Brimstone Bread is not just a treat; it’s a time-saver! With simple ingredients and quick prep, you can have a delicious loaf ready in no time. The unique flavors of garlic and paprika will tantalize your taste buds, while the fun shapes will delight your family. Plus, it’s a fantastic way to get the kids involved in the kitchen. Who knew baking could be this much fun?
Ingredients for Halloween Brimstone Bread
Gathering the right ingredients is half the fun of baking! For this Halloween Brimstone Bread, you’ll need a mix of pantry staples and a few flavorful additions.
- All-purpose flour: The backbone of your bread, providing structure and texture.
- Warm water: Activates the yeast, helping your dough rise beautifully.
- Sugar: A little sweetness to feed the yeast and enhance flavor.
- Salt: Balances the flavors and strengthens the dough.
- Active dry yeast: The magic ingredient that makes your bread rise and gives it that lovely airy texture.
- Olive oil: Adds moisture and a hint of richness to the bread.
- Paprika: Gives the bread a warm, smoky flavor and a vibrant color.
- Garlic powder: A savory touch that elevates the overall taste.
- Black pepper: A dash of spice to awaken your taste buds.
- Shredded cheese (optional): For those who love a cheesy twist, sprinkle some on top before baking!
Feel free to get creative! You can swap out the olive oil for melted butter or add herbs like rosemary for an extra flavor kick. If you’re looking for a gluten-free option, try using a gluten-free flour blend. For exact measurements, check the bottom of the article where you can find everything you need for printing.
How to Make Halloween Brimstone Bread
Now that we have our ingredients ready, let’s dive into the fun part—making the Halloween Brimstone Bread! Follow these simple steps, and you’ll have a delightful loaf that’s sure to impress.
Step 1: Prepare the Yeast Mixture
Start by combining warm water, sugar, and active dry yeast in a bowl. Give it a gentle stir and let it sit for about 5 to 10 minutes. You’ll know it’s ready when it becomes frothy and bubbly. This is the magic moment when the yeast wakes up and starts working its wonders!
Step 2: Mix in the Flavorings
Once your yeast mixture is frothy, it’s time to add the flavor! Pour in the olive oil, salt, paprika, garlic powder, and black pepper. Stir everything together until well combined. The aroma will start to fill your kitchen, and trust me, it’s a delightful preview of what’s to come!
Step 3: Form the Dough
Now, gradually add the all-purpose flour to the mixture. I like to do this in batches, mixing as I go. Keep stirring until a dough begins to form. It should be slightly sticky but manageable. If it’s too wet, don’t hesitate to add a little more flour!
Step 4: Knead the Dough
Time to get your hands a little messy! Transfer the dough to a floured surface and knead it for about 10 minutes. You want it to be smooth and elastic. Think of it as a mini workout! If the dough sticks to your hands, sprinkle a bit more flour as needed.
Step 5: Let the Dough Rise
Place your kneaded dough in a greased bowl, turning it to coat all sides. Cover it with a clean kitchen towel and let it rise in a warm spot for about an hour. It should double in size. This is the perfect time to clean up and maybe sip on a warm drink!
Step 6: Shape the Dough
Once the dough has risen, punch it down gently to release the air. Now, shape it into a loaf or get creative with spooky shapes! If you’re feeling adventurous, try forming it into a ghost or pumpkin. The kids will love this part!
Step 7: Prepare for Baking
If you’re using shredded cheese, sprinkle it on top of your shaped dough now. It adds a delicious cheesy crust! Preheat your oven to 375°F (190°C) while you prepare the bread for baking.
Step 8: Bake the Bread
Place your shaped dough on a baking sheet lined with parchment paper. Bake for 25 to 30 minutes, or until it’s golden brown. To check for doneness, tap the bottom of the loaf; it should sound hollow. Once baked, let it cool before slicing. Enjoy the spooky goodness of your Halloween Brimstone Bread!
Tips for Success
- Always use warm water, not hot, to activate the yeast properly.
- Don’t rush the rising time; it’s crucial for fluffy bread.
- Feel free to experiment with spices and herbs for unique flavors.
- Keep your work surface floured to prevent sticking while kneading.
- For a golden crust, brush the top with olive oil before baking.
Equipment Needed
- Mixing bowl: A large bowl for combining ingredients; any size will do!
- Measuring cups and spoons: Essential for accuracy; use a kitchen scale if you prefer.
- Floured surface: A clean countertop or cutting board works perfectly.
- Baking sheet: A standard sheet pan or a pizza stone can be used.
- Kitchen towel: For covering the dough while it rises; a clean cloth works just as well.
Variations of Halloween Brimstone Bread
- Herb-Infused: Add fresh or dried herbs like rosemary, thyme, or oregano for a fragrant twist.
- Cheesy Delight: Mix shredded cheese into the dough for a gooey, cheesy interior.
- Spicy Kick: Incorporate red pepper flakes or cayenne pepper for a spicy version that’ll wake up your taste buds.
- Sweet Twist: Replace some of the flour with pumpkin puree and add cinnamon for a sweet, autumn-inspired bread.
- Gluten-Free: Use a gluten-free flour blend to make this recipe suitable for those with gluten sensitivities.
Serving Suggestions for Halloween Brimstone Bread
- Pair with a spooky dip, like a garlic or spinach dip, for a delicious combo.
- Serve alongside a warm bowl of pumpkin soup for a cozy meal.
- For drinks, consider a festive apple cider or a spooky-themed cocktail.
- Present the bread on a Halloween-themed platter for added flair.
FAQs about Halloween Brimstone Bread
Can I make Halloween Brimstone Bread ahead of time?
Absolutely! You can prepare the dough a day in advance. Just let it rise, then punch it down and refrigerate. When you’re ready to bake, let it come to room temperature before shaping and baking.
What can I serve with Halloween Brimstone Bread?
This spooky bread pairs wonderfully with dips like garlic butter or a creamy spinach dip. You can also enjoy it with soups or salads for a complete meal.
Can I freeze the bread?
Yes! Once cooled, wrap the bread tightly in plastic wrap and then in aluminum foil. It can be frozen for up to three months. Just thaw it at room temperature when you’re ready to enjoy it again.
What if I don’t have active dry yeast?
You can substitute with instant yeast! Just mix it directly with the dry ingredients without needing to activate it first. The results will be just as delightful!
How can I make this recipe vegan?
To make Halloween Brimstone Bread vegan, simply replace the olive oil with a plant-based oil and skip the cheese or use a vegan cheese alternative. It’s that easy!
Final Thoughts
Baking Halloween Brimstone Bread is more than just a recipe; it’s an experience filled with laughter and creativity. As the dough rises, so does the excitement in your kitchen. The delightful aroma wafting through the air will have everyone eagerly awaiting a slice. This spooky treat not only brings a festive touch to your table but also creates lasting memories with your loved ones. So, roll up your sleeves, embrace the mess, and enjoy the magic of baking together. Trust me, this Halloween, your kitchen will be the heart of the celebration!