
Introduction to Halloween Cake Balls
As the leaves turn and the air gets crisp, I can’t help but get excited about Halloween! One of my favorite treats to whip up are Halloween Cake Balls. They’re not just delicious; they’re a quick solution for busy days filled with school events and family gatherings. These little bites of joy are perfect for impressing your loved ones without spending hours in the kitchen. Plus, they’re a fun way to get the kids involved in the kitchen. Trust me, once you try these festive delights, they’ll become a staple in your Halloween celebrations!
PrintHalloween Cake Balls: Discover Easy Recipes Today!
Delicious and festive Halloween-themed cake balls that are easy to make and perfect for any Halloween celebration.
- Prep Time: 20 minutes
- Cook Time: 30 minutes
- Total Time: 1 hour
- Yield: 24 cake balls
- Category: Dessert
- Method: Baking and Chilling
- Cuisine: American
- Diet: Vegetarian
Ingredients
- 1 box of chocolate cake mix
- 1 cup of frosting (any flavor)
- 1 cup of white chocolate chips
- 1 tablespoon of vegetable oil
- Halloween-themed sprinkles
Instructions
- Prepare the chocolate cake mix according to package instructions and bake in a 9×13 inch pan.
- Once baked, let the cake cool completely.
- Crumble the cooled cake into a large bowl.
- Add the frosting to the crumbled cake and mix until well combined.
- Form the mixture into small balls and place them on a baking sheet.
- Chill the cake balls in the refrigerator for at least 30 minutes.
- In a microwave-safe bowl, melt the white chocolate chips with the vegetable oil until smooth.
- Dip each cake ball into the melted chocolate and place back on the baking sheet.
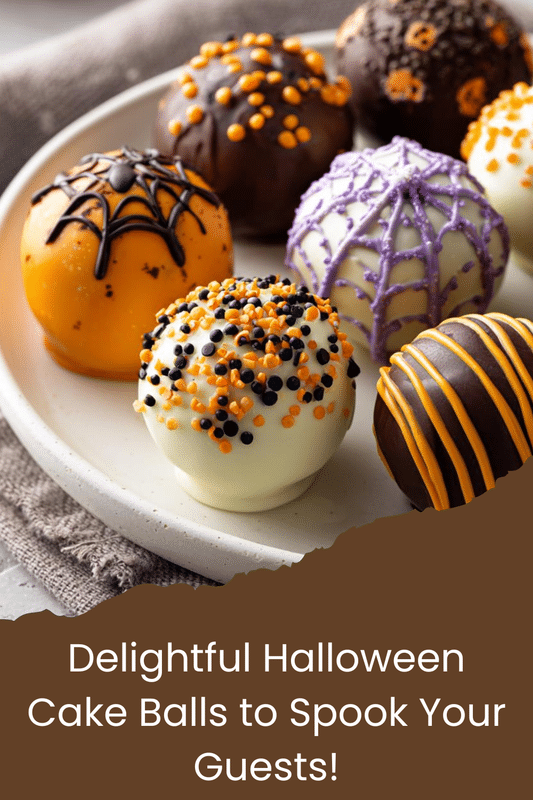
- Sprinkle with Halloween-themed sprinkles before the chocolate sets.
- Let the cake balls cool completely before serving.
Notes
- For a fun twist, use different flavored cake mixes and frostings.
- Store in an airtight container in the refrigerator for up to a week.
- These can be made ahead of time and frozen for later use.
Why You’ll Love This Halloween Cake Balls
These Halloween Cake Balls are a lifesaver for busy moms like me! They’re incredibly easy to make, taking just about an hour from start to finish. The taste? Absolutely divine! With a rich chocolate flavor and creamy frosting, they’re sure to please even the pickiest eaters. Plus, the festive sprinkles add a fun touch that makes them perfect for any Halloween gathering. You’ll love how quickly they disappear!
Ingredients for Halloween Cake Balls
Gathering the right ingredients is the first step to creating these delightful Halloween Cake Balls. Here’s what you’ll need:
- Chocolate cake mix: This is the base of our cake balls, providing that rich, chocolatey goodness. You can use any brand you love!
- Frosting: Any flavor will do, but I recommend chocolate or vanilla for a classic taste. It binds the cake together and adds creaminess.
- White chocolate chips: These are melted to coat the cake balls, giving them a sweet, smooth finish. You can also use dark chocolate if you prefer a richer flavor.
- Vegetable oil: This helps the chocolate melt smoothly, ensuring a perfect coating. You can substitute with coconut oil for a hint of tropical flavor.
- Halloween-themed sprinkles: These add a festive touch! Feel free to get creative with colors and shapes to match your Halloween theme.
For exact quantities, check the bottom of the article where you can find everything listed for easy printing. Happy baking!
How to Make Halloween Cake Balls
Now that we have our ingredients ready, let’s dive into the fun part—making these delightful Halloween Cake Balls! Follow these simple steps, and you’ll have a spooky treat that’s sure to impress.
Step 1: Prepare the Cake
Start by preparing the chocolate cake mix according to the package instructions. Pour the batter into a 9×13 inch pan and bake it until a toothpick comes out clean. The aroma of chocolate filling your kitchen will be irresistible!
Step 2: Cool the Cake
Once the cake is baked, let it cool completely. This step is crucial! If you skip it, the cake will crumble too much, making it hard to form those perfect little balls.
Step 3: Crumble the Cake
When the cake is cool, crumble it into a large bowl. Use your hands or a fork to break it into fine pieces. The texture should be like sand—this will help the cake balls hold together nicely.
Step 4: Mix with Frosting
Next, add your chosen frosting to the crumbled cake. Mix it well until everything is combined. The frosting acts like glue, binding the cake together and adding a creamy sweetness that’s simply divine!
Step 5: Form the Cake Balls
Now comes the fun part! Take small portions of the mixture and roll them into balls, about the size of a tablespoon. Place them on a baking sheet lined with parchment paper. Don’t worry if they’re not perfect; they’ll still taste amazing!
Step 6: Chill the Cake Balls
Pop the baking sheet into the refrigerator for at least 30 minutes. Chilling helps the cake balls firm up, making them easier to dip in chocolate later. Plus, it builds anticipation for that first bite!
Step 7: Melt the Chocolate
While the cake balls chill, melt the white chocolate chips with the vegetable oil in a microwave-safe bowl. Heat in short bursts, stirring in between, until smooth. This silky chocolate will create a beautiful coating for your cake balls.
Step 8: Dip the Cake Balls
Once the chocolate is melted, dip each chilled cake ball into the chocolate, ensuring it’s fully coated. Use a fork to lift it out, letting the excess chocolate drip off before placing it back on the baking sheet.
Step 9: Add Sprinkles
Before the chocolate sets, sprinkle your Halloween-themed sprinkles on top. This is where you can get creative! The sprinkles not only add color but also a festive flair that’s perfect for Halloween.
Step 10: Cool Completely
Finally, let the cake balls cool completely before serving. This allows the chocolate to harden, creating a delightful shell around the moist cake inside. Once they’re ready, enjoy your spooky treats!
Tips for Success
- Make sure your cake is completely cool before crumbling; this prevents a gooey mess.
- Use a cookie scoop for uniform cake balls; it makes the process quicker and easier.
- Experiment with different frosting flavors for a unique twist on taste.
- Chill the cake balls longer if they feel too soft; this helps with dipping.
- Have fun with sprinkles! Mix and match for a colorful Halloween display.
Equipment Needed
- 9×13 inch baking pan: Any baking dish will work, but this size is perfect for our cake.
- Mixing bowl: A large bowl is essential for combining the cake and frosting.
- Baking sheet: Use any flat surface to chill your cake balls.
- Parchment paper: This makes cleanup a breeze and prevents sticking.
- Microwave-safe bowl: For melting chocolate; a regular bowl works too if you prefer stovetop.
Variations of Halloween Cake Balls
- Red Velvet Cake Balls: Swap the chocolate cake mix for red velvet for a festive twist. Pair with cream cheese frosting for a deliciously rich flavor.
- Gluten-Free Option: Use a gluten-free cake mix to make these treats suitable for those with dietary restrictions. They’ll be just as delightful!
- Vegan Cake Balls: Substitute the frosting with a vegan option and use a plant-based cake mix. You can also replace the eggs with applesauce for a moist texture.
- Peanut Butter Chocolate: Mix in some peanut butter with the frosting for a nutty flavor that pairs perfectly with chocolate.
- Mint Chocolate Cake Balls: Add a few drops of peppermint extract to the frosting for a refreshing minty flavor that’s perfect for Halloween!
Serving Suggestions for Halloween Cake Balls
- Pair with a spooky punch or apple cider for a festive drink option.
- Serve on a decorative platter with Halloween-themed decorations for a fun presentation.
- Include a variety of cake ball flavors to create a colorful dessert table.
- Offer alongside fresh fruit for a balanced treat.
- Wrap in clear bags tied with orange ribbons for party favors!
FAQs about Halloween Cake Balls
Can I make Halloween Cake Balls ahead of time?
Absolutely! These delightful treats can be made a few days in advance. Just store them in an airtight container in the refrigerator. They’ll stay fresh and delicious, ready for your Halloween festivities!
What can I use instead of white chocolate?
If white chocolate isn’t your thing, feel free to use dark or milk chocolate instead. Each option brings its own unique flavor, making your Halloween Cake Balls even more exciting!
How do I store leftover cake balls?
Store any leftover Halloween Cake Balls in an airtight container in the fridge. They’ll last up to a week, but I doubt they’ll stick around that long!
Can I freeze Halloween Cake Balls?
Yes! These treats freeze beautifully. Just make sure they’re fully cooled and stored in a freezer-safe container. When you’re ready to enjoy them, let them thaw in the fridge overnight.
What’s the best way to decorate my cake balls?
Get creative! Use a variety of Halloween-themed sprinkles, edible glitter, or even drizzle some colored chocolate on top. The more festive, the better!
Final Thoughts
Making Halloween Cake Balls is more than just a recipe; it’s a delightful experience that brings joy to both the kitchen and your celebrations. The laughter shared while rolling the cake balls with your kids is priceless. Plus, the smiles on your loved ones’ faces when they take that first bite? Absolutely heartwarming! These treats are not only easy to whip up but also a canvas for creativity. So, gather your ingredients, embrace the festive spirit, and let these Halloween Cake Balls become a cherished tradition in your home. Happy baking, and enjoy every delicious moment!