

Introduction to Witches Brew Halloween Cake Jars
As the leaves turn and the air gets crisp, I find myself dreaming up spooky treats that bring a smile to my family’s faces. That’s where these Witches Brew Halloween Cake Jars come in! They’re not just a dessert; they’re a fun, interactive experience that even the busiest of moms can whip up. With layers of moist cake and creamy frosting, these jars are perfect for Halloween gatherings or a cozy night in. Plus, they’re a delightful way to impress your loved ones without spending hours in the kitchen. Let’s dive into this enchanting recipe!
PrintWitches Brew Halloween Cake Jars: A Spooktacular Treat!
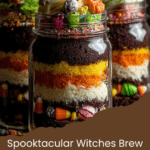
Witches Brew Halloween Cake Jars are a fun and spooky dessert perfect for Halloween celebrations. These layered cake jars combine moist cake, creamy frosting, and festive decorations to create a delightful treat that is sure to impress guests.
- Prep Time: 20 minutes
- Cook Time: 30 minutes
- Total Time: 50 minutes
- Yield: 12 jars
- Category: Dessert
- Method: Baking
- Cuisine: American
- Diet: Vegetarian
Ingredients
- 1 box chocolate cake mix
- 3 large eggs
- 1 cup water
- 1/2 cup vegetable oil
- 1 cup green frosting
- 1 cup purple frosting
- Halloween-themed sprinkles
- Chocolate spiders or other spooky decorations
Instructions
- Preheat the oven according to the cake mix instructions.
- In a large bowl, combine the chocolate cake mix, eggs, water, and vegetable oil. Mix until well combined.
- Pour the batter into a greased cake pan and bake according to package instructions.
- Once baked, let the cake cool completely before crumbling it into small pieces.
- In a jar, layer the crumbled cake, green frosting, and purple frosting. Repeat the layers until the jar is full.
- Top with Halloween-themed sprinkles and chocolate decorations.
- Serve immediately or refrigerate until ready to serve.
Notes
- Feel free to use any cake flavor you prefer.
- These jars can be made a day in advance for convenience.
- Customize the decorations based on your Halloween theme.
Why You’ll Love This Witches Brew Halloween Cake Jars
These Witches Brew Halloween Cake Jars are a lifesaver for busy days! They come together quickly, making them perfect for last-minute gatherings or school parties. The combination of rich chocolate cake and vibrant frosting is not only delicious but visually stunning. Plus, they’re customizable! You can let your creativity shine with decorations, ensuring every jar is a unique masterpiece. Who knew Halloween treats could be this easy and fun?
Ingredients for Witches Brew Halloween Cake Jars
Gathering the right ingredients is half the fun! Here’s what you’ll need to create these delightful Witches Brew Halloween Cake Jars:
- Chocolate cake mix: The base of our spooky treat, it brings rich flavor and moisture.
- Large eggs: These help bind the ingredients together, giving the cake a fluffy texture.
- Water: Essential for mixing the batter, it helps achieve the perfect consistency.
- Vegetable oil: This adds moisture and keeps the cake tender and delicious.
- Green frosting: A fun, vibrant layer that adds a pop of color and sweetness.
- Purple frosting: Another colorful layer that complements the green and adds visual appeal.
- Halloween-themed sprinkles: These add a festive touch, making your jars look extra special.
- Chocolate spiders or spooky decorations: Perfect for that eerie vibe, they’ll make your jars truly enchanting!
Feel free to get creative! You can swap the chocolate cake mix for any flavor you prefer, like vanilla or pumpkin spice. The frosting colors can also be customized to match your Halloween theme. For exact measurements, check the bottom of the article where you can find everything available for printing!
How to Make Witches Brew Halloween Cake Jars
Creating these Witches Brew Halloween Cake Jars is a delightful adventure! Follow these simple steps to whip up a spooky treat that will impress everyone. Let’s get started!
Step 1: Preheat the Oven
First things first, preheat your oven according to the cake mix instructions. Preheating is crucial because it ensures even baking. If the oven isn’t hot enough, your cake might turn out dense or uneven. Trust me, a well-preheated oven is the secret to a fluffy cake!
Step 2: Prepare the Cake Batter
In a large bowl, combine the chocolate cake mix, eggs, water, and vegetable oil. Mix until everything is well blended. I like to use a hand mixer for a smooth texture, but a whisk works just fine too! Make sure there are no lumps; this will help your cake rise beautifully.
Step 3: Bake the Cake
Pour the batter into a greased cake pan and bake according to the package instructions, usually around 30 minutes. To check if it’s done, insert a toothpick in the center. If it comes out clean, your cake is ready! If not, give it a few more minutes.
Step 4: Cool and Crumble the Cake
Once baked, let the cake cool completely in the pan. This step is essential! If you crumble it while it’s still warm, you’ll end up with a gooey mess. Once cool, gently crumble the cake into small pieces. This will create the perfect texture for layering in your jars.
Step 5: Layer the Cake Jars
Now comes the fun part! In your jars, start layering the crumbled cake, green frosting, and purple frosting. I like to alternate layers for a beautiful visual effect. Make sure to leave some space at the top for decorations. The more colorful the layers, the more enticing your jars will look!
Step 6: Decorate the Jars
Get creative with your decorations! Top each jar with Halloween-themed sprinkles and chocolate spiders. You can even add a little drizzle of frosting on top for extra flair. The goal is to make them as spooky and fun as possible. Let your imagination run wild!
Step 7: Serve or Store
These jars can be served immediately or stored in the fridge until you’re ready to enjoy them. If you’re making them in advance, just cover them tightly to keep them fresh. When it’s time to serve, you can even add a little extra sprinkle magic on top!
Tips for Success
- Always read the cake mix instructions for best results.
- Use room temperature eggs for a smoother batter.
- Don’t rush the cooling process; it’s key for crumbling.
- Experiment with different frosting colors to match your theme.
- For a fun twist, add candy corn or gummy worms between layers!
Equipment Needed
- Mixing bowl: A large bowl for combining ingredients; a stand mixer works too!
- Measuring cups: Essential for accurate ingredient amounts; you can use a kitchen scale as an alternative.
- Spatula: Great for mixing and layering; a wooden spoon can work in a pinch.
- Jars: Any clear jars will do; mason jars add a rustic touch!
- Oven: A conventional oven is best; toaster ovens can work for smaller batches.
Variations of Witches Brew Halloween Cake Jars
- Flavor Swaps: Try using vanilla or red velvet cake mix for a different taste experience.
- Gluten-Free Option: Substitute the chocolate cake mix with a gluten-free blend for a safe treat.
- Healthier Frosting: Use Greek yogurt mixed with food coloring for a lighter frosting alternative.
- Vegan Version: Replace eggs with flaxseed meal and use plant-based frosting for a vegan-friendly treat.
- Fruit Layers: Add layers of mashed bananas or applesauce for a fruity twist in between the cake layers.
Serving Suggestions for Witches Brew Halloween Cake Jars
- Pair with spooky-themed cocktails or mocktails for a festive touch.
- Serve alongside a platter of Halloween cookies for a delightful dessert spread.
- Use decorative plates or spooky napkins to enhance the presentation.
- Consider adding a small scoop of vanilla ice cream on the side.
- For a fun twist, serve them at a Halloween party with themed music!
FAQs about Witches Brew Halloween Cake Jars
Can I make Witches Brew Halloween Cake Jars in advance?
Absolutely! These jars can be made a day ahead. Just store them in the fridge, covered tightly. This actually allows the flavors to meld together beautifully!
What if I don’t have cake jars?
No worries! You can use any clear glass or plastic container. Even small cups work well. Just ensure they’re see-through to show off those colorful layers!
Can I customize the frosting colors?
Definitely! Feel free to use any colors that fit your Halloween theme. Orange and black are classic, but you can get creative with your choices!
How long do these cake jars last?
Stored properly in the fridge, they can last up to 3 days. Just make sure to keep them covered to maintain freshness!
Can I use a different cake flavor?
Of course! While chocolate is a favorite, vanilla, red velvet, or even pumpkin spice can add a delightful twist to your Witches Brew Halloween Cake Jars!
Final Thoughts
Creating Witches Brew Halloween Cake Jars is more than just baking; it’s about making memories with your loved ones. The joy of layering colorful cake and frosting brings out the kid in all of us. Each jar is a little surprise, a delightful treat that sparks laughter and conversation. Whether you’re hosting a Halloween party or enjoying a cozy night at home, these jars are sure to impress. So, roll up your sleeves, unleash your creativity, and let the magic of Halloween fill your kitchen. Trust me, the smiles you’ll see will be worth every moment spent!