
Introduction to Mini Mummy Pizzas
As a busy mom, I know how challenging it can be to whip up something fun and delicious for the family, especially around Halloween. That’s where these Mini Mummy Pizzas come in! They’re not just a treat for the taste buds; they’re a delightful way to get everyone involved in the kitchen. Picture this: a quick solution for a hectic evening, where the kids can help create their own spooky masterpieces. With just a few ingredients and a sprinkle of creativity, you’ll have a dish that’s sure to impress your loved ones and make mealtime a little more magical!
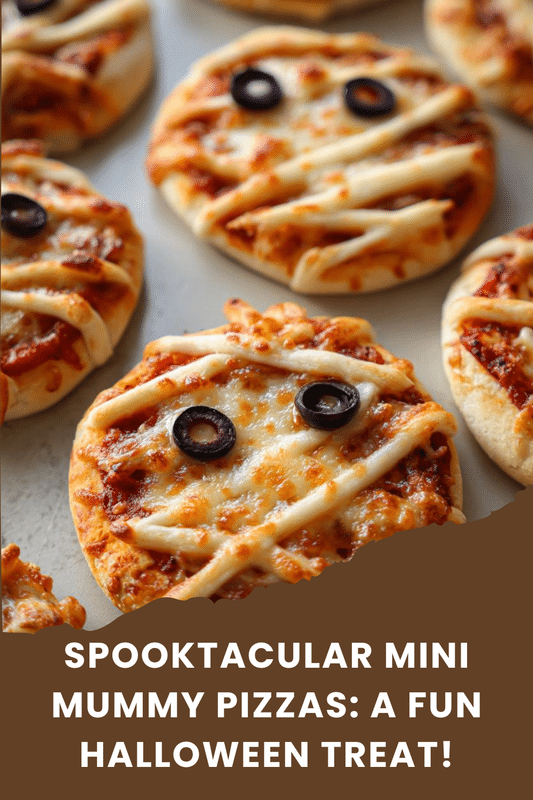
PrintMini Mummy Pizzas That Will Haunt Your Taste Buds!

Mini Mummy Pizzas are a fun and spooky twist on traditional pizza, perfect for Halloween parties or a fun family dinner.
- Prep Time: 15 minutes
- Cook Time: 12 minutes
- Total Time: 27 minutes
- Yield: 12 mini pizzas
- Category: Appetizer
- Method: Baking
- Cuisine: Italian
- Diet: Vegetarian
Ingredients
- 1 package of mini pizza crusts
- 1 cup pizza sauce
- 1 cup shredded mozzarella cheese
- 1/2 cup sliced black olives
- 1/2 cup pepperoni slices
- 1 package of string cheese
Instructions
- Preheat the oven to 400°F (200°C).
- Place the mini pizza crusts on a baking sheet.
- Spread a layer of pizza sauce on each crust.
- Sprinkle shredded mozzarella cheese over the sauce.
- Use the string cheese to create ‘bandages’ by cutting it into strips and placing it on top of the cheese.
- Add black olives as eyes and pepperoni slices for decoration.
- Bake in the preheated oven for 10-12 minutes or until the cheese is bubbly and golden.
- Remove from the oven and let cool slightly before serving.
Notes
- Feel free to customize toppings based on your preferences.
- These can be made ahead of time and baked just before serving.
- For a vegetarian option, omit the pepperoni.
Why You’ll Love This Mini Mummy Pizzas
These Mini Mummy Pizzas are a lifesaver for busy nights! They come together in just 27 minutes, making them perfect for a quick family dinner or a fun Halloween party. The best part? Everyone can customize their own pizza, so even picky eaters will find something they love. Plus, they’re a delightful way to spark creativity in the kitchen while enjoying a delicious meal together!
Ingredients for Mini Mummy Pizzas
Gathering the right ingredients is half the fun! Here’s what you’ll need to create these spooky delights:
- Mini pizza crusts: These are the perfect base for your mummies. You can find them in the store or make your own if you’re feeling adventurous!
- Pizza sauce: A classic tomato sauce adds that rich flavor. Feel free to use store-bought or whip up a quick homemade version.
- Shredded mozzarella cheese: This melty goodness is essential for that gooey texture. It’s the star of the show, so don’t skimp!
- Sliced black olives: These little circles make for spooky eyes. They add a salty kick and are a great way to get some healthy fats.
- Pepperoni slices: For those who love a bit of spice, pepperoni adds a delicious flavor. You can swap it out for turkey pepperoni or omit it for a vegetarian option.
- String cheese: This is what gives our mummies their bandage look! It’s fun to work with and adds a nice stretch to the pizza.
Feel free to customize your toppings based on your family’s preferences. Want to add some veggies? Go for it! The ingredient list with exact quantities is available at the bottom of the article for easy printing.
How to Make Mini Mummy Pizzas
Now that you have your ingredients ready, let’s dive into the fun part—making these Mini Mummy Pizzas! Follow these simple steps, and you’ll have a spooky treat in no time.
Step 1: Preheat the Oven
First things first, preheat your oven to 400°F (200°C). Preheating is crucial because it ensures that your pizzas bake evenly. A hot oven helps the cheese melt beautifully and gives that golden finish we all love!
Step 2: Prepare the Pizza Crusts
Next, grab a baking sheet and arrange your mini pizza crusts on it. Make sure they’re spaced out a bit so they can bake evenly. This is where the magic begins, and your kitchen will start to smell amazing!
Step 3: Add Pizza Sauce
Now, it’s time to spread the pizza sauce. Use a spoon to dollop a generous amount on each crust. Then, gently spread it out, leaving a little space at the edges. This will help keep the crust crispy and delicious!
Step 4: Sprinkle Cheese
Here comes the best part—cheese! Sprinkle a good layer of shredded mozzarella over the sauce. This melty goodness is what makes these Mini Mummy Pizzas so irresistible. Don’t be shy; the more, the merrier!
Step 5: Create the Mummy Effect
To give your pizzas that spooky mummy look, take the string cheese and cut it into strips. Place these strips over the cheese in a crisscross pattern, resembling bandages. It’s a fun way to get creative, and the kids will love helping with this step!
Step 6: Add Eyes and Decorations
Now, let’s add some personality! Use the sliced black olives as eyes by placing them on top of the cheese. For an extra touch, add a few pepperoni slices around for decoration. Your mummies are starting to come to life!
Step 7: Bake the Pizzas
Pop your baking sheet into the preheated oven and bake for 10-12 minutes. Keep an eye on them! You’ll know they’re done when the cheese is bubbly and golden. The aroma will be hard to resist!
Step 8: Cool and Serve
Once they’re out of the oven, let the Mini Mummy Pizzas cool for a few minutes. This step is important to avoid burning little fingers. Then, serve them up and watch your family enjoy these spooky delights!
Tips for Success
- Prep your ingredients ahead of time to save on cooking stress.
- Experiment with different toppings to keep things exciting for your family.
- Use a pizza stone for an extra crispy crust if you have one!
- Let the kids get creative with their mummy designs; it’s all about fun!
- Store any leftovers in an airtight container for a quick snack later.
Equipment Needed
- Baking sheet: A standard sheet works great, but a pizza stone can enhance crispiness.
- Spoon: For spreading sauce; a spatula can also do the trick.
- Knife: To cut string cheese; kitchen scissors are a fun alternative!
- Oven mitts: Essential for safely handling hot trays.
Variations on Mini Mummy Pizzas
- Veggie Mummy Pizzas: Load up on colorful veggies like bell peppers, mushrooms, and spinach for a healthier twist.
- BBQ Chicken Mummy Pizzas: Swap the pizza sauce for BBQ sauce and add shredded chicken for a smoky flavor.
- Cheesy Garlic Mummy Pizzas: Mix garlic powder into the cheese for an extra kick, and use a blend of cheeses for depth.
- Gluten-Free Mummy Pizzas: Use gluten-free mini pizza crusts to accommodate dietary needs without sacrificing fun.
- Breakfast Mummy Pizzas: Top with scrambled eggs, cheese, and bacon for a delightful morning treat!
Serving Suggestions for Mini Mummy Pizzas
- Side Salad: Pair with a fresh green salad for a balanced meal.
- Veggie Sticks: Serve with carrot and celery sticks for a crunchy contrast.
- Spooky Drinks: Create fun Halloween-themed drinks like “witches’ brew” with green punch.
- Presentation: Arrange the pizzas on a festive platter for a spooky touch!
FAQs about Mini Mummy Pizzas
As you embark on your culinary adventure with these Mini Mummy Pizzas, you might have a few questions. Here are some common queries that can help you along the way!
Can I make Mini Mummy Pizzas ahead of time?
Absolutely! You can prepare the pizzas in advance and store them in the fridge. Just bake them right before serving for that fresh-out-of-the-oven taste!
What if my kids don’t like certain toppings?
No worries! The beauty of these Mini Mummy Pizzas is their versatility. Let your kids choose their favorite toppings, making it a fun and personalized meal.
Can I freeze Mini Mummy Pizzas?
Yes, you can freeze them! Just assemble the pizzas, wrap them tightly, and store them in the freezer. When you’re ready to enjoy, bake them straight from frozen, adding a few extra minutes to the cooking time.
What are some good side dishes to serve with Mini Mummy Pizzas?
Pair these spooky delights with a fresh salad, veggie sticks, or even some spooky-themed snacks to keep the Halloween spirit alive!
Are Mini Mummy Pizzas suitable for vegetarians?
Definitely! Simply omit the pepperoni, and you’ll have a delicious vegetarian option that everyone can enjoy!
Final Thoughts
Making Mini Mummy Pizzas is more than just cooking; it’s about creating memories with your family. The laughter, the creativity, and the joy of seeing everyone’s unique creations come to life are what make this recipe special. Whether it’s a spooky Halloween gathering or a cozy family dinner, these pizzas bring a touch of fun to the table. Plus, they’re quick and easy, perfect for busy nights. So, roll up your sleeves, gather your loved ones, and let the kitchen become your playground. You’ll be haunted by the deliciousness long after the last bite!