
Introduction to Bat Shaped Sugar Cookies
As the leaves turn and the air gets crisp, I find myself dreaming of Halloween treats. One of my absolute favorites is bat shaped sugar cookies. These delightful cookies are not just a sweet indulgence; they’re a fun way to bring the family together in the kitchen. Whether you’re a busy mom juggling work and kids or a professional looking to impress at a gathering, this recipe is your go-to. With simple ingredients and easy steps, you’ll whip up a batch of these spooky delights in no time, making Halloween a little sweeter for everyone!
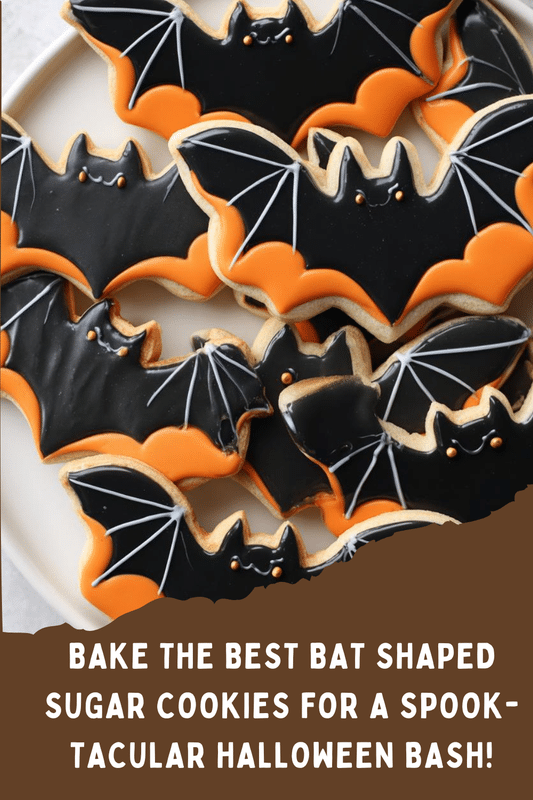
PrintBat Shaped Sugar Cookies That Perfectly Capture Halloween Fun!
Delicious bat-shaped sugar cookies that are perfect for Halloween celebrations.
- Prep Time: 20 minutes
- Cook Time: 10 minutes
- Total Time: 30 minutes
- Yield: 24 cookies
- Category: Dessert
- Method: Baking
- Cuisine: American
- Diet: Vegetarian
Ingredients
- 2 3/4 cups all-purpose flour
- 1 teaspoon baking soda
- 1/2 teaspoon baking powder
- 1 cup unsalted butter, softened
- 1 1/2 cups white sugar
- 1 egg
- 1 teaspoon vanilla extract
- 1/2 teaspoon almond extract
- 3 to 4 tablespoons milk
- Black icing for decoration
Instructions
- Preheat your oven to 375°F (190°C).
- In a bowl, mix together flour, baking soda, and baking powder.
- In a separate bowl, cream together the butter and sugar until smooth.
- Beat in the egg, vanilla extract, and almond extract.
- Gradually blend in the dry ingredients.
- Add milk as needed to soften the dough.
- Roll out the dough on a floured surface to about 1/4 inch thick.
- Cut out bat shapes using a cookie cutter.
- Place cookies on ungreased baking sheets.
- Bake for 8 to 10 minutes in the preheated oven.
- Let cool before decorating with black icing.
Notes
- For a more intense flavor, let the dough chill in the refrigerator for at least 30 minutes before rolling out.
- These cookies can be stored in an airtight container for up to a week.
- Feel free to use different colors of icing for a fun twist!
Why You’ll Love This Bat Shaped Sugar Cookies
These bat shaped sugar cookies are a breeze to make, perfect for busy days when time is tight. The delightful aroma that fills your kitchen while they bake is simply irresistible. Plus, they’re a hit with kids and adults alike, making them ideal for Halloween parties or family gatherings. With their soft texture and sweet flavor, these cookies will have everyone flying back for seconds!
Ingredients for Bat Shaped Sugar Cookies
Gathering the right ingredients is the first step to creating these delightful bat shaped sugar cookies. Here’s what you’ll need:
- All-purpose flour: This is the backbone of your cookies, providing structure and a soft texture.
- Baking soda: This helps the cookies rise, giving them that perfect fluffy bite.
- Baking powder: A little extra lift to ensure your cookies are light and airy.
- Unsalted butter: Softened butter adds richness and flavor, making your cookies melt in your mouth.
- White sugar: Sweetness is key! This sugar helps create that lovely crisp edge.
- Egg: Acts as a binder, holding everything together while adding moisture.
- Vanilla extract: A splash of this adds warmth and depth to the flavor.
- Almond extract: Just a hint of this nutty flavor elevates your cookies to the next level.
- Milk: Use this to adjust the dough’s consistency, ensuring it’s easy to roll out.
- Black icing: The finishing touch! Use it to decorate your bats and bring them to life.
For those looking to mix things up, consider adding a pinch of cinnamon for warmth or using different extracts like lemon for a zesty twist. You can find all the exact measurements at the bottom of the article, ready for printing!
How to Make Bat Shaped Sugar Cookies
Now that you have your ingredients ready, let’s dive into the fun part—making these bat shaped sugar cookies! Follow these simple steps, and you’ll have a batch of spooky treats in no time.
Step 1: Preheat the Oven
First things first, preheat your oven to 375°F (190°C). Preheating is crucial because it ensures your cookies bake evenly. If you skip this step, you might end up with cookies that are too soft or burnt on the edges. Trust me, a well-preheated oven is your best friend in baking!
Step 2: Mix Dry Ingredients
In a medium bowl, whisk together the all-purpose flour, baking soda, and baking powder. This step is essential for evenly distributing the leavening agents. It helps your cookies rise beautifully, giving them that perfect fluffy texture. Make sure there are no lumps; a smooth mix is key!
Step 3: Cream Butter and Sugar
In a separate large bowl, cream together the softened butter and white sugar until the mixture is light and fluffy. This process is vital for creating a tender cookie. The air you incorporate while creaming will help your cookies rise and create that melt-in-your-mouth texture. Don’t rush this step; it’s worth the extra minute!
Step 4: Add Wet Ingredients
Next, beat in the egg, vanilla extract, and almond extract into the butter-sugar mixture. Mix until everything is well combined. The egg adds moisture and binds the ingredients together, while the extracts infuse your cookies with delightful flavor. You’ll love the aroma that fills your kitchen!
Step 5: Combine Dry and Wet Mixtures
Gradually blend the dry ingredients into the wet mixture. I like to do this in batches to avoid a flour explosion! Mix until just combined; overmixing can lead to tough cookies. You want a soft dough that holds together but isn’t sticky.
Step 6: Adjust Dough Consistency
If your dough feels too dry, add milk one tablespoon at a time until it reaches the right consistency. The dough should be soft and pliable, making it easy to roll out. Remember, a little milk goes a long way, so add it slowly!
Step 7: Roll Out the Dough
On a floured surface, roll out the dough to about 1/4 inch thick. Use a light touch to avoid sticking. If the dough sticks to your rolling pin, sprinkle a bit more flour on top. This will help you achieve even bat shapes without tearing the dough.
Step 8: Cut Out Bat Shapes
Using a bat-shaped cookie cutter, cut out your cookies and place them on ungreased baking sheets. Leave a little space between each cookie, as they will spread slightly while baking. If you don’t have a bat cutter, any spooky shape will do!
Step 9: Bake the Cookies
Bake your cookies in the preheated oven for 8 to 10 minutes. Keep an eye on them; they’re done when the edges are lightly golden. If you want a softer cookie, take them out a minute early. Trust your instincts; you know your oven best!
Step 10: Cool and Decorate
Once baked, let the cookies cool on the baking sheet for a few minutes before transferring them to a wire rack. This cooling time helps them firm up. Once completely cool, it’s time to unleash your creativity with black icing. Decorate your bats and watch them come to life!
Tips for Success
- Chill the dough for 30 minutes before rolling for easier handling.
- Use a sharp cookie cutter for clean edges and defined shapes.
- Don’t skip the cooling step; it helps the cookies hold their shape.
- Experiment with different icing colors for a fun twist!
- Store cookies in an airtight container to keep them fresh.
Equipment Needed
- Baking sheets: If you don’t have these, a flat oven-safe tray works too.
- Mixing bowls: Any size will do; just ensure they’re sturdy.
- Whisk: A fork can substitute in a pinch for mixing dry ingredients.
- Rolling pin: A wine bottle can work if you’re in a bind!
- Cookie cutter: Use any fun shape if a bat isn’t available.
Variations
- For a chocolate twist, substitute 1/2 cup of flour with cocoa powder for chocolate bat shaped sugar cookies.
- Try adding a teaspoon of cinnamon or nutmeg for a warm, spiced flavor that’s perfect for fall.
- Make them gluten-free by using a 1:1 gluten-free flour blend in place of all-purpose flour.
- For a vegan option, replace the egg with a flax egg (1 tablespoon ground flaxseed mixed with 2.5 tablespoons water) and use vegan butter.
- Experiment with different extracts like peppermint or orange for a unique flavor profile.
Serving Suggestions
- Pair your bat shaped sugar cookies with a warm cup of apple cider for a cozy treat.
- Serve them alongside a spooky Halloween-themed fruit platter for a colorful contrast.
- Display cookies on a decorative platter with Halloween decorations for a festive touch.
- Consider adding a scoop of vanilla ice cream for an indulgent dessert.
FAQs about Bat Shaped Sugar Cookies
Can I make bat shaped sugar cookies ahead of time?
Absolutely! You can prepare the dough in advance and refrigerate it for up to three days. Just roll it out and cut your bat shapes when you’re ready to bake. This is a great time-saver for busy days!
What can I use instead of black icing for decoration?
If black icing isn’t your thing, feel free to use any color you like! Orange, purple, or even white icing can add a fun twist to your bat shaped sugar cookies. Get creative!
How should I store my bat shaped sugar cookies?
Store your cookies in an airtight container at room temperature. They’ll stay fresh for up to a week. If you want to keep them longer, consider freezing them!
Can I use a different shape for these cookies?
Of course! While bat shapes are perfect for Halloween, you can use any cookie cutter you have on hand. Ghosts, pumpkins, or even stars will work beautifully!
What’s the best way to get a soft cookie texture?
To achieve that soft, melt-in-your-mouth texture, be sure not to overmix your dough and keep an eye on the baking time. Taking them out just as the edges turn golden will help maintain that softness!
Final Thoughts
Making bat shaped sugar cookies is more than just baking; it’s about creating memories with loved ones. The joy of rolling out dough, cutting out those adorable bat shapes, and decorating them with icing brings a sense of togetherness that’s hard to beat. As the aroma fills your home, you’ll find smiles all around, making Halloween even more special. Whether you’re sharing them at a party or enjoying them with a cozy cup of cider, these cookies are sure to add a sprinkle of magic to your celebrations. So, gather your family and let the fun begin!