
Introduction to Eyeball Cake Pops
As a busy mom, I know how challenging it can be to whip up something fun and festive, especially around Halloween. That’s where these delightful Eyeball Cake Pops come in! They’re not just a treat; they’re a conversation starter that will have everyone giggling and reaching for more. With just a few simple ingredients, you can create these spooky delights that are perfect for parties or family gatherings. Plus, they’re a fantastic way to get the kids involved in the kitchen. Trust me, these cake pops will impress your loved ones and make your Halloween celebrations unforgettable!
PrintEyeball Cake Pops: A Spooky Treat You Must Try!
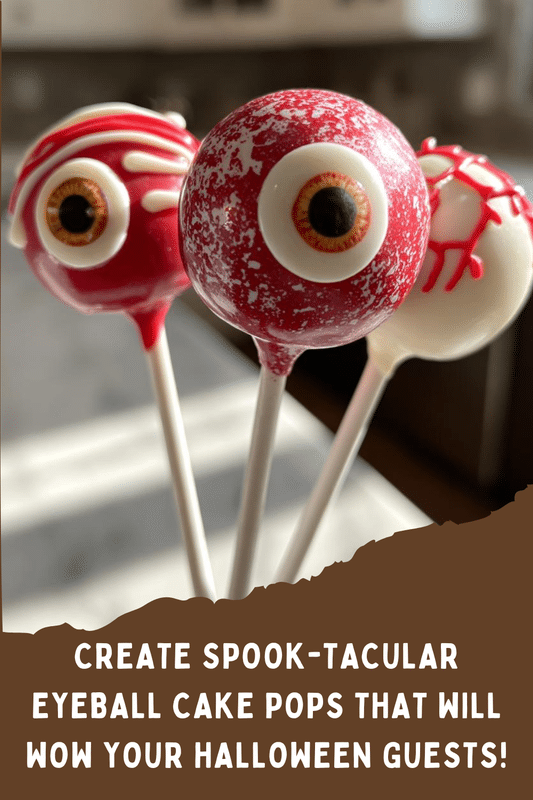
Eyeball Cake Pops are a fun and spooky treat perfect for Halloween or any themed party. These cake pops are designed to look like eyeballs, making them a hit among kids and adults alike.
- Prep Time: 30 minutes
- Cook Time: 30 minutes
- Total Time: 1 hour
- Yield: 24 cake pops
- Category: Dessert
- Method: Baking and Dipping
- Cuisine: American
- Diet: Vegetarian
Ingredients
- 1 box of cake mix
- 1 cup of frosting
- White chocolate melts
- Food coloring (red and black)
- Candy eyes
- Lollipop sticks
Instructions
- Prepare the cake mix according to package instructions and bake.
- Once cooled, crumble the cake into a large bowl.
- Add frosting to the crumbled cake and mix until combined.
- Form the mixture into balls and place them on a baking sheet.
- Chill the cake balls in the refrigerator for about 30 minutes.
- Melt the white chocolate melts in a microwave-safe bowl.
- Dip the end of each lollipop stick into the melted chocolate and insert it into a cake ball.
- Coat each cake ball in the melted white chocolate and let excess drip off.
- Place the coated cake pops back on the baking sheet and let them set.
- Once set, use food coloring to create veins and place candy eyes on top.
Notes
- Make sure the cake balls are chilled before dipping to prevent them from falling off the sticks.
- You can use different colors of food coloring for a unique look.
- Store in a cool place to keep the chocolate from melting.
Why You’ll Love This Eyeball Cake Pops
These Eyeball Cake Pops are a breeze to make, even on the busiest of days. They come together quickly, making them a perfect last-minute treat for any Halloween gathering. Plus, they’re deliciously sweet and fun to eat, appealing to both kids and adults alike. The best part? You can customize them to fit your style, ensuring they’re as unique as your family’s Halloween spirit!
Ingredients for Eyeball Cake Pops
Creating these Eyeball Cake Pops is as simple as gathering a few key ingredients. Here’s what you’ll need:
- Cake Mix: Any flavor you love will work! Chocolate or vanilla are popular choices that pair well with the spooky theme.
- Frosting: A classic buttercream or cream cheese frosting adds sweetness and helps bind the cake together. Feel free to use store-bought or homemade!
- White Chocolate Melts: These are essential for coating your cake pops. They give that eerie eyeball look and a deliciously creamy taste.
- Food Coloring: Red and black food coloring will help you create those creepy veins and details. Get creative with colors for a unique twist!
- Candy Eyes: These little guys are the finishing touch that makes your cake pops look like real eyeballs. You can find them at most craft or baking stores.
- Lollipop Sticks: These are what hold your cake pops together. You can use regular lollipop sticks or even sturdy straws for a fun variation.
For exact measurements, check the bottom of the article where you can find everything you need for printing. Happy baking!
How to Make Eyeball Cake Pops
Step 1: Prepare the Cake Mix
Start by preheating your oven according to the cake mix instructions. Prepare the cake mix as directed on the box. This is where the magic begins! The aroma of baking cake will fill your kitchen, making it feel cozy and inviting.
Step 2: Crumble the Cake
Once the cake has cooled completely, it’s time to crumble it into a large bowl. Use your hands or a fork to break it apart. The texture should be fine, almost like sand. This step is perfect for letting the kids help out!
Step 3: Mix in the Frosting
Add your frosting to the crumbled cake. Mix it well until everything is combined. The mixture should be moist but not too sticky. This is where the sweetness comes in, making your Eyeball Cake Pops irresistible!
Step 4: Form Cake Balls
Now, it’s time to roll the mixture into balls. Aim for about one inch in diameter. Place them on a baking sheet lined with parchment paper. This is where your cake pops start to take shape, and they’ll look adorable!
Step 5: Chill the Cake Balls
Pop the baking sheet into the refrigerator for about 30 minutes. Chilling helps the cake balls firm up, making them easier to dip later. Trust me, this step is crucial to prevent any mishaps!
Step 6: Melt the White Chocolate
While the cake balls chill, melt your white chocolate melts in a microwave-safe bowl. Heat in short bursts, stirring in between, until smooth. The melted chocolate will be the perfect coating for your spooky treats!
Step 7: Insert Lollipop Sticks
Take the chilled cake balls out of the fridge. Dip the end of each lollipop stick into the melted chocolate, then insert it into a cake ball. This helps secure the stick and adds a fun touch to your Eyeball Cake Pops.
Step 8: Coat with White Chocolate
Now, dip each cake ball into the melted white chocolate. Make sure they’re fully coated, then let the excess chocolate drip off. This step is where the magic happens, transforming your cake balls into spooky eyeballs!
Step 9: Let Set
Place the coated cake pops back on the baking sheet. Allow them to set until the chocolate hardens. You can speed this up by placing them in the fridge for a few minutes. The anticipation will be worth it!
Step 10: Decorate with Food Coloring and Candy Eyes
Once the chocolate is set, it’s time to get creative! Use food coloring to add veins and details to your eyeballs. Finally, place candy eyes on top. This is the fun part where you can let your imagination run wild!
Tips for Success
- Chill the cake balls thoroughly before dipping to prevent them from falling off the sticks.
- Use a toothpick to help place candy eyes if your fingers are too big for precision.
- Experiment with different food coloring combinations for a unique look.
- Keep melted chocolate warm while working to ensure smooth coating.
- Store your Eyeball Cake Pops in a cool place to maintain their shape.
Equipment Needed
- Baking Sheet: A standard baking sheet works well, but you can use a large plate if needed.
- Parchment Paper: This helps prevent sticking; wax paper is a good alternative.
- Microwave-Safe Bowl: Any bowl that can handle heat will do, even a glass bowl.
- Lollipop Sticks: Sturdy straws can be a fun substitute for a unique twist.
- Mixing Bowl: A large bowl is essential for mixing the cake and frosting.
Variations
- Gluten-Free: Use a gluten-free cake mix to make these Eyeball Cake Pops suitable for those with gluten sensitivities.
- Vegan: Substitute the cake mix with a vegan option and use dairy-free frosting and chocolate melts for a plant-based treat.
- Flavor Twists: Experiment with different cake flavors like red velvet or lemon for a unique taste experience.
- Colorful Coatings: Instead of white chocolate, try using colored candy melts to create a vibrant assortment of eyeballs.
- Nutty Surprise: Add crushed nuts or sprinkles to the cake mixture for an extra crunch and flavor boost.
Serving Suggestions
- Pair your Eyeball Cake Pops with spooky-themed drinks like a bubbling punch or dark soda.
- Serve them on a decorative platter with fake spider webs for a festive touch.
- Include a variety of Halloween treats alongside for a fun dessert table.
- Wrap them in clear bags tied with orange ribbons for a cute party favor.
- Display them in a pumpkin or a spooky jar for an eye-catching centerpiece.
FAQs about Eyeball Cake Pops
Can I make Eyeball Cake Pops ahead of time?
Absolutely! You can prepare the cake balls and coat them in chocolate a day in advance. Just store them in a cool place to keep them fresh. This makes it easier to enjoy your spooky treats without the last-minute rush!
What can I use instead of white chocolate melts?
If you’re not a fan of white chocolate, you can use milk or dark chocolate melts instead. They’ll give your Eyeball Cake Pops a different flavor while still looking fantastic!
How do I store leftover Eyeball Cake Pops?
Store any leftovers in an airtight container in a cool place. If it’s warm, the fridge is a good option. Just make sure they’re not squished together!
Can I customize the flavors of the cake pops?
Definitely! Feel free to use any cake mix flavor you love. Chocolate, vanilla, or even funfetti can add a delightful twist to your Eyeball Cake Pops!
Are Eyeball Cake Pops suitable for kids?
Yes! These treats are perfect for kids, especially with their fun appearance. Just keep an eye on the candy eyes, as they can be a choking hazard for younger children.
Final Thoughts
Making Eyeball Cake Pops is more than just a fun baking project; it’s a delightful way to create lasting memories with your family. The laughter and excitement as you decorate these spooky treats will fill your kitchen with joy. Plus, the smiles on your loved ones’ faces when they see these creepy yet cute cake pops are priceless! Whether you’re hosting a Halloween party or just looking for a fun activity, these cake pops are sure to be a hit. So roll up your sleeves, gather your ingredients, and let the Halloween fun begin!