
Introduction to Halloween Lush Recipe
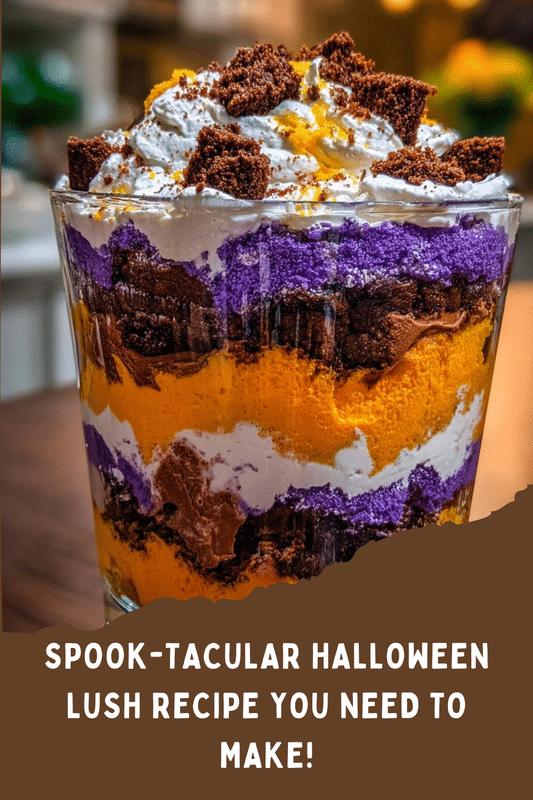
As the leaves turn and the air gets crisp, I find myself craving festive treats that bring a smile to my family’s faces. This Halloween Lush Recipe is just the ticket! It’s a delightful, no-bake dessert that’s as fun to make as it is to eat. Perfect for busy moms like us, it requires minimal effort but delivers maximum flavor and flair. Whether you’re hosting a spooky gathering or just want to surprise your loved ones, this layered treat will surely impress. Let’s dive into this colorful concoction that captures the spirit of Halloween!
PrintHalloween Lush Recipe: Create Spooky Treats at Home!
A fun and spooky Halloween Lush recipe that combines layers of delicious flavors and colors to create a festive treat perfect for Halloween celebrations.
- Prep Time: 20 minutes
- Cook Time: 0 minutes
- Total Time: 2 hours 20 minutes
- Yield: 8 servings
- Category: Dessert
- Method: No-Bake
- Cuisine: American
- Diet: Vegetarian
Ingredients
- 1 package of vanilla pudding mix
- 2 cups of milk
- 1 cup of whipped cream
- 1 cup of crushed Oreos
- 1 cup of green gelatin
- 1 cup of orange gelatin
- 1 cup of gummy worms
- 1 cup of candy corn
Instructions
- Prepare the vanilla pudding mix according to package instructions using milk.
- In a separate bowl, mix the green gelatin with boiling water and let it cool.
- Layer the crushed Oreos at the bottom of a serving dish.
- Add a layer of the prepared vanilla pudding over the Oreos.
- Pour the cooled green gelatin over the pudding layer.
- Add another layer of vanilla pudding on top of the gelatin.
- Pour the orange gelatin over the second pudding layer.
- Top with whipped cream and garnish with gummy worms and candy corn.
- Chill in the refrigerator for at least 2 hours before serving.
Notes
- Feel free to customize the layers with different colors and flavors of gelatin.
- For a more intense flavor, consider adding a splash of vanilla extract to the pudding.
- Make sure to let each layer set before adding the next one for best results.
Why You’ll Love This Halloween Lush Recipe
This Halloween Lush Recipe is a lifesaver for busy days. It’s quick to whip up, taking just 20 minutes of prep time. Plus, it’s a no-bake dessert, so you won’t heat up the kitchen! The layers of vibrant colors and flavors make it visually stunning and delicious. Your family will love the combination of creamy pudding, crunchy Oreos, and sweet gummy worms. It’s a treat that brings joy without the stress!
Ingredients for Halloween Lush Recipe
Gathering the right ingredients is half the fun! Here’s what you’ll need for this spooky delight:
- Vanilla pudding mix: This creamy base adds a rich flavor and smooth texture.
- Milk: Essential for preparing the pudding, it brings everything together.
- Whipped cream: A fluffy topping that adds a light, airy finish to your layers.
- Crushed Oreos: These provide a crunchy layer that contrasts beautifully with the creamy pudding.
- Green gelatin: This adds a fun, vibrant color and a fruity flavor that screams Halloween.
- Orange gelatin: A classic Halloween color that complements the green and adds another layer of flavor.
- Gummy worms: These creepy crawlers are the perfect garnish to make your dessert extra festive!
- Candy corn: A sweet treat that adds a pop of color and nostalgia to your lush.
Feel free to get creative! You can customize the layers with different colors and flavors of gelatin. If you want a more intense flavor, consider adding a splash of vanilla extract to the pudding. Just remember, letting each layer set before adding the next one is key for the best results. For exact quantities, check the bottom of the article where you can find them available for printing!
How to Make Halloween Lush Recipe
Now that we have our ingredients ready, let’s get to the fun part—making this Halloween Lush Recipe! Follow these simple steps, and you’ll have a spooky treat that’s sure to impress.
Step 1: Prepare the Vanilla Pudding
Start by preparing the vanilla pudding mix according to the package instructions. Simply whisk the pudding mix with milk until it thickens. This creamy layer is the heart of our lush, so make sure it’s nice and smooth!
Step 2: Mix the Green Gelatin
Next, grab a bowl and mix the green gelatin with boiling water. Stir until it’s completely dissolved, then let it cool. This vibrant layer adds a fun twist to our dessert, making it perfect for Halloween!
Step 3: Layer the Crushed Oreos
Now, it’s time to create the base. Layer the crushed Oreos at the bottom of your serving dish. This crunchy layer provides a delightful contrast to the creamy pudding above. Plus, it looks great!
Step 4: Add Vanilla Pudding Layer
Once your Oreos are in place, pour a layer of the prepared vanilla pudding over them. Spread it evenly, making sure to cover all the Oreos. This creamy goodness is what makes this Halloween Lush Recipe so irresistible!
Step 5: Pour the Green Gelatin
Now, gently pour the cooled green gelatin over the pudding layer. Take your time to ensure it spreads evenly. This layer adds a spooky touch and a burst of fruity flavor that everyone will love!
Step 6: Add Another Pudding Layer
After the gelatin, it’s time for another layer of vanilla pudding. Pour it over the green gelatin, smoothing it out as you go. This creates a beautiful contrast of colors that’s sure to catch everyone’s eye.
Step 7: Pour the Orange Gelatin
Next, pour the orange gelatin over the second pudding layer. This vibrant color not only looks festive but also adds a delicious flavor that complements the other layers perfectly. It’s like Halloween in a dish!
Step 8: Top with Whipped Cream
Now for the fun part—topping it off! Spread a generous layer of whipped cream on top. This fluffy finish makes everything feel extra special. Don’t forget to garnish with gummy worms and candy corn for that spooky flair!
Step 9: Chill Before Serving
Finally, it’s time to chill your creation in the refrigerator for at least 2 hours. This step is crucial! Chilling allows the layers to set and meld together, making each bite a delightful experience. Trust me, the wait will be worth it!
Tips for Success
- Let each layer set before adding the next for a cleaner look.
- Use a spatula to smooth out layers for a polished finish.
- Chill the dessert overnight for even better flavor and texture.
- Experiment with different gelatin flavors for a unique twist.
- For a festive touch, use Halloween-themed serving dishes or cups.
Equipment Needed
- Mixing bowls: Any size will do, but a large bowl is best for mixing pudding.
- Whisk: A hand whisk works great, or you can use an electric mixer for speed.
- Spatula: Perfect for smoothing out layers and scraping the bowl clean.
- Serving dish: A clear glass dish showcases the colorful layers beautifully.
Variations
- For a chocolate twist, substitute chocolate pudding for vanilla pudding.
- Use sugar-free gelatin and pudding for a lighter version of this Halloween Lush Recipe.
- Add a layer of crushed fruit, like strawberries or blueberries, for a fruity surprise.
- Incorporate different flavors of gelatin, such as raspberry or lemon, for a unique taste.
- For a gluten-free option, use gluten-free cookies instead of Oreos.
Serving Suggestions
- Pair with spooky-themed cupcakes for a festive dessert table.
- Serve alongside a warm apple cider for a cozy fall vibe.
- Use clear cups for individual servings, showcasing the colorful layers.
- Garnish with extra gummy worms on the plate for added fun.
FAQs about Halloween Lush Recipe
Can I make this Halloween Lush Recipe ahead of time?
Absolutely! This no-bake dessert is perfect for making ahead. Just prepare it a day in advance and let it chill overnight. The flavors will meld beautifully, making it even more delicious!
What can I substitute for the Oreos?
If Oreos aren’t your thing, you can use any chocolate cookie or even graham crackers. Just crush them up to create that delightful crunchy layer!
How long can I store leftovers?
You can store any leftovers in the refrigerator for up to 3 days. Just make sure to cover it well to keep it fresh!
Can I use different flavors of gelatin?
Definitely! Feel free to mix and match flavors. Raspberry, lemon, or even blue raspberry can add a fun twist to your Halloween Lush Recipe!
Is this dessert suitable for kids?
Yes! This Halloween Lush Recipe is kid-friendly and perfect for Halloween parties. The colorful layers and fun toppings will delight children and adults alike!
Final Thoughts
Creating this Halloween Lush Recipe is more than just making a dessert; it’s about crafting memories with your loved ones. The joy of layering vibrant colors and flavors brings a sense of excitement to the kitchen. As I watch my family dive into this spooky treat, I can’t help but smile. It’s a simple yet delightful way to celebrate the season, and it’s sure to become a cherished tradition. So, roll up your sleeves, gather your ingredients, and let the Halloween fun begin! You’ll be amazed at how a little creativity can turn an ordinary day into something magical.