
Introduction to Ghost Brownies
As the leaves turn and the air gets crisp, I find myself craving something sweet and spooky. That’s where my Ghost Brownies come in! These delightful treats are not just a quick solution for a busy day; they’re a fun way to bring a little Halloween magic into your kitchen. With their rich chocolatey goodness and adorable ghostly decorations, they’re sure to impress your loved ones. Plus, they’re easy enough to whip up even on the busiest of days. So, let’s dive into this deliciously spooky adventure together!
PrintGhost Brownies: Unleash the Spooky Flavor Delight!

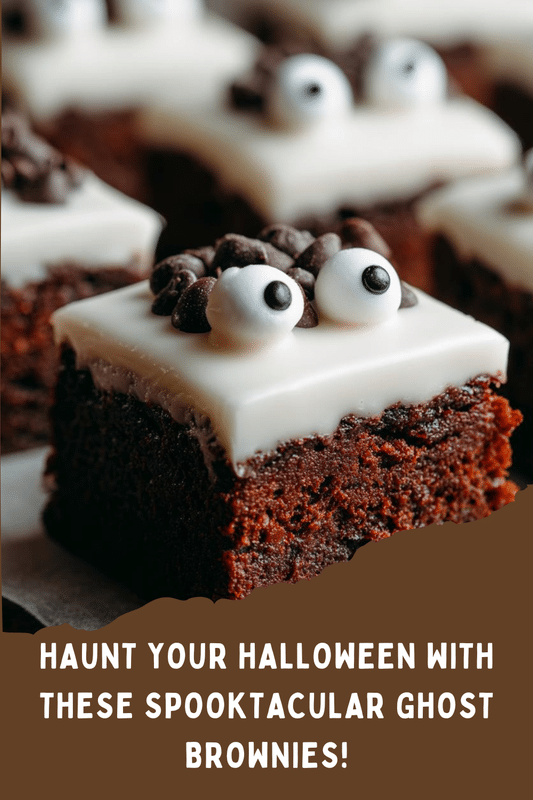
Deliciously spooky brownies perfect for Halloween, topped with ghostly decorations.
- Prep Time: 20 minutes
- Cook Time: 30 minutes
- Total Time: 50 minutes
- Yield: 16 brownies
- Category: Dessert
- Method: Baking
- Cuisine: American
- Diet: Vegetarian
Ingredients
- 1 cup unsalted butter
- 2 cups granulated sugar
- 4 large eggs
- 1 teaspoon vanilla extract
- 1 cup all-purpose flour
- 1 cup cocoa powder
- 1/2 teaspoon salt
- 1/2 teaspoon baking powder
- White chocolate for ghost decorations
- Chocolate chips for eyes
Instructions
- Preheat the oven to 350°F (175°C).
- In a large bowl, melt the butter and mix in the sugar until well combined.
- Add the eggs one at a time, mixing well after each addition, then stir in the vanilla extract.
- In another bowl, whisk together the flour, cocoa powder, salt, and baking powder.
- Gradually add the dry ingredients to the wet ingredients, mixing until just combined.
- Pour the brownie batter into a greased baking pan and spread evenly.
- Bake for 25-30 minutes or until a toothpick inserted comes out clean.
- Let the brownies cool completely before decorating.
- Melt the white chocolate and drizzle it over the brownies to create ghost shapes.
- Use chocolate chips to create eyes on the ghost decorations.
Notes
- For a richer flavor, use dark chocolate cocoa powder.
- Store brownies in an airtight container for up to a week.
- Feel free to add nuts or other toppings as desired.
Why You’ll Love This Ghost Brownies
These Ghost Brownies are a dream come true for busy moms and professionals alike. They come together in just 50 minutes, making them perfect for last-minute Halloween gatherings. The rich, fudgy texture will have everyone coming back for seconds. Plus, the fun ghost decorations add a playful touch that kids adore. You’ll love how easy they are to make, and the smiles they bring are simply priceless!
Ingredients for Ghost Brownies
Gathering the right ingredients is the first step to creating these delightful Ghost Brownies. Here’s what you’ll need:
- Unsalted butter: This adds richness and moisture, making your brownies fudgy.
- Granulated sugar: Sweetens the batter and helps create that lovely crust on top.
- Large eggs: They bind everything together and give the brownies their structure.
- Vanilla extract: A splash of this adds a warm, inviting flavor that complements the chocolate.
- All-purpose flour: Provides the necessary structure for your brownies.
- Cocoa powder: The star of the show! It gives the brownies their rich chocolate flavor.
- Salt: Just a pinch enhances the sweetness and balances the flavors.
- Baking powder: This helps the brownies rise slightly, giving them a nice texture.
- White chocolate: Melted and drizzled on top, it creates the ghostly decorations.
- Chocolate chips: These are perfect for adding little eyes to your ghostly creations.
Feel free to get creative! You can swap in dark chocolate cocoa powder for a richer flavor or add nuts for a delightful crunch. For exact measurements, check the bottom of the article where you can find everything available for printing.
How to Make Ghost Brownies
Now that we have our ingredients ready, let’s get to the fun part—making these delicious Ghost Brownies! Follow these simple steps, and you’ll have a spooky treat that’s sure to delight.
Step 1: Preheat the Oven
First things first, preheat your oven to 350°F (175°C). Preheating is crucial because it ensures even baking. If the oven isn’t hot enough, your brownies might turn out gooey in the middle. Trust me, no one wants that!
Step 2: Prepare the Batter
In a large bowl, melt the unsalted butter. I usually do this in the microwave for about 30 seconds. Once melted, mix in the granulated sugar until it’s well combined. The mixture should be smooth and glossy, almost like a shiny river of sweetness. This texture is key to achieving that fudgy brownie consistency!
Step 3: Add Eggs and Vanilla
Next, add the eggs one at a time, mixing well after each addition. This step is important because it helps incorporate air into the batter, giving your brownies a lovely lift. Don’t forget to add the vanilla extract! It adds a warm, inviting flavor that pairs beautifully with the chocolate.
Step 4: Combine Dry Ingredients
In another bowl, whisk together the all-purpose flour, cocoa powder, salt, and baking powder. This step is essential for evenly distributing the dry ingredients. You want to make sure there are no lumps of cocoa powder hiding in your batter. A smooth brownie is a happy brownie!
Step 5: Mix Wet and Dry Ingredients
Now, gradually add the dry ingredients to the wet mixture. Stir gently until just combined. Be careful not to overmix! Overmixing can lead to tough brownies, and we want them to be soft and fudgy. A few flour streaks are okay; they’ll disappear as the brownies bake.
Step 6: Bake the Brownies
Pour the brownie batter into a greased baking pan, spreading it evenly. Bake in your preheated oven for 25-30 minutes. To check for doneness, insert a toothpick into the center. If it comes out clean or with a few moist crumbs, they’re ready! If it’s wet, give them a few more minutes.
Step 7: Cool and Decorate
Once baked, let the brownies cool completely in the pan. This is crucial for easy decorating! After they’ve cooled, melt the white chocolate and drizzle it over the brownies to create ghost shapes. Use chocolate chips to add little eyes to your ghostly creations. It’s the perfect finishing touch!
Tips for Success
- Always measure your ingredients accurately for the best results.
- Let the brownies cool completely before decorating to avoid melting the chocolate.
- Use high-quality cocoa powder for a richer chocolate flavor.
- Experiment with different toppings like sprinkles or nuts for added texture.
- Store leftovers in an airtight container to keep them fresh and fudgy.
Equipment Needed
- Mixing bowls: Use any size you have; just ensure they’re large enough for mixing.
- Whisk: A fork works too if you don’t have one handy!
- Baking pan: An 8×8 inch pan is ideal, but a 9×9 inch works as well.
- Spatula: A rubber spatula is great for scraping down the sides.
- Toothpick: Essential for checking if your brownies are done.
Variations of Ghost Brownies
- Nutty Delight: Add chopped walnuts or pecans for a crunchy texture that complements the fudgy brownies.
- Gluten-Free Option: Substitute all-purpose flour with a gluten-free flour blend for a deliciously inclusive treat.
- Minty Ghosts: Mix in a few drops of peppermint extract for a refreshing twist that pairs well with chocolate.
- Vegan Version: Replace eggs with flaxseed meal and use a plant-based butter alternative for a vegan-friendly treat.
- Spicy Kick: Add a pinch of cayenne pepper or cinnamon to the batter for a surprising flavor boost that warms the palate.
Serving Suggestions for Ghost Brownies
- Pair with Ice Cream: A scoop of vanilla or mint chocolate chip ice cream complements the rich brownies perfectly.
- Serve with Hot Cocoa: A warm cup of hot cocoa makes for a cozy treat on chilly nights.
- Presentation: Arrange brownies on a spooky-themed platter for a festive touch.
FAQs about Ghost Brownies
Can I make Ghost Brownies ahead of time?
Absolutely! You can bake the brownies a day in advance. Just store them in an airtight container at room temperature. Decorate them the day you plan to serve for the best presentation.
What can I use instead of white chocolate for decorations?
If white chocolate isn’t your thing, you can use melted vanilla candy melts or even cream cheese frosting for a spooky twist. Just drizzle it over the brownies and add chocolate chips for eyes!
How do I store leftover Ghost Brownies?
Store any leftovers in an airtight container at room temperature for up to a week. If you want to keep them fresh longer, you can freeze them for up to three months. Just thaw before serving!
Can I make these brownies gluten-free?
<pYes, you can! Simply substitute the all-purpose flour with a gluten-free flour blend. The texture will still be deliciously fudgy, and everyone can enjoy them!
What’s the best way to cut brownies for a clean edge?
To achieve clean cuts, use a sharp knife and wipe it with a damp cloth between cuts. This prevents the brownies from sticking to the knife, giving you those perfect, ghostly squares!
Final Thoughts
Making Ghost Brownies is more than just baking; it’s about creating memories and sharing joy with family and friends. The delightful aroma of chocolate wafting through the kitchen brings back fond memories of Halloween fun. These spooky treats are not only delicious but also a canvas for creativity, allowing you to decorate them in playful ways. Whether you’re hosting a Halloween party or simply enjoying a cozy night in, these brownies are sure to bring smiles. So, roll up your sleeves, embrace the spirit of the season, and let the magic of Ghost Brownies fill your home with warmth and laughter!