
Introduction to Christmas Pinwheel Cookies
As the holiday season approaches, I find myself dreaming of festive treats that bring joy to my family. Christmas Pinwheel Cookies are a delightful way to spread cheer and create lasting memories. These colorful, swirled cookies not only look stunning on a platter but also taste heavenly. They’re perfect for busy moms like us, offering a quick solution for holiday baking without sacrificing flavor or fun. Whether you’re hosting a gathering or simply want to impress your loved ones, these cookies are sure to be a hit. Let’s dive into this delicious adventure together!
PrintChristmas Pinwheel Cookies: Delightful Treats You’ll Love!

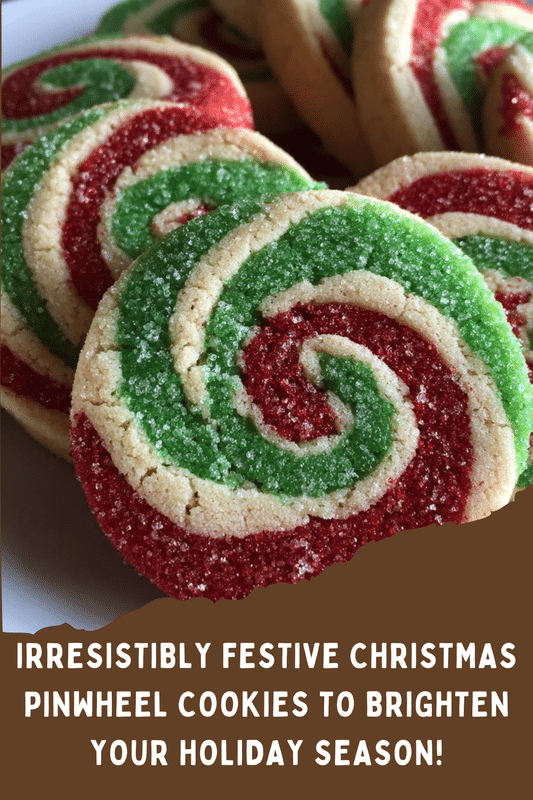
Christmas Pinwheel Cookies are festive, colorful, and delicious treats that are perfect for the holiday season. These cookies are not only visually appealing but also offer a delightful combination of flavors.
- Prep Time: 30 minutes
- Cook Time: 12 minutes
- Total Time: 2 hours 42 minutes
- Yield: 24 cookies
- Category: Dessert
- Method: Baking
- Cuisine: American
- Diet: Vegetarian
Ingredients
- 2 3/4 cups all-purpose flour
- 1 teaspoon baking powder
- 1/2 teaspoon salt
- 1 cup unsalted butter, softened
- 1 cup granulated sugar
- 1 large egg
- 1 teaspoon vanilla extract
- 1/2 teaspoon almond extract
- 1/4 cup cocoa powder
- 1/4 cup red food coloring
- 1/4 cup green food coloring
Instructions
- Preheat your oven to 350°F (175°C).
- In a bowl, whisk together flour, baking powder, and salt.
- In a separate bowl, cream together the butter and sugar until light and fluffy.
- Add the egg, vanilla extract, and almond extract to the butter mixture and mix well.
- Gradually add the dry ingredients to the wet ingredients and mix until combined.
- Divide the dough into three equal parts. Leave one part plain, add cocoa powder to the second part, and red food coloring to the third part.
- Roll out each portion of dough between two sheets of parchment paper into rectangles.
- Layer the colored doughs on top of each other, starting with the plain dough, then the cocoa dough, and finally the red dough.
- Roll the layered dough tightly into a log and wrap it in plastic wrap. Chill in the refrigerator for at least 2 hours.
- Once chilled, slice the log into 1/4 inch thick rounds and place them on a baking sheet.
- Bake for 10-12 minutes or until the edges are lightly golden.
- Let cool on a wire rack before serving.
Notes
- For a festive touch, sprinkle powdered sugar on top before serving.
- These cookies can be stored in an airtight container for up to a week.
- Feel free to experiment with different food coloring to create unique designs.
Why You’ll Love This Christmas Pinwheel Cookies
These Christmas Pinwheel Cookies are a holiday miracle wrapped in colorful layers! They’re not just easy to make; they’re also a feast for the eyes and the taste buds. With a delightful combination of flavors, they’ll satisfy even the pickiest eaters. Plus, the vibrant colors make them a fun project to involve the kids. In just a few simple steps, you’ll have a batch of festive cookies that will brighten any holiday gathering!
Ingredients for Christmas Pinwheel Cookies
Gathering the right ingredients is the first step to creating these festive delights. Here’s what you’ll need:
- All-purpose flour: This is the backbone of your cookies, providing structure and texture.
- Baking powder: A leavening agent that helps the cookies rise and become fluffy.
- Salt: Just a pinch enhances the flavors and balances the sweetness.
- Unsalted butter: Softened butter adds richness and a creamy texture to the dough.
- Granulated sugar: This sweetener gives the cookies their delightful sweetness and helps with browning.
- Large egg: Acts as a binder, helping to hold everything together while adding moisture.
- Vanilla extract: A classic flavor that brings warmth and depth to your cookies.
- Almond extract: Just a hint of this adds a lovely nutty flavor that complements the vanilla.
- Cocoa powder: This gives one layer its rich chocolate flavor, making the cookies even more irresistible.
- Red food coloring: Adds a festive touch, making your cookies pop with holiday cheer.
- Green food coloring: Complements the red and creates a beautiful pinwheel effect.
For those looking to experiment, feel free to swap out the extracts or use different food coloring to create unique designs. You can find the exact quantities for each ingredient at the bottom of the article, ready for printing!
How to Make Christmas Pinwheel Cookies
Now that we have our ingredients ready, let’s get to the fun part—making these beautiful Christmas Pinwheel Cookies! Follow these simple steps, and you’ll be on your way to a festive treat that will impress everyone.
Step 1: Preheat the Oven
First things first, preheat your oven to 350°F (175°C). Preheating is crucial because it ensures that your cookies bake evenly. A hot oven helps them rise and develop that lovely golden edge we all adore.
Step 2: Prepare the Dry Ingredients
In a mixing bowl, whisk together the all-purpose flour, baking powder, and salt. This step is essential for creating a perfect cookie base. Whisking helps to aerate the flour, ensuring your cookies will be light and fluffy.
Step 3: Cream the Butter and Sugar
In another bowl, cream together the softened butter and granulated sugar until the mixture is light and fluffy. This technique is key to achieving a soft texture. The air you incorporate during this step will make your cookies tender and delightful!
Step 4: Add the Wet Ingredients
Next, add the large egg, vanilla extract, and almond extract to the butter mixture. Mix well until everything is combined. The extracts will infuse your cookies with a warm, inviting flavor that’s perfect for the holidays.
Step 5: Combine Dry and Wet Ingredients
Gradually add the dry ingredients to the wet mixture. Mix until just combined, being careful not to overwork the dough. Overmixing can lead to tough cookies, and we want them to be soft and melt-in-your-mouth delicious!
Step 6: Divide and Color the Dough
Now, divide the dough into three equal parts. Leave one part plain, mix cocoa powder into the second part, and add red food coloring to the third part. This is where the magic happens! Each layer will create that stunning pinwheel effect.
Step 7: Roll Out the Dough
Roll out each portion of dough between two sheets of parchment paper into rectangles. This method prevents sticking and makes it easier to achieve even thickness. Aim for about 1/4 inch thick for the perfect cookie texture.
Step 8: Layer the Dough
Carefully layer the colored doughs on top of each other, starting with the plain dough, followed by the cocoa dough, and finally the red dough. Press gently to ensure they stick together. This layering is what gives your cookies that beautiful pinwheel design!
Step 9: Chill the Dough
Wrap the layered dough tightly in plastic wrap and chill it in the refrigerator for at least 2 hours. Chilling is important for shaping and helps the cookies hold their form while baking. Plus, it makes slicing easier!
Step 10: Slice and Bake
Once chilled, slice the log into 1/4 inch thick rounds and place them on a baking sheet. Bake for 10-12 minutes or until the edges are lightly golden. Let them cool on a wire rack before serving. The aroma will fill your kitchen with holiday cheer!
Tips for Success
- Make sure your butter is softened to room temperature for easy creaming.
- Use parchment paper for rolling out dough to prevent sticking.
- Chill the dough thoroughly to ensure clean slices and better texture.
- Experiment with different food colorings for unique designs.
- Don’t skip the cooling step; it’s key for perfect cookies!
Equipment Needed
- Baking sheet: A standard one works, but a silicone mat can help prevent sticking.
- Mixing bowls: Use any size, but a large bowl is best for mixing dough.
- Whisk: A simple whisk or electric mixer will do the job.
- Parchment paper: Essential for rolling out dough without mess.
- Plastic wrap: To chill the dough and keep it fresh.
Variations
- For a minty twist, add peppermint extract to the dough for a refreshing flavor.
- Try using different food colorings like blue and yellow for a unique holiday palette.
- Substitute half of the all-purpose flour with almond flour for a nutty flavor and gluten-free option.
- Incorporate crushed candy canes into the dough for a festive crunch.
- For a spiced version, add a teaspoon of cinnamon or nutmeg to the dough for a warm, cozy flavor.
Serving Suggestions
- Pair these Christmas Pinwheel Cookies with a warm cup of hot cocoa or spiced tea for a cozy treat.
- Serve them on a festive platter, garnished with fresh mint leaves or edible glitter for a holiday sparkle.
- These cookies also make a delightful addition to cookie exchanges or holiday gift baskets.
FAQs about Christmas Pinwheel Cookies
As you embark on your baking journey with Christmas Pinwheel Cookies, you might have a few questions. Here are some common queries that can help you along the way:
Can I make the dough ahead of time?
Absolutely! You can prepare the dough a day in advance and keep it wrapped in plastic wrap in the refrigerator. Just remember to let it sit at room temperature for a few minutes before slicing.
What if I don’t have food coloring?
No worries! You can skip the food coloring altogether for a classic look or use natural alternatives like beet juice for red and spinach juice for green. Your cookies will still taste amazing!
How should I store the cookies?
Store your Christmas Pinwheel Cookies in an airtight container at room temperature. They’ll stay fresh for up to a week, but I doubt they’ll last that long!
Can I freeze these cookies?
Yes! You can freeze the unbaked log of dough for up to three months. Just slice and bake directly from the freezer, adding a minute or two to the baking time.
What can I serve with these cookies?
These festive cookies pair wonderfully with a cup of hot cocoa, coffee, or even a glass of milk. They also make a delightful addition to any holiday dessert table!
Final Thoughts
Making Christmas Pinwheel Cookies is more than just baking; it’s about creating cherished memories with loved ones. The vibrant colors and delightful flavors bring a sense of joy that fills the air with holiday spirit. As you roll, layer, and slice, you’ll find yourself immersed in the magic of the season. These cookies are perfect for sharing, gifting, or simply enjoying with a warm drink by the fire. So, gather your family, embrace the mess, and let the laughter and love flow as you create these festive treats together. Happy baking!