
Introduction to Japanese Katsu Bowls
As a busy mom, I know how challenging it can be to whip up a meal that pleases everyone. That’s where Japanese Katsu Bowls come in! This delightful dish features crispy, breaded meat served over a fluffy bed of rice, drizzled with savory tonkatsu sauce. It’s not just a meal; it’s a warm hug on a plate. Perfect for a quick weeknight dinner or a special weekend treat, these bowls are sure to impress your loved ones. Trust me, once you try this recipe, it will become a staple in your kitchen!
PrintJapanese Katsu Bowls: Discover the Secret to Perfection!
Japanese Katsu Bowls are a delicious and satisfying dish featuring crispy breaded meat served over rice with a savory sauce.
- Prep Time: 15 minutes
- Cook Time: 20 minutes
- Total Time: 35 minutes
- Yield: 2 servings
- Category: Main Course
- Method: Frying
- Cuisine: Japanese
- Diet: Gluten Free
Ingredients
- 1 cup of rice
- 2 boneless chicken breasts or pork cutlets
- 1 cup of panko breadcrumbs
- 1/2 cup of all-purpose flour
- 2 eggs
- Salt and pepper to taste
- Vegetable oil for frying
- 1/4 cup of tonkatsu sauce
- Chopped green onions for garnish
Instructions
- Cook the rice according to package instructions.
- Season the chicken or pork with salt and pepper.
- Set up a breading station with flour, beaten eggs, and panko breadcrumbs.
- Dredge the meat in flour, dip in eggs, and coat with panko breadcrumbs.
- Heat vegetable oil in a pan over medium heat and fry the breaded meat until golden brown and cooked through.
- Slice the cooked meat and place it over a bed of rice.
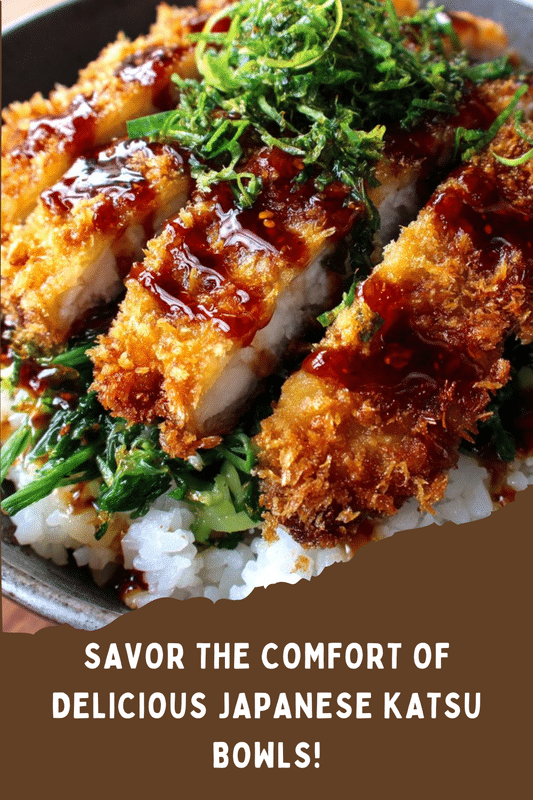
- Drizzle tonkatsu sauce over the meat and garnish with chopped green onions.
Notes
- For a vegetarian option, substitute meat with eggplant or tofu.
- Ensure the oil is hot enough before frying to achieve a crispy texture.
- Serve with pickled vegetables for added flavor.
Why You’ll Love This Japanese Katsu Bowls
Japanese Katsu Bowls are a lifesaver for busy days. They come together in just 35 minutes, making them perfect for those hectic evenings. The crispy texture of the breaded meat paired with the savory sauce creates a flavor explosion that will have your family asking for seconds. Plus, you can easily customize the ingredients to suit your family’s tastes, ensuring everyone leaves the table happy and satisfied!
Ingredients for Japanese Katsu Bowls
Gathering the right ingredients is key to making delicious Japanese Katsu Bowls. Here’s what you’ll need:
- Rice: A fluffy base for your katsu. I prefer jasmine or short-grain rice for that perfect stickiness.
- Boneless Chicken Breasts or Pork Cutlets: The star of the dish! Choose your favorite protein for that crispy coating.
- Panko Breadcrumbs: These Japanese-style breadcrumbs give your katsu that irresistible crunch. They’re lighter and crispier than regular breadcrumbs.
- All-Purpose Flour: This helps the egg adhere to the meat, creating a perfect base for the panko.
- Eggs: Beaten eggs act as a binding agent, ensuring the breadcrumbs stick well to the meat.
- Salt and Pepper: Simple seasonings that enhance the flavor of the meat. Don’t skip this step!
- Vegetable Oil: Essential for frying. Choose a neutral oil with a high smoke point, like canola or sunflower oil.
- Tonkatsu Sauce: This sweet and tangy sauce is the finishing touch that brings everything together. You can find it in most grocery stores or make your own!
- Chopped Green Onions: A fresh garnish that adds a pop of color and flavor to your bowl.
For those looking for alternatives, you can substitute the meat with eggplant or tofu for a vegetarian option. Just remember to adjust cooking times accordingly. If you want to add a little zing, serve with pickled vegetables on the side!
Exact measurements for these ingredients are available at the bottom of the article for easy printing.
How to Make Japanese Katsu Bowls
Step 1: Cook the Rice
Start by cooking your rice according to the package instructions. I love using jasmine rice for its fragrant aroma. While the rice cooks, it’s the perfect time to prep the rest of your ingredients. The fluffy rice will be the perfect canvas for your crispy katsu!
Step 2: Prepare the Meat
Next, take your boneless chicken breasts or pork cutlets and season them with salt and pepper. This simple step enhances the flavor of the meat. If you’re using chicken, make sure to pound it to an even thickness. This ensures even cooking and that delightful crunch we all crave!
Step 3: Set Up the Breading Station
Now, let’s create a breading station. You’ll need three shallow dishes: one for all-purpose flour, one for beaten eggs, and one for panko breadcrumbs. This setup makes the breading process smooth and efficient. Trust me, it’s worth the little extra effort!
Step 4: Bread the Meat
Time to bread the meat! Dredge each piece in flour first, shaking off any excess. Then, dip it into the beaten eggs, allowing the egg to coat the meat evenly. Finally, coat it with panko breadcrumbs, pressing gently to ensure they stick. This three-step process is what gives your katsu that irresistible crunch!
Step 5: Fry the Meat
Heat vegetable oil in a pan over medium heat. You want enough oil to cover the bottom of the pan, but not so much that it splashes everywhere. Once the oil is hot, carefully add the breaded meat. Fry until golden brown and cooked through, about 4-5 minutes per side. The sizzling sound is music to my ears!
Step 6: Assemble the Bowl
Once your meat is perfectly fried, slice it into strips. Place a generous scoop of rice in a bowl, then lay the sliced katsu on top. Drizzle with tonkatsu sauce and sprinkle with chopped green onions for that fresh touch. Voilà! Your Japanese Katsu Bowl is ready to be devoured!
Tips for Success
- Make sure your oil is hot enough before frying. This ensures a crispy texture.
- Don’t overcrowd the pan while frying. Fry in batches for even cooking.
- Let the fried meat rest on a paper towel to absorb excess oil.
- Experiment with different proteins or vegetables for variety.
- Serve immediately for the best texture and flavor!
Equipment Needed
- Frying Pan: A non-stick skillet works well, but a cast-iron pan gives great heat retention.
- Shallow Dishes: Use pie plates or any shallow bowls for the breading station.
- Meat Mallet: A rolling pin can substitute for pounding the meat evenly.
- Slotted Spoon: This helps in removing the fried katsu from the oil.
- Rice Cooker: If you have one, it makes cooking rice a breeze!
Variations of Japanese Katsu Bowls
- Vegetarian Katsu: Swap out the meat for eggplant or tofu. Both options absorb flavors beautifully and provide a satisfying bite.
- Spicy Katsu: Add a dash of chili powder or sriracha to the panko breadcrumbs for a spicy kick that will awaken your taste buds!
- Curry Katsu Bowl: Serve your katsu over a bed of Japanese curry instead of plain rice for a comforting twist.
- Gluten-Free Katsu: Use gluten-free breadcrumbs and flour to make this dish suitable for those with gluten sensitivities.
- Loaded Katsu Bowl: Top your katsu with shredded cabbage, pickled ginger, and a soft-boiled egg for a hearty meal.
Serving Suggestions for Japanese Katsu Bowls
- Pickled Vegetables: Serve with a side of pickled daikon or cucumbers for a refreshing crunch.
- Green Tea: Pair your meal with a warm cup of green tea to enhance the flavors.
- Presentation: Use colorful bowls and garnish with sesame seeds for an eye-catching display.
- Salad: A simple side salad with a light vinaigrette complements the richness of the katsu.
FAQs about Japanese Katsu Bowls
What is the difference between katsu and tonkatsu?
Katsu is a general term for breaded and fried meat in Japanese cuisine, while tonkatsu specifically refers to pork katsu. Both are delicious, but tonkatsu has a unique flavor profile thanks to the pork.
Can I make Japanese Katsu Bowls ahead of time?
While it’s best enjoyed fresh, you can prepare the breaded meat in advance and store it in the fridge. Just fry it right before serving for that crispy texture!
What can I serve with Japanese Katsu Bowls?
These bowls pair wonderfully with pickled vegetables, a light salad, or even a warm cup of green tea. The contrast of flavors enhances the overall experience!
Is it possible to make a gluten-free version of katsu?
Absolutely! Just use gluten-free breadcrumbs and flour. This way, you can enjoy the same crispy goodness without the gluten.
How do I store leftovers?
Store any leftover katsu in an airtight container in the fridge for up to two days. Reheat in the oven to maintain that crispy texture!
Final Thoughts
Japanese Katsu Bowls are more than just a meal; they’re a delightful experience that brings joy to the table. The crispy, golden meat paired with fluffy rice and savory sauce creates a symphony of flavors that warms the heart. I love how this dish can be customized to fit any palate, making it a family favorite. Whether it’s a busy weeknight or a special gathering, these bowls are sure to impress. So, roll up your sleeves and dive into this culinary adventure. Trust me, once you serve these, your loved ones will be asking for more!