
Introduction to Thanksgiving Brownies
As the holiday season approaches, I find myself dreaming of cozy gatherings and delicious treats. Thanksgiving brownies are the perfect way to bring a touch of sweetness to your table. These rich, fudgy delights combine the warmth of chocolate with festive spices, making them a hit with family and friends. Whether you’re a busy mom juggling work and home or a professional looking to impress, this recipe is a quick solution for a delightful dessert. Trust me, these brownies will have everyone asking for seconds!
PrintThanksgiving Brownies: A Delicious Holiday Treat to Savor!
Thanksgiving Brownies are a rich and fudgy dessert perfect for the holiday season, combining the flavors of chocolate with festive spices.
- Prep Time: 15 minutes
- Cook Time: 30 minutes
- Total Time: 45 minutes
- Yield: 24 brownies
- Category: Dessert
- Method: Baking
- Cuisine: American
- Diet: Vegetarian
Ingredients
- 1 cup unsalted butter
- 2 cups granulated sugar
- 4 large eggs
- 1 teaspoon vanilla extract
- 1 cup all-purpose flour
- 1 cup cocoa powder
- 1 teaspoon baking powder
- 1/2 teaspoon salt
- 1 cup chopped walnuts (optional)
- 1 cup chocolate chips
Instructions
- Preheat the oven to 350°F (175°C) and grease a 9×13 inch baking pan.
- In a large bowl, melt the butter and mix in the sugar until well combined.
- Add the eggs one at a time, mixing well after each addition, then stir in the vanilla extract.
- In another bowl, whisk together the flour, cocoa powder, baking powder, and salt.
- Gradually add the dry ingredients to the wet ingredients, mixing until just combined.
- Fold in the walnuts and chocolate chips if using.
- Pour the batter into the prepared baking pan and spread evenly.
- Bake for 25-30 minutes or until a toothpick inserted in the center comes out with a few moist crumbs.
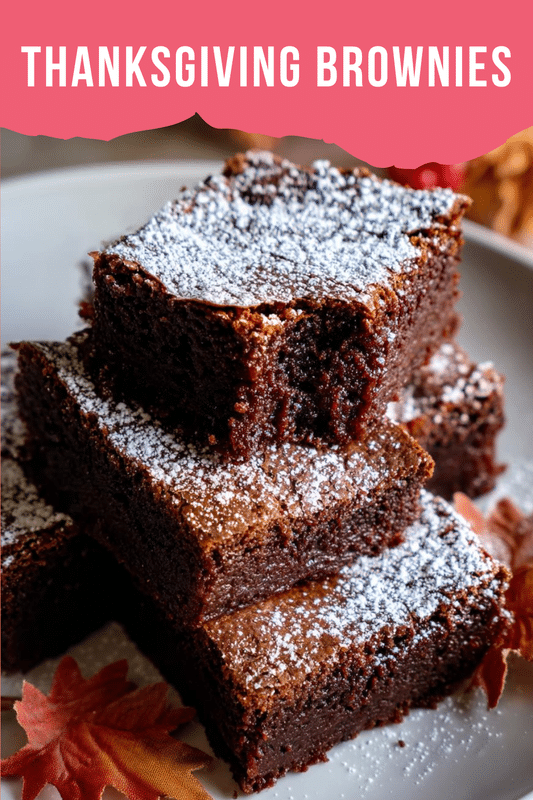
- Let cool before cutting into squares and serving.
Notes
- For a festive touch, add a sprinkle of cinnamon or nutmeg to the batter.
- These brownies can be stored in an airtight container for up to a week.
- Serve with whipped cream or ice cream for an extra treat.
Why You’ll Love This Thanksgiving Brownies
Thanksgiving brownies are not just a dessert; they’re a lifesaver for busy days. With just a few simple steps, you can whip up a batch that’s sure to impress. The rich chocolate flavor paired with festive spices creates a taste that feels like a warm hug. Plus, they’re perfect for sharing, making them an ideal treat for gatherings. You’ll love how quickly they disappear from the table!
Ingredients for Thanksgiving Brownies
Gathering the right ingredients is the first step to creating these delightful Thanksgiving brownies. Here’s what you’ll need:
- Unsalted butter: This adds richness and moisture, making your brownies fudgy.
- Granulated sugar: Sweetens the brownies and helps achieve that perfect texture.
- Large eggs: They bind everything together and contribute to the brownies’ structure.
- Vanilla extract: A splash of this adds depth and enhances the chocolate flavor.
- All-purpose flour: Provides the base for your brownies, giving them body.
- Cocoa powder: The star of the show! It brings that rich chocolate flavor we all love.
- Baking powder: A little leavening agent to help the brownies rise slightly.
- Salt: Just a pinch to balance the sweetness and enhance the flavors.
- Chopped walnuts (optional): For a delightful crunch and nutty flavor, but feel free to skip if you’re not a fan.
- Chocolate chips: These add extra gooeyness and bursts of chocolate in every bite.
For exact measurements, check the bottom of the article where you can find everything listed for easy printing. Happy baking!
How to Make Thanksgiving Brownies
Step 1: Preheat and Prepare
First things first, preheat your oven to 350°F (175°C). This ensures your Thanksgiving brownies bake evenly. While the oven warms up, grab a 9×13 inch baking pan and grease it well. You can use butter or cooking spray to prevent sticking. Trust me, you want those brownies to come out perfectly!
Step 2: Mix the Wet Ingredients
In a large bowl, melt the unsalted butter. I usually do this in the microwave for about 30 seconds. Once melted, mix in the granulated sugar until it’s well combined. Next, add the eggs one at a time, stirring after each addition. Finally, stir in the vanilla extract. This mixture should be smooth and creamy, like a warm hug!
Step 3: Combine the Dry Ingredients
In another bowl, whisk together the all-purpose flour, cocoa powder, baking powder, and salt. This step is crucial for evenly distributing the leavening agent and cocoa. It also helps to avoid any lumps in your batter. Just imagine the rich chocolate flavor waiting to burst forth!
Step 4: Combine Wet and Dry Mixtures
Now, it’s time to bring it all together! Gradually add the dry ingredients to the wet mixture. Stir gently until just combined. Be careful not to overmix; we want those brownies to stay fudgy and delicious. The batter should be thick and luscious, ready for the next step!
Step 5: Add Nuts and Chocolate Chips
If you’re using walnuts, fold them into the batter along with the chocolate chips. This adds a delightful crunch and extra chocolatey goodness. I love the way the chocolate chips melt into the batter, creating pockets of gooeyness. It’s pure bliss in every bite!
Step 6: Bake the Brownies
Pour the brownie batter into your prepared baking pan, spreading it evenly. Pop it into the preheated oven and bake for 25-30 minutes. Keep an eye on them! You want a toothpick inserted in the center to come out with a few moist crumbs. That’s the sign of a perfect brownie!
Step 7: Cool and Serve
Once baked, remove the brownies from the oven and let them cool in the pan. After about 10-15 minutes, transfer them to a wire rack to cool completely. Once cooled, cut them into squares. Serve them warm or at room temperature, and watch them disappear!
Tips for Success
- Use room temperature eggs for better mixing and texture.
- Don’t overmix the batter; it keeps your brownies fudgy.
- For extra flavor, add a sprinkle of cinnamon or nutmeg to the batter.
- Let the brownies cool completely before cutting for cleaner squares.
- Store leftovers in an airtight container to keep them fresh.
Equipment Needed
- 9×13 inch baking pan: A standard size for brownies; you can use a glass or metal pan.
- Mixing bowls: A large bowl for wet ingredients and a medium bowl for dry ingredients.
- Whisk: Perfect for mixing dry ingredients; a fork works in a pinch!
- Spatula: Great for folding in ingredients and spreading the batter.
- Measuring cups and spoons: Essential for accurate ingredient measurements.
Variations
- Gluten-Free: Substitute all-purpose flour with a gluten-free blend for a delicious gluten-free option.
- Nut-Free: Omit the walnuts and use chocolate chips only for a nut-free treat that everyone can enjoy.
- Mint Chocolate: Add a teaspoon of peppermint extract for a festive minty twist that pairs beautifully with chocolate.
- Pumpkin Spice: Mix in a half cup of pumpkin puree and a teaspoon of pumpkin spice for a seasonal flavor boost.
- Vegan: Replace eggs with flax eggs and use dairy-free chocolate chips for a vegan-friendly version.
Serving Suggestions
- Serve warm brownies with a scoop of vanilla ice cream for a delightful contrast.
- Top with whipped cream and a sprinkle of cinnamon for a festive touch.
- Pair with a rich cup of coffee or hot cocoa to enhance the chocolate flavor.
- For a beautiful presentation, dust with powdered sugar before serving.
FAQs about Thanksgiving Brownies
Can I make Thanksgiving brownies ahead of time?
Absolutely! You can bake these brownies a day or two in advance. Just store them in an airtight container at room temperature. They’ll stay fresh and delicious, ready to impress your guests!
How do I know when my brownies are done baking?
The best way to check is by inserting a toothpick into the center. If it comes out with a few moist crumbs, your Thanksgiving brownies are perfect! If it’s clean, they might be overbaked.
Can I freeze Thanksgiving brownies?
Yes, you can freeze them! Just wrap the cooled brownies tightly in plastic wrap and then in aluminum foil. They’ll keep well for up to three months. Thaw them at room temperature before serving.
What can I substitute for eggs in this recipe?
If you’re looking for an egg substitute, try using flax eggs. Mix one tablespoon of ground flaxseed with three tablespoons of water for each egg. Let it sit for a few minutes until it thickens. It works wonders in brownies!
Can I add other mix-ins to my brownies?
Definitely! Feel free to get creative. You can add dried fruits, different nuts, or even swirls of peanut butter for a fun twist. The possibilities are endless with Thanksgiving brownies!
Final Thoughts
As I reflect on the joy these Thanksgiving brownies bring, I can’t help but smile. They’re more than just a dessert; they’re a way to create memories with loved ones. The rich chocolate flavor, combined with festive spices, makes every bite a celebration. Whether you’re sharing them at a family gathering or enjoying a quiet moment with a cup of coffee, these brownies are sure to warm your heart. So, roll up your sleeves and dive into this delightful recipe. Trust me, your holiday season will be a little sweeter with these brownies on your table!