
Introduction to Cheesy Garlic Butter Rolls
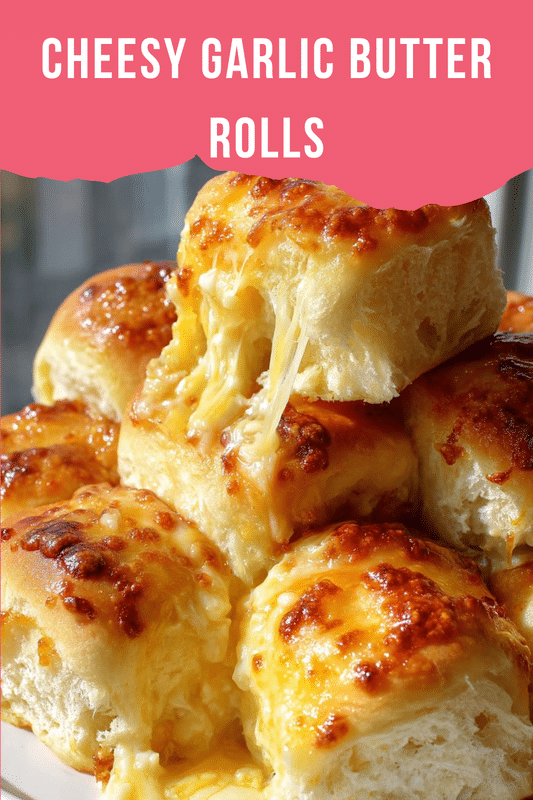
As a busy mom, I know how precious time can be, especially when it comes to meal prep. That’s why I absolutely adore these Cheesy Garlic Butter Rolls. They’re not just a treat; they’re a warm hug in bread form! Imagine fluffy rolls bursting with gooey cheese, all topped with a rich garlic butter that makes your kitchen smell divine. Whether you’re looking for a quick solution for a hectic weeknight dinner or a dish to impress your loved ones at a gathering, these rolls are the answer. Trust me, they’ll disappear faster than you can say “yum!”
PrintCheesy Garlic Butter Rolls: Discover This Easy Recipe!
Cheesy Garlic Butter Rolls are soft, fluffy rolls filled with gooey cheese and topped with a rich garlic butter mixture, perfect for any meal or as a snack.
- Prep Time: 15 minutes
- Cook Time: 20 minutes
- Total Time: 1 hour 35 minutes
- Yield: 12 rolls
- Category: Breads
- Method: Baking
- Cuisine: American
- Diet: Vegetarian
Ingredients
- 2 cups all-purpose flour
- 1 cup shredded mozzarella cheese
- 1/2 cup unsalted butter, melted
- 1/4 cup milk
- 2 tablespoons garlic, minced
- 1 tablespoon sugar
- 1 teaspoon salt
- 1 packet (2 1/4 teaspoons) active dry yeast
- 1/2 teaspoon Italian seasoning
Instructions
- In a bowl, combine warm milk and sugar, then sprinkle yeast on top and let it sit for 5 minutes.
- In a large mixing bowl, combine flour, salt, and Italian seasoning.
- Add the yeast mixture and melted butter to the flour mixture, and mix until a dough forms.
- Knead the dough on a floured surface for about 5 minutes until smooth.
- Place the dough in a greased bowl, cover, and let it rise in a warm place for 1 hour.
- Preheat the oven to 375°F (190°C).
- Once risen, punch down the dough and divide it into small balls.
- Stuff each ball with mozzarella cheese and shape them into rolls.
- Place the rolls on a baking sheet and let them rise for another 30 minutes.
- Mix melted butter with minced garlic and brush it over the rolls.
- Bake for 15-20 minutes or until golden brown.
- Serve warm and enjoy!
Notes
- For extra flavor, add herbs like parsley or oregano to the garlic butter.
- These rolls can be frozen after baking; reheat in the oven before serving.
- Adjust the amount of cheese based on your preference.
Why You’ll Love This Cheesy Garlic Butter Rolls
These Cheesy Garlic Butter Rolls are a game-changer for any busy kitchen. They’re incredibly easy to whip up, taking just over an hour from start to finish. The taste? Oh, it’s like a flavor explosion in your mouth! Soft, fluffy, and cheesy, they pair perfectly with any meal or can be enjoyed as a snack. Plus, they’re a hit with kids and adults alike, making them a family favorite!
Ingredients for Cheesy Garlic Butter Rolls
Gathering the right ingredients is the first step to creating these delightful Cheesy Garlic Butter Rolls. Here’s what you’ll need:
- All-purpose flour: The backbone of your rolls, giving them that soft, fluffy texture.
- Shredded mozzarella cheese: This gooey goodness is what makes these rolls irresistibly cheesy.
- Unsalted butter: Melted butter adds richness and flavor, making every bite heavenly.
- Milk: Warm milk helps activate the yeast and keeps the rolls moist.
- Garlic: Minced garlic infuses the rolls with a savory aroma that’s simply mouthwatering.
- Sugar: Just a touch to help activate the yeast and balance the flavors.
- Salt: Essential for enhancing the overall taste of the rolls.
- Active dry yeast: This little powerhouse makes your rolls rise and become fluffy.
- Italian seasoning: A sprinkle of this adds a delightful herbaceous note to the rolls.
Feel free to get creative! You can add herbs like parsley or oregano to the garlic butter for an extra flavor kick. If you’re looking for a lighter option, consider using whole wheat flour instead of all-purpose. And remember, the exact quantities are listed at the bottom of the article for easy printing!
How to Make Cheesy Garlic Butter Rolls
Now that you have your ingredients ready, let’s dive into the fun part: making these Cheesy Garlic Butter Rolls! Follow these simple steps, and you’ll have warm, cheesy goodness in no time.
Step 1: Prepare the Yeast Mixture
Start by combining warm milk and sugar in a bowl. The warmth helps activate the yeast, so make sure it’s not too hot! Once mixed, sprinkle the yeast on top and let it sit for about 5 minutes. You’ll see it start to bubble, which means it’s working its magic!
Step 2: Mix Dry Ingredients
In a large mixing bowl, combine the all-purpose flour, salt, and Italian seasoning. This blend is the foundation of your rolls, giving them that delightful flavor. Stir it well to ensure everything is evenly distributed.
Step 3: Combine Wet and Dry Ingredients
Now, it’s time to bring it all together! Add the yeast mixture and melted butter to the flour mixture. Mix until a dough forms. It might be a bit sticky at first, but don’t worry; that’s normal!
Step 4: Knead the Dough
Transfer the dough to a floured surface and knead it for about 5 minutes. You want it to be smooth and elastic. Think of it as giving your dough a little workout! This step is crucial for that fluffy texture.
Step 5: Let the Dough Rise
Place the kneaded dough in a greased bowl and cover it with a clean kitchen towel. Let it rise in a warm place for about 1 hour. This is when the dough will double in size, so be patient—it’s worth it!
Step 6: Preheat the Oven
While the dough is rising, preheat your oven to 375°F (190°C). This ensures that your rolls will bake evenly and come out perfectly golden brown.
Step 7: Shape the Rolls
Once the dough has risen, punch it down gently to release the air. Divide it into small balls, about the size of a golf ball. Now, here’s the fun part: stuff each ball with mozzarella cheese and shape them into rolls. Make sure the cheese is well-sealed inside!
Step 8: Second Rise
Place the shaped rolls on a baking sheet lined with parchment paper. Cover them again and let them rise for another 30 minutes. This second rise is key to achieving that fluffy texture we all love.
Step 9: Prepare Garlic Butter
While the rolls are rising, mix the melted butter with minced garlic in a small bowl. This garlic butter will be brushed over the rolls, adding that irresistible flavor. You can even add some herbs for an extra kick!
Step 10: Bake the Rolls
Finally, it’s time to bake! Brush the garlic butter over the rolls and pop them in the oven. Bake for 15-20 minutes or until they’re golden brown and your kitchen smells heavenly. Trust me, you won’t be able to resist!
Tips for Success
- Make sure your milk is warm, not hot, to activate the yeast properly.
- Don’t skip the second rise; it’s essential for fluffy rolls.
- Experiment with different cheeses like cheddar or pepper jack for a twist.
- Brush the garlic butter generously for maximum flavor.
- Store any leftovers in an airtight container to keep them fresh.
Equipment Needed
- Mixing bowls: A large bowl for mixing dough and a smaller one for the yeast mixture.
- Measuring cups and spoons: Essential for accurate ingredient measurements.
- Rolling pin: Optional, but helpful for shaping the dough.
- Baking sheet: A standard sheet works perfectly for baking the rolls.
- Parchment paper: Great for easy cleanup and preventing sticking.
Variations of Cheesy Garlic Butter Rolls
- Herb-Infused Rolls: Add fresh herbs like rosemary or thyme to the dough for an aromatic twist.
- Spicy Kick: Mix in some crushed red pepper flakes or jalapeños for a spicy version that packs a punch.
- Cheese Lovers: Experiment with different cheeses like cheddar, gouda, or feta for unique flavors.
- Whole Wheat Option: Substitute half of the all-purpose flour with whole wheat flour for a healthier alternative.
- Vegan Version: Use plant-based butter and dairy-free cheese to create a delicious vegan-friendly roll.
Serving Suggestions for Cheesy Garlic Butter Rolls
- Pair with Soup: These rolls are perfect alongside a warm bowl of tomato or minestrone soup.
- Salad Side: Serve with a fresh garden salad for a balanced meal.
- Presentation: Arrange rolls in a basket lined with a cloth for a cozy touch.
- Dip Options: Offer marinara or garlic dipping sauce for extra flavor.
FAQs about Cheesy Garlic Butter Rolls
As you embark on your journey to make these delightful Cheesy Garlic Butter Rolls, you might have a few questions. Here are some common queries I’ve encountered, along with helpful answers!
Can I make the dough ahead of time?
Absolutely! You can prepare the dough and let it rise, then refrigerate it overnight. Just bring it back to room temperature before shaping and baking.
What can I use instead of mozzarella cheese?
If mozzarella isn’t your favorite, feel free to swap it out for cheddar, gouda, or even a spicy pepper jack for a kick!
How do I store leftover rolls?
Store any leftover Cheesy Garlic Butter Rolls in an airtight container at room temperature for up to 2 days. For longer storage, freeze them and reheat in the oven.
Can I add more garlic to the butter?
Of course! If you love garlic, don’t hold back. Just remember, a little goes a long way, so adjust to your taste!
Are these rolls suitable for freezing?
Yes! These rolls freeze beautifully. Just bake them, let them cool, and then store in a freezer-safe bag. Reheat in the oven when you’re ready to enjoy!
Final Thoughts
Making Cheesy Garlic Butter Rolls is more than just baking; it’s about creating moments of joy in your kitchen. The aroma wafting through your home as they bake is simply irresistible. These rolls are perfect for family dinners, gatherings, or even a cozy night in. Each bite is a delightful combination of soft bread and gooey cheese, making them a true comfort food. I hope you find as much happiness in making and sharing these rolls as I do. So, roll up your sleeves, and let’s get baking—your taste buds will thank you!