
Introduction to Classic Beef Wellington
Ah, the allure of a Classic Beef Wellington! This dish is like a warm hug on a plate, perfect for those special moments when you want to impress your loved ones. I remember the first time I made it; the aroma filled my kitchen, and my family couldn’t wait to dig in. It’s not just a meal; it’s an experience. Whether you’re celebrating a birthday or just want to elevate a weeknight dinner, this recipe is your go-to. Trust me, with a little love and patience, you can create a masterpiece that will leave everyone asking for seconds!
PrintClassic Beef Wellington: Discover the Perfect Recipe!
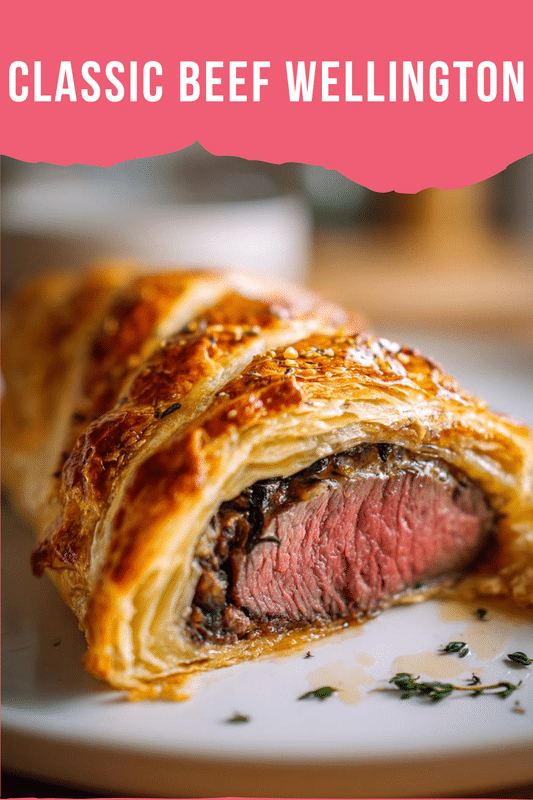
Classic Beef Wellington is a luxurious dish featuring tender beef fillet coated with mushroom duxelles and wrapped in flaky puff pastry, perfect for special occasions.
- Prep Time: 30 minutes
- Cook Time: 30 minutes
- Total Time: 1 hour
- Yield: 4 servings
- Category: Main Course
- Method: Baking
- Cuisine: British
- Diet: Gluten Free
Ingredients
- 1.5 lbs beef tenderloin
- 8 oz mushrooms, finely chopped
- 4 oz pâté (optional)
- 1 sheet puff pastry
- 1 egg, beaten (for egg wash)
- 2 tbsp Dijon mustard
- Salt and pepper to taste
- Olive oil for searing
Instructions
- Preheat the oven to 400°F (200°C).
- Season the beef tenderloin with salt and pepper, then sear it in a hot pan with olive oil until browned on all sides.
- Remove the beef and let it cool, then brush it with Dijon mustard.
- In the same pan, sauté the chopped mushrooms until all moisture has evaporated, then let cool.
- If using, spread the pâté over the beef, then layer the mushroom mixture on top.
- Roll out the puff pastry and wrap it around the beef, sealing the edges.
- Brush the pastry with beaten egg and make a few slits on top for steam to escape.
- Bake in the preheated oven for 25-30 minutes or until the pastry is golden brown.
- Let it rest for 10 minutes before slicing and serving.
Notes
- Ensure the beef is at room temperature before cooking for even cooking.
- Use a meat thermometer to check for desired doneness.
- Serve with a red wine sauce for added flavor.
Why You’ll Love This Classic Beef Wellington
This Classic Beef Wellington is not just a dish; it’s a culinary adventure that brings joy to your table. It’s surprisingly easy to make, even for busy moms like us! The flaky puff pastry envelops tender beef, creating a delightful contrast of textures. Plus, it’s a showstopper that will impress your guests without spending hours in the kitchen. You’ll love how it transforms an ordinary meal into something extraordinary!
Ingredients for Classic Beef Wellington
Gathering the right ingredients is the first step to creating your Classic Beef Wellington masterpiece. Here’s what you’ll need:
- Beef Tenderloin: The star of the show! This cut is tender and flavorful, making it perfect for a special occasion.
- Mushrooms: Finely chopped mushrooms create a rich, earthy flavor in the duxelles. They add depth and moisture to the dish.
- Pâté (optional): A luxurious addition that enhances the flavor. If you’re feeling adventurous, try a mushroom or liver pâté for an extra kick!
- Puff Pastry: This flaky pastry wraps everything together, creating a beautiful golden crust. You can find it in the freezer section of your grocery store.
- Egg: Beaten for an egg wash, it gives the pastry that gorgeous golden color when baked.
- Dijon Mustard: A tangy layer that adds a zesty kick to the beef. It’s a small but mighty ingredient!
- Salt and Pepper: Essential for seasoning. Don’t skip these; they elevate the flavors of the dish.
- Olive Oil: Used for searing the beef, it helps lock in the juices and adds a lovely richness.
For exact measurements, check the bottom of the article where you can find everything listed for easy printing. Happy cooking!
How to Make Classic Beef Wellington
Now that you have your ingredients ready, let’s dive into the steps to create your Classic Beef Wellington. Each step is crucial, so let’s take it one delicious bite at a time!
Step 1: Preheat the Oven
First things first, preheat your oven to 400°F (200°C). Preheating is essential because it ensures that your puff pastry bakes evenly and achieves that perfect golden color. Trust me, you want that flaky crust to shine!
Step 2: Season and Sear the Beef
Next, season your beef tenderloin generously with salt and pepper. This simple step enhances the flavor immensely. Heat a pan over medium-high heat and add a splash of olive oil. Sear the beef for about 2-3 minutes on each side until it’s beautifully browned. This locks in the juices and creates a lovely crust.
Step 3: Cool and Brush with Mustard
Once your beef is seared, remove it from the pan and let it cool for a few minutes. This cooling period is crucial; it prevents the puff pastry from getting soggy. After it cools, brush a generous layer of Dijon mustard over the beef. This adds a zesty kick that elevates the flavor!
Step 4: Prepare the Mushroom Duxelles
In the same pan, add your finely chopped mushrooms. Sauté them over medium heat until all the moisture evaporates, about 5-7 minutes. This step is vital; excess moisture can ruin your pastry. Once they’re dry, let them cool before moving on.
Step 5: Assemble the Wellington
If you’re using pâté, spread a thin layer over the cooled beef. Then, layer the sautéed mushrooms on top. This combination creates a rich flavor profile that’s simply irresistible. Make sure everything is evenly spread for a balanced bite!
Step 6: Wrap in Puff Pastry
Now, roll out your puff pastry on a floured surface. Carefully wrap it around the beef, ensuring it’s snug but not too tight. Seal the edges by pressing them together. This is where the magic happens; the pastry will encase all those delicious flavors!
Step 7: Egg Wash and Venting
Brush the wrapped pastry with the beaten egg. This gives it that gorgeous golden hue when baked. Don’t forget to make a few slits on top for steam to escape. This prevents the pastry from getting soggy and ensures a crispy finish!
Step 8: Bake to Perfection
Place your Wellington in the preheated oven and bake for 25-30 minutes. Keep an eye on it; you want the pastry to be golden brown and flaky. If you have a meat thermometer, check for an internal temperature of 130°F (54°C) for medium-rare.
Step 9: Rest and Serve
Once baked, let your Classic Beef Wellington rest for about 10 minutes. This resting period allows the juices to redistribute, making each slice tender and juicy. Now, slice it up and serve it with pride!
Tips for Success
- Always let the beef come to room temperature before cooking for even doneness.
- Use a sharp knife to slice the Wellington for clean, beautiful pieces.
- Don’t rush the cooling process; it’s key to keeping the pastry crisp.
- Experiment with different mushrooms for unique flavors in your duxelles.
- Pair with a rich red wine sauce for an extra touch of elegance.
Equipment Needed
- Skillet: A heavy-bottomed skillet is ideal for searing. A non-stick pan works too!
- Oven: A conventional oven is perfect, but a toaster oven can work in a pinch.
- Rolling Pin: Essential for rolling out puff pastry. A wine bottle can substitute in a hurry!
- Meat Thermometer: Helps ensure perfect doneness. If you don’t have one, just cut into the beef to check.
Variations of Classic Beef Wellington
- Vegetarian Wellington: Substitute the beef with a hearty mixture of roasted vegetables, lentils, and nuts for a delicious plant-based option.
- Chicken Wellington: Use chicken breast instead of beef for a lighter twist. Pair it with spinach and cream cheese for added flavor.
- Herbed Mushroom Duxelles: Experiment with different herbs like thyme or rosemary in your mushroom mixture for a fresh, aromatic touch.
- Spicy Beef Wellington: Add a touch of heat by mixing in some chopped jalapeños or a dash of hot sauce into the mushroom duxelles.
- Gluten-Free Wellington: Use gluten-free puff pastry to make this dish suitable for those with gluten sensitivities.
Serving Suggestions for Classic Beef Wellington
- Side Dishes: Pair with creamy mashed potatoes or roasted seasonal vegetables for a comforting meal.
- Salad: A fresh arugula salad with a light vinaigrette adds a refreshing contrast.
- Wine: Serve with a bold red wine, like Cabernet Sauvignon, to complement the rich flavors.
- Presentation: Slice the Wellington and arrange on a platter with sprigs of fresh herbs for an elegant touch.
FAQs about Classic Beef Wellington
Can I make Classic Beef Wellington ahead of time?
Absolutely! You can prepare the beef and mushroom duxelles a day in advance. Just wrap the assembled Wellington in plastic wrap and refrigerate. Bake it fresh when you’re ready to serve!
What can I serve with Classic Beef Wellington?
Classic Beef Wellington pairs beautifully with creamy mashed potatoes, roasted vegetables, or a fresh salad. A rich red wine sauce also enhances the flavors wonderfully!
How do I know when the beef is cooked perfectly?
Using a meat thermometer is the best way to check. Aim for an internal temperature of 130°F (54°C) for medium-rare. If you prefer it more done, adjust accordingly.
Can I use a different type of meat?
Yes! While beef is traditional, you can experiment with chicken or even a hearty vegetable mix for a vegetarian Wellington. Just adjust cooking times as needed.
What if my puff pastry tears while wrapping?
No worries! You can patch it up with a little extra pastry. Just make sure to seal it well to keep all those delicious juices inside!
Final Thoughts
Creating a Classic Beef Wellington is more than just cooking; it’s about crafting memories around the dinner table. The joy of watching your loved ones savor each bite is truly priceless. This dish transforms an ordinary evening into a celebration, filling your home with warmth and laughter. Plus, it’s a fantastic way to showcase your culinary skills without spending all day in the kitchen. So, roll up your sleeves, embrace the process, and enjoy the delightful aroma wafting through your home. Trust me, this recipe will become a cherished favorite in your family for years to come!