

Introduction to Dessert Charcuterie Board
As a busy mom, I know how challenging it can be to whip up something special for gatherings. That’s where a dessert charcuterie board comes in! This delightful arrangement of sweet treats is not only visually stunning but also incredibly easy to assemble. Imagine a colorful spread of chocolates, fruits, and pastries that will impress your guests without keeping you in the kitchen for hours. Whether it’s a birthday party, a holiday gathering, or just a cozy family night, this dessert charcuterie board is the perfect solution to satisfy everyone’s sweet tooth while allowing you to enjoy the moment.
PrintDessert charcuterie board: Creative ideas to impress!
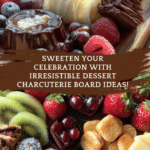
A dessert charcuterie board is a delightful and visually appealing arrangement of various sweet treats, perfect for impressing guests at any gathering.
- Prep Time: 20 minutes
- Cook Time: 0 minutes
- Total Time: 20 minutes
- Yield: Serves 8-10
- Category: Dessert
- Method: No-cook
- Cuisine: American
- Diet: Vegetarian
Ingredients
- Assorted chocolates (dark, milk, white)
- Fresh fruits (strawberries, blueberries, grapes)
- Cookies (variety of flavors)
- Brownies or blondies
- Mini pastries (eclairs, macarons)
- Nuts (almonds, walnuts)
- Dried fruits (apricots, figs)
- Cheesecake bites
- Caramel and chocolate sauces for dipping
Instructions
- Choose a large wooden or marble board as the base.
- Start by placing larger items like brownies and mini pastries in clusters.
- Add assorted chocolates around the larger items.
- Fill in gaps with fresh fruits and dried fruits for color.
- Arrange cookies in a decorative manner.
- Include small bowls for sauces and dips.
- Sprinkle nuts around the board for added texture.
- Finish with a few decorative touches like edible flowers or mint leaves.
Notes
- Consider dietary restrictions when selecting ingredients.
- Use seasonal fruits for the best flavor and presentation.
- Mix textures for a more interesting board.
- Label items if serving to a large group.
Why You’ll Love This Dessert Charcuterie Board
This dessert charcuterie board is a game-changer for busy lives. It’s quick to prepare, taking just 20 minutes, and requires no cooking at all! You can customize it to fit any occasion or dietary preference, making it versatile and fun. Plus, the vibrant colors and variety of textures create an eye-catching centerpiece that will have everyone reaching for more. It’s a sweet treat that brings joy without the stress!
Ingredients for Dessert Charcuterie Board
Creating a stunning dessert charcuterie board is all about variety and color. Here’s what you’ll need:
- Assorted chocolates: Dark, milk, and white chocolates add richness and sweetness. Choose your favorites for a personal touch.
- Fresh fruits: Strawberries, blueberries, and grapes not only provide a burst of color but also a refreshing contrast to the sweets.
- Cookies: A variety of flavors, like chocolate chip, oatmeal raisin, or sugar cookies, will cater to different tastes.
- Brownies or blondies: These fudgy treats are a must for any dessert board, offering a chewy texture that everyone loves.
- Mini pastries: Eclairs and macarons bring elegance and a touch of sophistication to your board.
- Nuts: Almonds and walnuts add crunch and a savory element, balancing the sweetness of the other treats.
- Dried fruits: Apricots and figs provide a chewy texture and a concentrated sweetness that complements the fresh fruits.
- Cheesecake bites: These little gems are creamy and decadent, perfect for those who adore cheesecake.
- Caramel and chocolate sauces: These are essential for dipping, adding an extra layer of indulgence to your sweet treats.
Feel free to mix and match based on what you have on hand or what’s in season. For example, you can swap out strawberries for raspberries or use pecans instead of walnuts. The possibilities are endless! For exact quantities, check the bottom of the article where you can find a printable version.
How to Make Dessert Charcuterie Board
Step 1: Choose Your Board
Start by selecting a large wooden or marble board. This will be your canvas for creating a beautiful dessert charcuterie board. A round or rectangular shape works well. Make sure it’s big enough to hold all your sweet treats without looking overcrowded.
Step 2: Arrange Larger Items
Begin by placing larger items like brownies and mini pastries in clusters. This creates a solid foundation for your board. Grouping them together makes it visually appealing and gives your guests a focal point. Think of it as building a sweet mountain!
Step 3: Add Assorted Chocolates
Next, fill in the spaces around the larger items with assorted chocolates. Dark, milk, and white chocolates not only add flavor but also create a colorful contrast. Scatter them around like little treasures waiting to be discovered.
Step 4: Fill in with Fresh and Dried Fruits
Now, it’s time to add fresh fruits like strawberries, blueberries, and grapes. These vibrant colors will brighten up your board. Don’t forget the dried fruits, too! Apricots and figs add a chewy texture that complements the fresh fruits beautifully.
Step 5: Decorate with Cookies
Arrange your cookies in a decorative manner. You can stack them or lay them flat. A variety of flavors will cater to everyone’s taste buds. Plus, they add a fun element to your dessert charcuterie board!
Step 6: Include Dipping Sauces
Incorporate small bowls for caramel and chocolate sauces. These are essential for dipping and will elevate your dessert experience. Place them strategically around the board for easy access. Your guests will love the extra indulgence!
Step 7: Sprinkle Nuts for Texture
Now, sprinkle nuts like almonds and walnuts around the board. They add a delightful crunch and a savory contrast to the sweetness. This little touch makes a big difference in texture and flavor.
Step 8: Final Touches
Finish your dessert charcuterie board with a few decorative touches. Edible flowers or fresh mint leaves can add a pop of color and elegance. Step back and admire your creation! It’s not just a dessert; it’s a work of art.
Tips for Success
- Use seasonal fruits for the best flavor and presentation.
- Mix textures—combine crunchy, chewy, and creamy elements for a delightful experience.
- Label items if serving to a large group, so everyone knows what to expect.
- Don’t be afraid to get creative! Personalize your board with family favorites.
- Prepare ingredients ahead of time to make assembly a breeze.
Equipment Needed
- Large board: A wooden or marble board works best, but a large platter or tray can also do the trick.
- Small bowls: Use these for sauces; ramekins or even muffin tins can be great alternatives.
- Serving utensils: Tongs or small spoons for easy serving.
Variations
- Gluten-free: Use gluten-free cookies and brownies to accommodate those with dietary restrictions.
- Vegan: Opt for dairy-free chocolates and plant-based desserts like coconut macaroons for a vegan-friendly board.
- Nut-free: Replace nuts with seeds like pumpkin or sunflower seeds for a crunchy texture without allergens.
- Seasonal themes: Incorporate seasonal fruits like peaches in summer or apples in fall for a fresh twist.
- Chocolate lovers: Add chocolate-covered strawberries or truffles for an extra indulgent experience.
Serving Suggestions
- Pair your dessert charcuterie board with a selection of herbal teas for a refreshing touch.
- Offer sparkling water with fresh fruit slices for a fun, festive drink option.
- Consider serving alongside a cheese platter for a delightful contrast of flavors.
- Use decorative napkins and plates to enhance the presentation.
- Set the board on a colorful tablecloth to make it pop!
FAQs about Dessert Charcuterie Board
What is a dessert charcuterie board?
A dessert charcuterie board is a delightful arrangement of various sweet treats, perfect for gatherings. It typically includes chocolates, fruits, cookies, and more, all beautifully presented to impress your guests.
How do I keep the fruits fresh on the board?
To keep your fresh fruits looking vibrant, wash and dry them just before serving. You can also use a little lemon juice on cut fruits to prevent browning. This way, they’ll stay fresh and appealing throughout your event.
Can I make a dessert charcuterie board ahead of time?
Absolutely! You can prepare most of the ingredients a few hours in advance. Just assemble the board right before serving to ensure everything looks fresh and inviting. This is a great time-saver for busy moms!
What are some good dipping sauces for the board?
Caramel and chocolate sauces are classic choices, but you can also try peanut butter or a fruit compote for a unique twist. These sauces add an extra layer of indulgence to your dessert charcuterie board.
How can I customize the board for dietary restrictions?
Consider using gluten-free cookies, dairy-free chocolates, or nut-free options to accommodate various dietary needs. Personalizing your dessert charcuterie board ensures everyone can enjoy the sweet treats!
Final Thoughts
Creating a dessert charcuterie board is more than just assembling sweet treats; it’s about bringing joy to your gatherings. The smiles on your loved ones’ faces as they indulge in a colorful array of goodies are priceless. This delightful board allows you to express your creativity while keeping things simple and stress-free. Whether it’s a family celebration or a casual get-together, this dessert charcuterie board is sure to be a hit. So, gather your favorite sweets, let your imagination run wild, and enjoy the sweet moments with those you cherish most!