
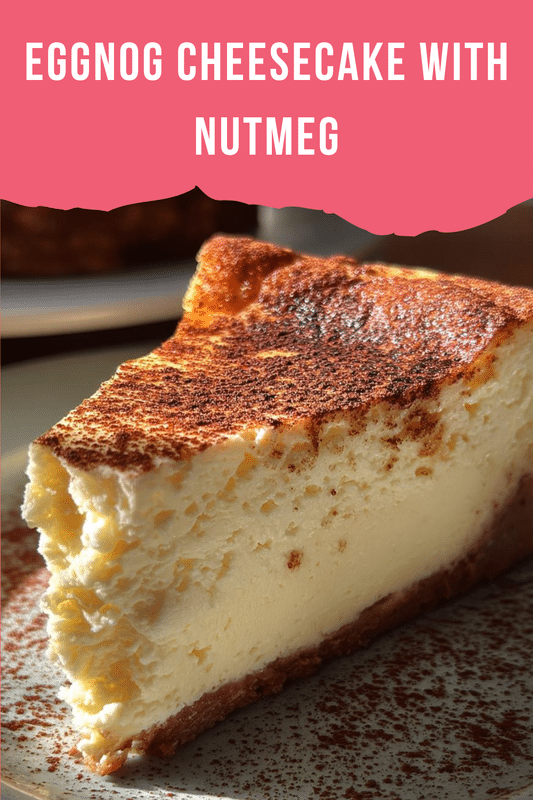
Introduction to Eggnog Cheesecake with Nutmeg
As the holiday season approaches, I find myself dreaming of cozy gatherings and sweet treats. One dessert that never fails to impress is my Eggnog Cheesecake with Nutmeg. This creamy delight is not just a feast for the eyes; it’s a quick solution for busy days when you want to whip up something special. With its rich flavors and festive aroma, it’s sure to become a favorite at your holiday table. Plus, it’s a wonderful way to share the warmth of the season with loved ones, making every bite a cherished memory.
PrintEggnog Cheesecake with Nutmeg: A Festive Delight Awaits!
A creamy and rich eggnog cheesecake infused with nutmeg, perfect for the holiday season.
- Prep Time: 20 minutes
- Cook Time: 60 minutes
- Total Time: 4 hours 20 minutes
- Yield: 12 servings
- Category: Dessert
- Method: Baking
- Cuisine: American
- Diet: Vegetarian
Ingredients
- 1 ½ cups graham cracker crumbs
- ½ cup unsalted butter, melted
- 2 cups cream cheese, softened
- 1 cup granulated sugar
- 3 large eggs
- 1 cup eggnog
- 1 teaspoon vanilla extract
- 1 teaspoon ground nutmeg
- ½ teaspoon ground cinnamon
Instructions
- Preheat the oven to 325°F (160°C).
- In a bowl, mix graham cracker crumbs and melted butter until combined.
- Press the mixture into the bottom of a springform pan to form the crust.
- In a large mixing bowl, beat the cream cheese and sugar until smooth.
- Add the eggs one at a time, mixing well after each addition.
- Stir in the eggnog, vanilla extract, nutmeg, and cinnamon until fully combined.
- Pour the cheesecake filling over the crust in the springform pan.
- Bake for 50-60 minutes or until the center is set.
- Allow to cool, then refrigerate for at least 4 hours before serving.
Notes
- For a stronger nutmeg flavor, add more nutmeg to taste.
- Serve with whipped cream and a sprinkle of nutmeg on top.
- This cheesecake can be made a day in advance for better flavor.
Why You’ll Love This Eggnog Cheesecake with Nutmeg
This Eggnog Cheesecake with Nutmeg is a delightful blend of ease and flavor. It comes together quickly, making it perfect for busy moms and professionals like us. The creamy texture and warm spices create a comforting dessert that feels like a hug in every bite. Plus, it’s a showstopper at holiday gatherings, ensuring you’ll impress your guests without spending hours in the kitchen. What’s not to love?
Ingredients for Eggnog Cheesecake with Nutmeg
Gathering the right ingredients is the first step to creating this festive Eggnog Cheesecake with Nutmeg. Here’s what you’ll need:
- Graham cracker crumbs: These form the base of your cheesecake crust, providing a sweet and crunchy texture.
- Unsalted butter: Melted butter binds the crumbs together, adding richness to the crust.
- Cream cheese: The star of the show! It gives the cheesecake its creamy, smooth texture.
- Granulated sugar: This sweetens the filling, balancing the flavors beautifully.
- Eggs: They help set the cheesecake, giving it that perfect sliceable consistency.
- Eggnog: The key ingredient that infuses the cheesecake with holiday flavor. You can use store-bought or homemade!
- Vanilla extract: A splash of vanilla enhances the overall flavor, making it even more delightful.
- Ground nutmeg: This spice adds warmth and a hint of holiday cheer. Feel free to adjust the amount to your taste!
- Ground cinnamon: A touch of cinnamon complements the nutmeg, creating a cozy flavor profile.
For those looking to customize, consider using gluten-free graham crackers for a gluten-free version. You can also swap out the eggnog for a dairy-free alternative if needed. The exact quantities for each ingredient are listed at the bottom of the article, ready for printing!
How to Make Eggnog Cheesecake with Nutmeg
Now that you have your ingredients ready, let’s dive into the delightful process of making this Eggnog Cheesecake with Nutmeg. Follow these simple steps, and you’ll have a festive dessert that will wow your family and friends!
Step 1: Preheat the Oven
First things first, preheat your oven to 325°F (160°C). Preheating is crucial because it ensures even baking. If you skip this step, your cheesecake might not set properly, leaving you with a gooey mess instead of a creamy delight. Trust me, a well-preheated oven is your best friend in baking!
Step 2: Prepare the Crust
In a mixing bowl, combine your graham cracker crumbs and melted butter. Stir until the crumbs are fully coated. This mixture should resemble wet sand. Now, press it firmly into the bottom of a springform pan. Don’t be shy—pressing it down well creates a sturdy base for your cheesecake. A good crust is the foundation of a great dessert!
Step 3: Make the Cheesecake Filling
In a large mixing bowl, beat the softened cream cheese and granulated sugar together until smooth. This step is key for a creamy texture. Next, add the eggs one at a time, mixing well after each addition. Then, stir in the eggnog, vanilla extract, ground nutmeg, and cinnamon. Mix until everything is fully combined. The aroma will be heavenly, and you’ll know you’re on the right track!
Step 4: Assemble and Bake
Pour the luscious cheesecake filling over your prepared crust in the springform pan. Spread it evenly with a spatula. Now, it’s time to bake! Place the pan in the preheated oven and bake for 50-60 minutes. You’ll know it’s done when the center is set but still slightly jiggly. This ensures a creamy texture that melts in your mouth!
Step 5: Cooling and Refrigeration
Once baked, remove the cheesecake from the oven and let it cool at room temperature. This cooling process is essential to prevent cracks. After it’s cooled, refrigerate the cheesecake for at least 4 hours, or overnight if you can wait! Refrigeration allows the flavors to meld beautifully, making each bite even more delicious. Trust me, the wait is worth it!
Tips for Success
- Use room temperature cream cheese for a smoother filling.
- Don’t overmix the batter; mix just until combined to avoid cracks.
- For a festive touch, garnish with whipped cream and a sprinkle of nutmeg.
- Let the cheesecake cool completely before refrigerating for best results.
- Consider making it a day ahead; the flavors deepen overnight!
Equipment Needed
- Springform pan: Essential for easy removal. A regular cake pan works too, but slicing may be trickier.
- Mixing bowls: Use a large bowl for the filling and a smaller one for the crust.
- Electric mixer: A hand mixer or stand mixer makes beating the cream cheese a breeze.
- Spatula: Perfect for spreading the filling evenly over the crust.
- Measuring cups and spoons: Accurate measurements ensure the best results!
Variations
- Chocolate Eggnog Cheesecake: Add melted chocolate to the filling for a rich twist on the classic flavor.
- Nut-Free Option: Substitute the graham cracker crust with a nut-free cookie or a simple shortbread crust.
- Dairy-Free Version: Use dairy-free cream cheese and coconut or almond milk eggnog for a delicious alternative.
- Spiced Rum Infusion: Add a splash of spiced rum to the filling for an adult version that enhances the holiday spirit.
- Fruit Topping: Top with caramelized pears or cranberries for a festive and fruity finish.
Serving Suggestions
- Pair with a dollop of freshly whipped cream for added richness.
- Serve alongside a warm cup of spiced chai or hot cocoa for a cozy touch.
- Garnish with a sprinkle of nutmeg or cinnamon for a festive presentation.
- Consider adding a side of gingerbread cookies for a delightful contrast.
- For a touch of elegance, serve on a decorative platter with seasonal fruits.
FAQs about Eggnog Cheesecake with Nutmeg
Can I use store-bought eggnog for this recipe?
Absolutely! Store-bought eggnog works perfectly in this Eggnog Cheesecake with Nutmeg. Just make sure to choose a brand you enjoy, as it will influence the flavor of your cheesecake.
How do I know when the cheesecake is done baking?
The cheesecake is done when the center is set but still slightly jiggly. It will firm up as it cools. A toothpick inserted into the edge should come out clean, but the center may still have a little wiggle.
Can I freeze the Eggnog Cheesecake with Nutmeg?
Yes, you can freeze it! Just wrap it tightly in plastic wrap and then in aluminum foil. It can be frozen for up to three months. Thaw it in the refrigerator overnight before serving.
What can I use instead of cream cheese?
If you’re looking for a dairy-free option, try using a dairy-free cream cheese alternative. It will give you a similar creamy texture while keeping the flavors intact.
How long does the cheesecake need to chill before serving?
For the best flavor and texture, refrigerate the cheesecake for at least 4 hours, but overnight is even better. This allows the flavors to meld beautifully, making each slice a delightful experience!
Final Thoughts
Creating this Eggnog Cheesecake with Nutmeg is more than just baking; it’s about crafting memories. The rich, creamy texture paired with the warm spices brings a sense of comfort that feels like home during the bustling holiday season. Each slice is a celebration, perfect for sharing with family and friends. I love how this dessert can transform any gathering into a festive occasion, sparking joy and laughter. So, roll up your sleeves, embrace the holiday spirit, and let this cheesecake be the star of your dessert table. Trust me, it will leave everyone asking for seconds!