
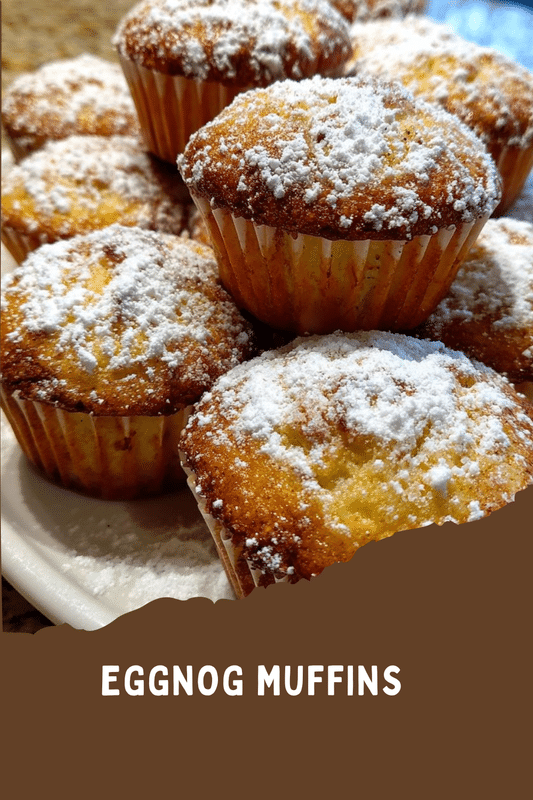
Introduction to Eggnog Muffins
As the holiday season approaches, I find myself craving the warm, cozy flavors that make this time of year so special. That’s where my Eggnog Muffins come in! These delightful treats are not just a quick solution for busy mornings; they’re a way to bring a little festive cheer into your home. Imagine the aroma of nutmeg and cinnamon wafting through your kitchen, inviting your loved ones to gather around. Whether you’re hosting a holiday brunch or simply looking for a sweet snack, these muffins are sure to impress and satisfy everyone’s taste buds!
PrintEggnog Muffins: Discover the Perfect Holiday Treat!
Eggnog Muffins are a delightful holiday treat that combines the rich flavors of eggnog with a soft, moist muffin texture, perfect for festive gatherings.
- Prep Time: 15 minutes
- Cook Time: 20 minutes
- Total Time: 35 minutes
- Yield: 12 muffins
- Category: Dessert
- Method: Baking
- Cuisine: American
- Diet: Vegetarian
Ingredients
- 2 cups all-purpose flour
- 1 cup sugar
- 1 tablespoon baking powder
- 1/2 teaspoon salt
- 1 teaspoon ground nutmeg
- 1/2 teaspoon ground cinnamon
- 1 cup eggnog
- 1/2 cup vegetable oil
- 2 large eggs
- 1 teaspoon vanilla extract
Instructions
- Preheat the oven to 350°F (175°C) and line a muffin tin with paper liners.
- In a large bowl, whisk together the flour, sugar, baking powder, salt, nutmeg, and cinnamon.
- In another bowl, mix the eggnog, vegetable oil, eggs, and vanilla extract until well combined.
- Pour the wet ingredients into the dry ingredients and stir until just combined.
- Fill each muffin cup about 2/3 full with the batter.
- Bake for 18-20 minutes or until a toothpick inserted into the center comes out clean.
- Allow the muffins to cool in the pan for 5 minutes before transferring to a wire rack to cool completely.
Notes
- For added flavor, consider adding chocolate chips or chopped nuts to the batter.
- These muffins can be stored in an airtight container for up to 3 days.
- They can also be frozen for up to 2 months.
Why You’ll Love This Eggnog Muffins
These Eggnog Muffins are a delightful blend of ease and flavor, making them perfect for busy moms and professionals alike. With just a few simple steps, you can whip up a batch in no time. The rich, festive taste of eggnog combined with warm spices will transport you to a cozy holiday gathering. Plus, they’re versatile enough to enjoy for breakfast, dessert, or as a sweet treat during the day!
Ingredients for Eggnog Muffins
Gathering the right ingredients is the first step to creating these delightful Eggnog Muffins. Here’s what you’ll need:
- All-purpose flour: This is the base of your muffins, providing structure and a soft texture.
- Sugar: Adds sweetness and helps create that lovely golden crust.
- Baking powder: A leavening agent that makes your muffins rise and become fluffy.
- Salt: Enhances the flavors and balances the sweetness.
- Ground nutmeg: A classic holiday spice that brings warmth and depth to the muffins.
- Ground cinnamon: Adds a cozy, aromatic touch that complements the eggnog perfectly.
- Eggnog: The star ingredient! It infuses the muffins with rich, creamy flavor.
- Vegetable oil: Keeps the muffins moist and tender.
- Large eggs: Provide structure and help bind the ingredients together.
- Vanilla extract: A splash of vanilla enhances the overall flavor profile.
For those looking to get creative, consider adding chocolate chips or chopped nuts for extra texture and flavor. If you’re out of eggnog, you can substitute it with milk or a dairy-free alternative, but the flavor will differ. You can find the exact quantities for each ingredient at the bottom of the article, ready for printing!
How to Make Eggnog Muffins
Making Eggnog Muffins is a delightful experience that fills your kitchen with holiday cheer. Follow these simple steps, and you’ll have a batch of warm, fluffy muffins ready to enjoy!
Step 1: Preheat the Oven
Start by preheating your oven to 350°F (175°C). This step is crucial for ensuring your muffins rise perfectly. While the oven warms up, line a muffin tin with paper liners. This makes for easy cleanup and helps the muffins release smoothly.
Step 2: Mix Dry Ingredients
In a large bowl, whisk together the all-purpose flour, sugar, baking powder, salt, nutmeg, and cinnamon. Mixing these dry ingredients well is key to achieving a uniform texture. Make sure there are no lumps, as this will help your Eggnog Muffins rise evenly.
Step 3: Combine Wet Ingredients
In another bowl, mix the eggnog, vegetable oil, eggs, and vanilla extract. Stir until everything is well combined. This mixture should be smooth and creamy, which will add moisture and flavor to your muffins. Don’t rush this step; a good mix ensures a delightful taste!
Step 4: Combine Wet and Dry Ingredients
Now, pour the wet ingredients into the dry ingredients. Gently stir until just combined. Be careful not to overmix; a few lumps are perfectly fine. Overworking the batter can lead to dense muffins, and we want them light and fluffy!
Step 5: Fill Muffin Cups
Using a spoon or a scoop, fill each muffin cup about two-thirds full with batter. This allows room for the muffins to rise without overflowing. If you’re feeling adventurous, sprinkle some chocolate chips or nuts on top for added flavor!
Step 6: Bake the Muffins
Place the muffin tin in the preheated oven and bake for 18-20 minutes. To check for doneness, insert a toothpick into the center of a muffin. If it comes out clean, they’re ready! If not, give them a few more minutes.
Step 7: Cool and Serve
Once baked, allow the muffins to cool in the pan for about 5 minutes. Then, transfer them to a wire rack to cool completely. This step is important for maintaining their fluffy texture. Store any leftovers in an airtight container for up to three days, or freeze them for up to two months!
Tips for Success
- Always measure your flour correctly; spoon it into the measuring cup and level it off.
- For extra moist muffins, don’t overbake; keep an eye on them as they approach the 18-minute mark.
- Let the muffins cool completely before storing to prevent sogginess.
- Experiment with spices; a pinch of ginger or cloves can add a unique twist!
- Use room temperature eggs and eggnog for better mixing.
Equipment Needed
- Muffin tin: A standard 12-cup muffin tin works best, but you can use silicone molds for easy release.
- Mixing bowls: Use a large bowl for dry ingredients and a medium bowl for wet ingredients.
- Whisk: A whisk is perfect for combining ingredients, but a fork will do in a pinch.
- Spoon or scoop: For filling muffin cups, a cookie scoop makes it mess-free!
Variations
- Chocolate Chip Eggnog Muffins: Add a cup of semi-sweet chocolate chips to the batter for a delightful twist.
- Nutty Eggnog Muffins: Incorporate 1/2 cup of chopped walnuts or pecans for added crunch and flavor.
- Gluten-Free Option: Substitute all-purpose flour with a gluten-free flour blend for a delicious gluten-free treat.
- Dairy-Free Version: Use almond milk or coconut milk in place of eggnog for a dairy-free alternative.
- Spiced Eggnog Muffins: Add a pinch of ground ginger or cloves for an extra layer of holiday spice.
Serving Suggestions
- Pair your Eggnog Muffins with a steaming cup of coffee or spiced chai for a cozy breakfast.
- Serve them alongside a fruit salad for a refreshing contrast.
- For a festive touch, dust with powdered sugar or drizzle with a simple glaze.
- Present on a decorative platter for holiday gatherings to impress your guests!
FAQs about Eggnog Muffins
Can I use homemade eggnog for this recipe?
Absolutely! Homemade eggnog can add a personal touch to your Eggnog Muffins. Just ensure it’s well-mixed and creamy for the best results.
How do I store leftover Eggnog Muffins?
Store your muffins in an airtight container at room temperature for up to three days. For longer storage, freeze them for up to two months. Just thaw and enjoy!
Can I make these muffins ahead of time?
Yes! You can prepare the batter the night before and store it in the fridge. Just bake them fresh in the morning for a delightful breakfast treat!
What can I substitute for eggnog if I don’t have any?
If you’re out of eggnog, you can use milk or a dairy-free alternative. Just remember, the flavor will be different, but still delicious!
Are Eggnog Muffins suitable for freezing?
Definitely! These muffins freeze beautifully. Just wrap them individually in plastic wrap and place them in a freezer bag for easy access later.
Final Thoughts
Making Eggnog Muffins is more than just baking; it’s about creating memories and sharing joy with loved ones. The delightful aroma that fills your kitchen is like a warm hug on a chilly day. Each bite is a reminder of the festive spirit, bringing smiles to faces young and old. Whether you enjoy them at breakfast or as a sweet afternoon treat, these muffins are sure to become a cherished holiday tradition. So, roll up your sleeves, gather your ingredients, and let the magic of Eggnog Muffins brighten your holiday season!