
Introduction to Fried Strawberry Cheesecake Sandwiches
As a busy mom, I know how precious time can be, especially when it comes to whipping up something sweet. That’s why I absolutely adore these Fried Strawberry Cheesecake Sandwiches! They’re not just a dessert; they’re a delightful treat that combines creamy cheesecake and fresh strawberries, all wrapped in a crispy, golden-brown exterior. Perfect for a quick solution on a hectic day or a fun way to impress your loved ones, these sandwiches are sure to bring smiles to the table. Trust me, once you try them, they’ll become a favorite in your home!
PrintFried Strawberry Cheesecake Sandwiches: A Sweet Delight!

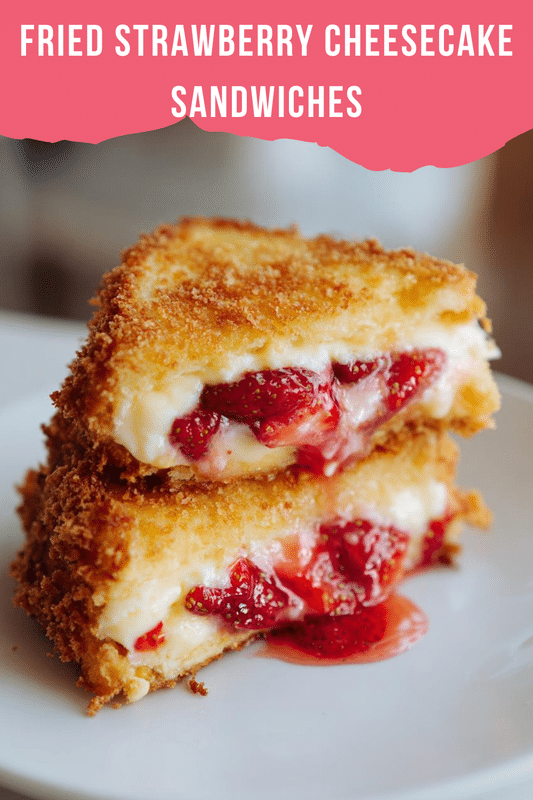
Fried Strawberry Cheesecake Sandwiches are a delicious dessert that combines the flavors of creamy cheesecake and fresh strawberries, all encased in a crispy, golden-brown exterior.
- Prep Time: 15 minutes
- Cook Time: 10 minutes
- Total Time: 25 minutes
- Yield: 2 servings
- Category: Dessert
- Method: Frying
- Cuisine: American
- Diet: Vegetarian
Ingredients
- 8 ounces cream cheese, softened
- 1/2 cup powdered sugar
- 1 teaspoon vanilla extract
- 1 cup fresh strawberries, sliced
- 4 slices of bread
- 1 cup milk
- 1 cup all-purpose flour
- 1 cup breadcrumbs
- 1 teaspoon cinnamon
- Oil for frying
Instructions
- In a bowl, mix the softened cream cheese, powdered sugar, and vanilla extract until smooth.
- Spread the cream cheese mixture on two slices of bread.
- Top with sliced strawberries and cover with the remaining slices of bread to form sandwiches.
- In a shallow dish, pour the milk. In another dish, place the flour, and in a third dish, mix the breadcrumbs with cinnamon.
- Dip each sandwich first in the milk, then in the flour, and finally in the breadcrumb mixture, ensuring they are well coated.
- Heat oil in a frying pan over medium heat. Fry the sandwiches until golden brown on both sides, about 2-3 minutes per side.
- Remove from the pan and drain on paper towels.
- Serve warm, optionally dusted with powdered sugar.
Notes
- For a richer flavor, you can add a bit of lemon zest to the cream cheese mixture.
- Make sure the oil is hot enough before frying to achieve a crispy texture.
- These sandwiches are best served immediately after frying.
Why You’ll Love This Fried Strawberry Cheesecake Sandwiches
These Fried Strawberry Cheesecake Sandwiches are a game-changer for busy days. They come together in just 25 minutes, making them a quick and satisfying dessert. The combination of creamy cheesecake and juicy strawberries is simply irresistible. Plus, the crispy coating adds a delightful crunch that will have everyone asking for seconds. Whether it’s a family gathering or a cozy night in, these sandwiches are sure to impress!
Ingredients for Fried Strawberry Cheesecake Sandwiches
Gathering the right ingredients is the first step to creating these delightful Fried Strawberry Cheesecake Sandwiches. Here’s what you’ll need:
- Cream Cheese: The star of the show! It provides that rich, creamy texture that makes cheesecake so irresistible.
- Powdered Sugar: This sweetener adds just the right amount of sweetness to balance the tanginess of the cream cheese.
- Vanilla Extract: A splash of vanilla enhances the flavor, making every bite taste like a dream.
- Fresh Strawberries: Juicy and vibrant, these berries bring a burst of freshness and color to the sandwiches.
- Bread: Choose your favorite type! White, whole wheat, or even brioche can work wonders for the base.
- Milk: Used for dipping, it helps the bread soak up the flavors and keeps everything moist.
- All-Purpose Flour: This creates a light coating that helps the breadcrumbs stick and adds a bit of crunch.
- Breadcrumbs: The crispy exterior comes from these! They give the sandwiches that golden-brown finish.
- Cinnamon: A sprinkle of cinnamon in the breadcrumbs adds warmth and a hint of spice.
- Oil for Frying: Choose a neutral oil like vegetable or canola for frying. It helps achieve that perfect crispy texture.
For a little twist, consider adding lemon zest to the cream cheese mixture for a refreshing zing. You can find all the exact quantities for these ingredients at the bottom of the article, ready for printing!
How to Make Fried Strawberry Cheesecake Sandwiches
Now that you have all your ingredients ready, let’s dive into the fun part—making these Fried Strawberry Cheesecake Sandwiches! Follow these simple steps, and you’ll have a delicious dessert in no time.
Step 1: Prepare the Cream Cheese Mixture
Start by grabbing a mixing bowl. Add the softened cream cheese, powdered sugar, and vanilla extract. Using a hand mixer or a spatula, blend everything together until it’s smooth and creamy. This mixture is the heart of your sandwiches, so make sure it’s well combined. The sweet aroma of vanilla will fill your kitchen, making it hard to resist tasting!
Step 2: Assemble the Sandwiches
Take two slices of your chosen bread and spread a generous layer of the cream cheese mixture on each slice. Next, layer on the fresh strawberry slices, making sure to cover the cream cheese evenly. Top with the remaining slices of bread to create your sandwiches. Press down gently to help everything stick together. You’re already on your way to a delightful treat!
Step 3: Prepare for Frying
Now it’s time to set up your frying station. In one shallow dish, pour the milk. In another dish, add the all-purpose flour. Finally, in a third dish, mix the breadcrumbs with cinnamon. This setup will make the coating process a breeze. Having everything ready will save you time and keep the mess to a minimum!
Step 4: Coat the Sandwiches
Take each sandwich and dip it first into the milk, ensuring it’s well soaked. Then, transfer it to the flour, coating both sides. Finally, roll it in the breadcrumb mixture, pressing gently to ensure a good coating. This three-step process is what gives your sandwiches that irresistible crunch. Repeat until all sandwiches are coated!
Step 5: Fry the Sandwiches
Heat oil in a frying pan over medium heat. You want the oil hot enough to sizzle when you add the sandwiches. Carefully place each sandwich in the pan, frying them for about 2-3 minutes on each side, or until they’re golden brown. The sound of frying will be music to your ears! Keep an eye on them to avoid burning.
Step 6: Serve and Enjoy
Once they’re perfectly golden, remove the sandwiches from the pan and let them drain on paper towels. This helps get rid of any excess oil. Serve them warm, and if you like, dust with powdered sugar for an extra touch of sweetness. Get ready for smiles and compliments as everyone digs in!
Tips for Success
- Make sure your cream cheese is softened for easy mixing.
- Use a thermometer to check the oil temperature; it should be around 350°F for perfect frying.
- Don’t overcrowd the pan; fry in batches for even cooking.
- For extra flavor, try adding a pinch of nutmeg to the breadcrumb mixture.
- Serve immediately for the best taste and texture!
Equipment Needed
- Mixing Bowl: A medium-sized bowl works best; a large one can be used if you’re making a double batch.
- Frying Pan: A non-stick skillet is ideal, but any frying pan will do.
- Spatula: Use a spatula for flipping the sandwiches; a slotted one helps drain excess oil.
- Shallow Dishes: Three shallow dishes for milk, flour, and breadcrumbs are essential.
Variations
- Chocolate Drizzle: Drizzle melted chocolate over the sandwiches before serving for a decadent twist.
- Nutty Crunch: Add crushed nuts like almonds or pecans to the breadcrumb mixture for extra texture and flavor.
- Berry Medley: Swap strawberries for a mix of berries like blueberries and raspberries for a colorful treat.
- Gluten-Free Option: Use gluten-free bread and breadcrumbs to make this dessert suitable for gluten-sensitive friends.
- Vegan Version: Substitute cream cheese with a vegan alternative and use plant-based milk for a dairy-free delight.
Serving Suggestions
- Fresh Whipped Cream: A dollop of whipped cream on the side adds a light, airy touch.
- Fruit Salad: Serve with a refreshing fruit salad for a colorful contrast.
- Hot Chocolate: Pair with a warm cup of hot chocolate for a cozy treat.
- Presentation: Dust with powdered sugar and garnish with mint leaves for a beautiful finish.
FAQs about Fried Strawberry Cheesecake Sandwiches
Can I make Fried Strawberry Cheesecake Sandwiches ahead of time?
While these sandwiches are best enjoyed fresh, you can prepare the cream cheese mixture and assemble the sandwiches a few hours in advance. Just keep them covered in the fridge until you’re ready to fry!
What can I use instead of cream cheese?
If you’re looking for a lighter option, you can use ricotta cheese or a vegan cream cheese alternative. Both will still give you that creamy texture without compromising flavor.
How do I store leftovers?
Store any leftover Fried Strawberry Cheesecake Sandwiches in an airtight container in the fridge for up to two days. Reheat them in a toaster oven for a few minutes to regain that crispy texture.
Can I freeze these sandwiches?
Yes! You can freeze the assembled sandwiches before frying. Just wrap them tightly in plastic wrap and store them in a freezer bag. When you’re ready to enjoy, fry them straight from the freezer, adding a minute or two to the cooking time.
What other fruits can I use in this recipe?
Feel free to get creative! Sliced bananas, peaches, or even blueberries can be delicious substitutes. Each fruit will bring its own unique flavor to the Fried Strawberry Cheesecake Sandwiches!
Final Thoughts
Making Fried Strawberry Cheesecake Sandwiches is more than just a cooking experience; it’s a joyful adventure in the kitchen. The moment you take that first bite, the creamy cheesecake and fresh strawberries dance together in perfect harmony, bringing a smile to your face. These sandwiches are not only a treat for your taste buds but also a wonderful way to create lasting memories with family and friends. Whether it’s a special occasion or a simple weeknight dessert, this recipe is sure to bring warmth and happiness to your home. So, roll up your sleeves and enjoy the sweet moments!