

Introduction to Fruit Charcuterie Board
As a busy mom, I know how challenging it can be to whip up something delightful that pleases everyone. That’s where the fruit charcuterie board comes in! This vibrant and delicious spread is not only a feast for the eyes but also a quick solution for those hectic days. With a variety of fresh fruits, nuts, and dips, it’s perfect for impressing your loved ones or simply treating yourself. Plus, it’s a fun way to encourage healthy snacking without the fuss. Let’s dive into this colorful culinary adventure together!
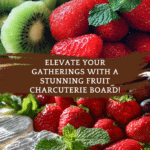
PrintFruit charcuterie board: Elevate Your Snack Game Today!
A vibrant and delicious fruit charcuterie board that elevates your snack game with a variety of fresh fruits, nuts, and dips.
- Prep Time: 15 minutes
- Cook Time: 0 minutes
- Total Time: 15 minutes
- Yield: Serves 4-6
- Category: Appetizer
- Method: No-cook
- Cuisine: American
- Diet: Vegetarian
Ingredients
- Assorted fresh fruits (grapes, strawberries, kiwi, pineapple, etc.)
- Mixed nuts (almonds, walnuts, cashews)
- Cheese (optional, such as brie or goat cheese)
- Honey or chocolate sauce for drizzling
- Fresh mint leaves for garnish
Instructions
- Wash and prepare all the fresh fruits by cutting them into bite-sized pieces.
- Arrange the fruits on a large serving board or platter in an aesthetically pleasing manner.
- Add small bowls of honey or chocolate sauce for dipping.
- Scatter mixed nuts around the fruits for added texture and flavor.
- If using cheese, slice it and place it on the board.
- Garnish with fresh mint leaves for a pop of color.
- Serve immediately and enjoy your fruit charcuterie board!
Notes
- Feel free to customize the fruits based on seasonal availability.
- Consider adding dried fruits for additional variety.
- This board can be made ahead of time; just keep it refrigerated until serving.
Why You’ll Love This Fruit Charcuterie Board
This fruit charcuterie board is a game-changer for busy days. It’s incredibly easy to prepare, taking just 15 minutes from start to finish. The vibrant colors and fresh flavors make it a hit at any gathering, whether it’s a family snack or a party appetizer. Plus, it’s a healthy option that satisfies sweet cravings without the guilt. You’ll love how it brings everyone together around the table!
Ingredients for Fruit Charcuterie Board
Creating a stunning fruit charcuterie board is all about variety and freshness. Here’s what you’ll need:
- Assorted fresh fruits: Think grapes, strawberries, kiwi, and pineapple. Choose seasonal fruits for the best flavor and color.
- Mixed nuts: Almonds, walnuts, and cashews add a delightful crunch. They’re also a great source of healthy fats!
- Cheese (optional): If you want to elevate your board, consider adding creamy brie or tangy goat cheese. They pair beautifully with fruits.
- Honey or chocolate sauce: A drizzle of honey or a rich chocolate sauce makes for a sweet dipping option that everyone will love.
- Fresh mint leaves: These not only add a pop of color but also a refreshing aroma that enhances the overall experience.
Feel free to customize your board based on what you have on hand or what’s in season. You can even add dried fruits for an extra layer of flavor. For exact quantities, check the bottom of the article where you can find everything available for printing!
How to Make a Fruit Charcuterie Board
Step 1: Prepare the Fresh Fruits
First things first, let’s wash those beautiful fruits! Rinse them under cool water to remove any dirt or pesticides. For berries, a gentle rinse is all you need. For larger fruits like kiwi and pineapple, peel them carefully. Then, cut everything into bite-sized pieces. Think about how your family likes to snack. I often slice strawberries in half and cube the pineapple. This way, they’re easy to grab and enjoy. Remember, the more colorful your fruits, the more inviting your fruit charcuterie board will be!
Step 2: Arrange the Fruits
Now comes the fun part—arranging the fruits! Grab a large serving board or platter and start placing your fruits in a way that’s pleasing to the eye. I like to group similar colors together for a rainbow effect. You can create sections or just scatter them around for a more casual look. Don’t be afraid to play with shapes and sizes. The goal is to make it look abundant and inviting. Trust me, your family will be drawn to it like bees to honey!
Step 3: Add Dipping Options
Next, let’s add some delicious dipping options! Take small bowls and fill them with honey or chocolate sauce. Place these bowls strategically around the board. This not only adds flavor but also creates a beautiful contrast against the fruits. I love the idea of drizzling honey over fresh strawberries. It’s a match made in heaven! Make sure the bowls are easy to reach so everyone can enjoy dipping their favorite fruits.
Step 4: Scatter Mixed Nuts
Now, let’s add some crunch! Scatter mixed nuts around the fruits. Almonds, walnuts, and cashews not only add texture but also a delightful flavor contrast. I like to create little piles of nuts in between the fruits. This way, it’s easy for everyone to grab a handful. Plus, nuts are a great source of protein, making this fruit charcuterie board even more satisfying. It’s a simple step that elevates the whole experience!
Step 5: Include Cheese (Optional)
If you’re feeling fancy, let’s add some cheese! Slice up your choice of cheese, like creamy brie or tangy goat cheese, and place it on the board. I usually put it near the fruits that pair well with it. The creaminess of the cheese complements the sweetness of the fruits beautifully. Plus, it adds a gourmet touch that will impress your guests. Just remember, cheese is optional, but it can take your fruit charcuterie board to the next level!
Step 6: Garnish with Fresh Mint
To finish off your masterpiece, let’s add a touch of freshness with mint leaves. Scatter a few fresh mint leaves over the board. Not only do they add a pop of color, but they also bring a refreshing aroma. I love how mint can elevate the entire presentation. It’s like the cherry on top of a sundae! Plus, it’s a great way to signal to everyone that this board is all about fresh flavors.
Step 7: Serve and Enjoy
Finally, it’s time to serve and enjoy your beautiful fruit charcuterie board! Gather your family or friends around the table and watch their faces light up. This board is perfect for snacking, sharing stories, or even as a light dessert. I always encourage everyone to dig in right away. The freshness of the fruits and the sweetness of the dips are best enjoyed immediately. So, grab a plate and let the snacking begin!
Tips for Success
- Choose seasonal fruits for the best flavor and freshness.
- Prep your fruits ahead of time and store them in the fridge.
- Use a variety of colors and textures to make your board visually appealing.
- Don’t hesitate to mix in dried fruits for added sweetness.
- Keep your dips in small bowls to prevent mess and make serving easier.
Equipment Needed
- Large serving board or platter: A wooden or marble board works beautifully, but any large plate will do.
- Small bowls: Use ramekins or even muffin tins for dips.
- Knife: A sharp knife is essential for cutting fruits and cheese.
- Cutting board: A sturdy cutting board makes prep easier.
Variations of Fruit Charcuterie Board
- Seasonal Fruits: Swap out fruits based on the season. In fall, consider adding apples and pears, while winter can feature citrus fruits like oranges and grapefruits.
- Nut-Free Option: For those with nut allergies, replace mixed nuts with seeds like pumpkin or sunflower seeds for a crunchy texture.
- Vegan Delight: Omit cheese and use plant-based dips like almond butter or coconut yogurt for a vegan-friendly board.
- Chocolate Lovers: Add chocolate-covered fruits or a chocolate fountain for a decadent twist that kids will adore.
- Herb Infusion: Experiment with other herbs like basil or rosemary for a unique flavor profile that pairs well with fruits.
Serving Suggestions for Fruit Charcuterie Board
- Pair with Sparkling Water: A refreshing sparkling water with a slice of lemon complements the sweetness of the fruits.
- Cheese Platter: Serve alongside a cheese platter for a more substantial appetizer spread.
- Presentation: Use colorful napkins and fun plates to enhance the visual appeal.
- Seasonal Decor: Add seasonal decorations like small pumpkins or flowers for a festive touch.
FAQs about Fruit Charcuterie Board
What fruits work best for a fruit charcuterie board?
When it comes to a fruit charcuterie board, the sky’s the limit! I love using a mix of grapes, strawberries, kiwi, and pineapple. Seasonal fruits not only taste better but also add vibrant colors. Feel free to get creative with your choices!
Can I make a fruit charcuterie board ahead of time?
Absolutely! You can prep your fruits a few hours in advance. Just keep them in the fridge until you’re ready to serve. This way, you can save time and still impress your guests with a fresh-looking board.
How do I keep the fruits from browning?
To prevent fruits like apples and bananas from browning, you can toss them in a little lemon juice. This simple trick keeps them looking fresh and appetizing on your fruit charcuterie board.
What can I serve with my fruit charcuterie board?
Pair your fruit charcuterie board with sparkling water or a light white wine for a refreshing touch. You can also serve it alongside a cheese platter for a more substantial spread. The options are endless!
Is a fruit charcuterie board suitable for kids?
Definitely! Kids love the colorful variety and the fun of dipping fruits in honey or chocolate sauce. It’s a great way to encourage healthy snacking while keeping it exciting for them!
Final Thoughts
Creating a fruit charcuterie board is more than just assembling fruits; it’s about bringing joy and connection to the table. I love how this vibrant spread can turn an ordinary snack time into a delightful experience for my family and friends. The colors, textures, and flavors come together to create a feast that’s not only beautiful but also healthy. Whether it’s a casual afternoon treat or a centerpiece for a gathering, this fruit charcuterie board is sure to impress. So, gather your favorite fruits, get creative, and enjoy the smiles that come with every bite!