
Introduction to Garlic Butter Cheeseburger Rollups Packed with Flavor and Melted Cheese Bliss
As a busy mom, I know how challenging it can be to whip up something delicious after a long day. That’s why I absolutely adore these Garlic Butter Cheeseburger Rollups Packed with Flavor and Melted Cheese Bliss! They’re not just quick to make; they’re also a delightful twist on a classic cheeseburger that the whole family will love. Imagine the aroma of garlic butter wafting through your kitchen as these rollups bake to golden perfection. Trust me, this recipe is a surefire way to impress your loved ones while keeping your sanity intact!
PrintGarlic Butter Cheeseburger Rollups: Flavor & Cheese Delight!
Garlic Butter Cheeseburger Rollups are a delicious and easy-to-make dish that combines the flavors of a cheeseburger with the convenience of rollups, all enhanced with garlic butter for an extra kick.
- Prep Time: 15 minutes
- Cook Time: 15 minutes
- Total Time: 30 minutes
- Yield: 8 rollups
- Category: Appetizer
- Method: Baking
- Cuisine: American
- Diet: Low Calorie
Ingredients
- 1 lb ground beef
- 1 cup shredded cheddar cheese
- 1/2 cup cream cheese
- 1/4 cup garlic butter
- 1 package of crescent roll dough
- Salt and pepper to taste
- Chopped parsley for garnish
Instructions
- Preheat the oven to 375°F (190°C).
- In a skillet, cook the ground beef over medium heat until browned. Season with salt and pepper.
- In a bowl, mix the cooked beef with cream cheese and shredded cheddar cheese until well combined.
- Roll out the crescent roll dough and cut it into rectangles.
- Place a spoonful of the beef and cheese mixture on each rectangle and roll them up.
- Brush the tops with garlic butter.
- Place the rollups on a baking sheet and bake for 12-15 minutes or until golden brown.
- Garnish with chopped parsley before serving.
Notes
- For extra flavor, add diced onions or pickles to the beef mixture.
- These rollups can be served with ketchup or mustard for dipping.
- Store leftovers in an airtight container in the refrigerator for up to 3 days.
Why You’ll Love This Garlic Butter Cheeseburger Rollups Packed with Flavor and Melted Cheese Bliss
These Garlic Butter Cheeseburger Rollups are a lifesaver for busy weeknights! They come together in just 30 minutes, making them perfect for those evenings when time is tight. The combination of savory beef, creamy cheese, and that irresistible garlic butter creates a flavor explosion that will have everyone asking for seconds. Plus, they’re easy to customize, so you can cater to even the pickiest eaters in your family!
Ingredients for Garlic Butter Cheeseburger Rollups Packed with Flavor and Melted Cheese Bliss
Gathering the right ingredients is the first step to creating these mouthwatering Garlic Butter Cheeseburger Rollups. Here’s what you’ll need:
- Ground beef: The star of the show! Choose lean ground beef for a healthier option.
- Shredded cheddar cheese: This adds that classic cheeseburger flavor. Feel free to mix in other cheeses like mozzarella for a twist.
- Cream cheese: It brings creaminess to the filling, making it rich and satisfying.
- Garlic butter: This is where the magic happens! It infuses the rollups with a delicious garlic flavor. You can make your own or buy it pre-made.
- Crescent roll dough: The perfect, flaky wrap for your filling. You can substitute with puff pastry if you prefer.
- Salt and pepper: Essential for seasoning the beef and enhancing the overall flavor.
- Chopped parsley: A fresh garnish that adds a pop of color and a hint of freshness.
For those who want to elevate the flavor even more, consider adding diced onions or pickles to the beef mixture. These ingredients can really take your rollups to the next level!
Don’t worry about exact measurements just yet; you can find them at the bottom of the article for easy printing. Let’s get cooking!
How to Make Garlic Butter Cheeseburger Rollups Packed with Flavor and Melted Cheese Bliss
Step 1: Preheat the Oven
First things first, let’s get that oven preheating! Set it to 375°F (190°C). Preheating is crucial because it ensures your rollups bake evenly and achieve that golden-brown perfection. Trust me, you want that crispy exterior!
Step 2: Cook the Ground Beef
Next, grab a skillet and cook the ground beef over medium heat. Break it apart with a spatula as it cooks. Season it generously with salt and pepper. This step is vital for flavor! Cook until the beef is browned and no longer pink. Drain any excess fat to keep your rollups from being greasy.
Step 3: Mix the Cheese Filling
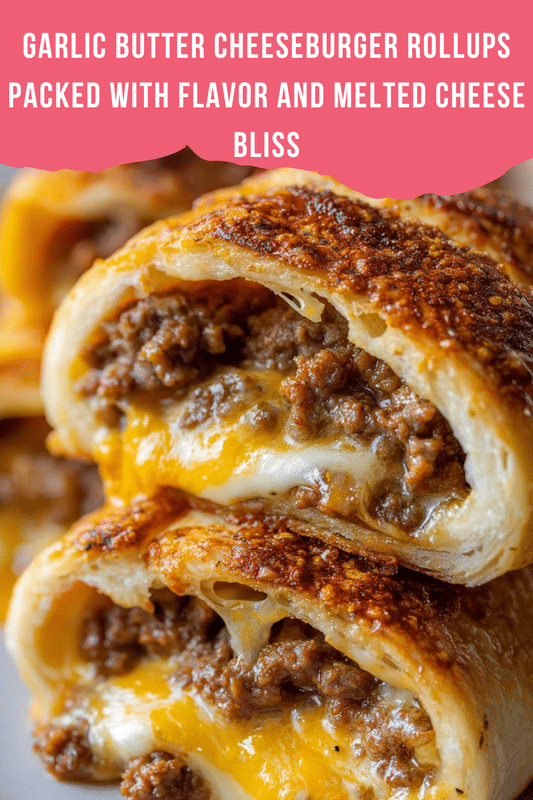
Now, let’s create that creamy filling! In a bowl, combine the cooked beef with cream cheese and shredded cheddar cheese. Mix until everything is well blended. The cream cheese adds a delightful richness, while the cheddar brings that classic cheeseburger taste. You’ll want to taste it—just to make sure it’s perfect!
Step 4: Prepare the Crescent Roll Dough
Time to work with the crescent roll dough! Roll it out on a clean surface and cut it into rectangles. Each rectangle should be big enough to hold a spoonful of your beef and cheese mixture. If you’re feeling adventurous, you can even use a rolling pin to flatten the dough a bit more for easier wrapping.
Step 5: Assemble the Rollups
Now comes the fun part—assembling the rollups! Place a spoonful of the beef and cheese mixture onto each rectangle. Carefully roll them up, starting from one end and tucking in the sides as you go. This helps keep all that cheesy goodness inside. Make sure they’re snug but not too tight!
Step 6: Brush with Garlic Butter
Before baking, let’s add that irresistible garlic flavor! Brush the tops of each rollup with garlic butter. This not only enhances the taste but also gives them a beautiful golden color as they bake. If you have any leftover garlic butter, feel free to drizzle it over the rollups before serving!
Step 7: Bake to Perfection
Place your rollups on a baking sheet lined with parchment paper. Bake them in the preheated oven for 12-15 minutes. Keep an eye on them! You’ll know they’re done when they’re golden brown and the cheese is bubbling. The aroma will be heavenly!
Step 8: Garnish and Serve
Once out of the oven, let them cool for a minute. Then, sprinkle some chopped parsley on top for a pop of color. Serve these Garlic Butter Cheeseburger Rollups warm, and watch your family devour them. They’re perfect for game nights or a cozy family dinner!
Tips for Success
- Use lean ground beef to keep the rollups lighter and healthier.
- Don’t skip the garlic butter; it’s the secret to that mouthwatering flavor!
- Experiment with different cheeses for a unique twist.
- Make sure to seal the edges of the rollups well to prevent leaks.
- Let them cool slightly before serving to avoid burning your mouth!
Equipment Needed for Garlic Butter Cheeseburger Rollups Packed with Flavor and Melted Cheese Bliss
- Skillet: A non-stick skillet works best, but any frying pan will do.
- Baking sheet: Line it with parchment paper for easy cleanup.
- Mixing bowl: Use a medium-sized bowl for combining the filling.
- Spatula: A sturdy spatula helps with cooking and mixing.
- Rolling pin: Optional, but great for flattening the dough.
Variations of Garlic Butter Cheeseburger Rollups Packed with Flavor and Melted Cheese Bliss
- Turkey or Chicken: Swap out the ground beef for ground turkey or chicken for a lighter option.
- Veggie Delight: Use a mix of sautéed mushrooms, bell peppers, and onions for a vegetarian twist.
- Spicy Kick: Add diced jalapeños or a splash of hot sauce to the beef mixture for some heat.
- Cheese Lovers: Experiment with different cheeses like pepper jack or gouda for a unique flavor profile.
- Gluten-Free: Use gluten-free crescent roll dough or puff pastry to make these rollups suitable for gluten-sensitive diets.
Serving Suggestions for Garlic Butter Cheeseburger Rollups Packed with Flavor and Melted Cheese Bliss
- Pair with a fresh garden salad for a light and refreshing contrast.
- Serve with crispy sweet potato fries for a fun twist on classic sides.
- Offer a selection of dipping sauces like ketchup, mustard, or ranch dressing.
- For drinks, consider a chilled lemonade or a light beer.
- Present on a colorful platter, garnished with extra parsley for a pop of color.
FAQs about Garlic Butter Cheeseburger Rollups Packed with Flavor and Melted Cheese Bliss
Can I make these rollups ahead of time?
Absolutely! You can prepare the rollups and store them in the fridge before baking. Just cover them tightly with plastic wrap. When you’re ready to bake, simply pop them in the oven. They might need an extra minute or two to cook through.
What can I serve with Garlic Butter Cheeseburger Rollups?
These rollups pair wonderfully with a fresh salad, crispy fries, or even some homemade coleslaw. Dipping sauces like ketchup or ranch dressing also complement them perfectly!
Can I freeze the rollups?
Yes, you can freeze them! Just assemble the rollups, place them on a baking sheet, and freeze until solid. Then transfer them to a freezer bag. Bake from frozen, adding a few extra minutes to the cooking time.
What if I don’t have garlic butter?
No worries! You can easily make your own by mixing softened butter with minced garlic and a pinch of salt. It’s a simple way to add that delicious garlic flavor to your rollups!
Are these rollups kid-friendly?
Definitely! Kids love the cheesy, savory filling wrapped in flaky dough. Plus, you can customize the filling to suit their tastes, making them a hit at family dinners!
Final Thoughts on Garlic Butter Cheeseburger Rollups Packed with Flavor and Melted Cheese Bliss
These Garlic Butter Cheeseburger Rollups are more than just a meal; they’re a delightful experience that brings the family together. The joy of pulling a warm, cheesy rollup from the oven is unmatched. Each bite is a comforting reminder of home, filled with flavors that dance on your palate. Whether it’s a busy weeknight or a cozy gathering, these rollups are sure to impress. Plus, they’re so easy to make that you’ll find yourself whipping them up again and again. Trust me, once you try them, they’ll become a staple in your kitchen!