
Introduction to Gingerbread Cookies with Royal Icing
Ah, the sweet aroma of gingerbread cookies wafting through the house! There’s something magical about baking Gingerbread Cookies with Royal Icing during the holiday season. It’s like wrapping your loved ones in a warm, cozy hug. As a busy mom, I know how precious time is, and this recipe is a delightful way to create festive treats without spending all day in the kitchen. Whether you’re looking to impress guests or simply want to indulge your family, these cookies are sure to bring smiles and joy. Let’s dive into this delicious adventure together!
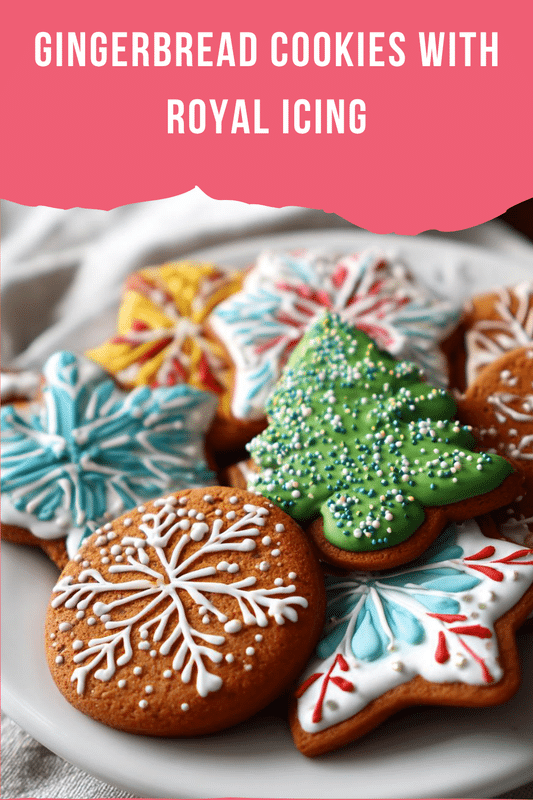
PrintGingerbread Cookies with Royal Icing: Bake Perfect Treats!

Delicious and festive gingerbread cookies decorated with royal icing, perfect for the holiday season.
- Prep Time: 30 minutes
- Cook Time: 10 minutes
- Total Time: 1 hour 40 minutes (including chilling time)
- Yield: 24 cookies
- Category: Dessert
- Method: Baking
- Cuisine: American
- Diet: Vegetarian
Ingredients
- 3 cups all-purpose flour
- 1 teaspoon baking soda
- 1 tablespoon ground ginger
- 1 tablespoon ground cinnamon
- 1/2 teaspoon ground cloves
- 1/2 teaspoon salt
- 1/2 cup unsalted butter, softened
- 1/2 cup brown sugar, packed
- 1/2 cup molasses
- 1 large egg
- 2 cups powdered sugar (for royal icing)
- 2 tablespoons meringue powder (for royal icing)
- Water (for royal icing)
Instructions
- In a bowl, whisk together flour, baking soda, ginger, cinnamon, cloves, and salt.
- In a separate bowl, cream together the butter and brown sugar until light and fluffy.
- Add molasses and egg to the butter mixture and mix well.
- Gradually add the dry ingredients to the wet ingredients, mixing until combined.
- Chill the dough for at least 1 hour.
- Preheat the oven to 350°F (175°C).
- Roll out the dough on a floured surface to about 1/4 inch thick.
- Cut out shapes using cookie cutters and place them on a baking sheet.
- Bake for 8-10 minutes or until the edges are firm.
- Let the cookies cool completely before decorating with royal icing.
- To make royal icing, mix powdered sugar, meringue powder, and water until smooth.
- Decorate the cooled cookies with royal icing as desired.
Notes
- Store cookies in an airtight container to keep them fresh.
- Royal icing can be colored with food coloring for festive designs.
- For a softer cookie, reduce baking time slightly.
Why You’ll Love This Gingerbread Cookies with Royal Icing
These Gingerbread Cookies with Royal Icing are not just tasty; they’re a breeze to make! With simple ingredients and straightforward steps, even the busiest of moms can whip them up in no time. Plus, the delightful aroma fills your home, creating a festive atmosphere. And let’s be honest, who can resist a cookie that’s both adorable and delicious? They’re perfect for sharing, gifting, or simply enjoying with a cup of tea!
Ingredients for Gingerbread Cookies with Royal Icing
Gathering the right ingredients is the first step to creating these delightful Gingerbread Cookies with Royal Icing. Here’s what you’ll need:
- All-purpose flour: The backbone of your cookies, providing structure and texture.
- Baking soda: This little leavening agent helps your cookies rise and become fluffy.
- Ground ginger: The star of the show! It adds that warm, spicy flavor we all love.
- Ground cinnamon: A classic spice that brings warmth and sweetness to the mix.
- Ground cloves: Just a pinch adds depth and a hint of earthiness to your cookies.
- Salt: Enhances all the flavors, making your cookies taste even better.
- Unsalted butter: For richness and a tender crumb, softened to room temperature for easy mixing.
- Brown sugar: Adds moisture and a lovely caramel flavor that pairs perfectly with spices.
- Molasses: This dark syrup gives your cookies that classic gingerbread color and flavor.
- Large egg: Binds everything together and helps with the cookie’s texture.
- Powdered sugar: Essential for making the royal icing that will decorate your cookies.
- Meringue powder: Stabilizes the royal icing, ensuring it dries hard and shiny.
- Water: Just enough to bring your royal icing to the perfect consistency.
For those looking to get creative, you can add food coloring to the royal icing for festive designs. If you’re out of meringue powder, you can substitute it with egg whites, but be sure to use pasteurized ones for safety. You’ll find the exact measurements for each ingredient at the bottom of the article, ready for printing!
How to Make Gingerbread Cookies with Royal Icing
Now that we have our ingredients ready, let’s dive into the fun part—making these delightful Gingerbread Cookies with Royal Icing! Follow these simple steps, and you’ll have a batch of festive cookies in no time.
Step 1: Prepare the Dry Ingredients
Start by whisking together the flour, baking soda, ginger, cinnamon, cloves, and salt in a large bowl. This step is crucial as it ensures that all the spices are evenly distributed. The aroma will already start to fill your kitchen, making it feel like the holidays!
Step 2: Cream the Butter and Sugar
In another bowl, cream the softened butter and brown sugar together until the mixture is light and fluffy. This usually takes about 2-3 minutes. The fluffiness is key to achieving that tender texture in your cookies. Don’t rush this step; it’s where the magic begins!
Step 3: Combine Wet Ingredients
Next, add the molasses and egg to the butter-sugar mixture. Mix well until everything is combined. The molasses will give your cookies that rich, dark color and deep flavor we all love in gingerbread.
Step 4: Mix Dry and Wet Ingredients
Gradually add the dry ingredients to the wet mixture. Stir until just combined. Be careful not to overmix; we want our cookies to be soft and chewy, not tough. You’ll see the dough start to come together beautifully!
Step 5: Chill the Dough
Wrap the dough in plastic wrap and chill it in the refrigerator for at least one hour. Chilling helps the flavors meld and makes the dough easier to roll out. While you wait, you can clean up your kitchen or sip on a warm cup of tea!
Step 6: Preheat the Oven
Once the dough is chilled, preheat your oven to 350°F (175°C). This ensures that your cookies bake evenly and come out perfectly golden. The anticipation will build as the oven warms up!
Step 7: Roll and Cut the Dough
On a floured surface, roll out the dough to about 1/4 inch thick. Use cookie cutters to cut out your favorite shapes. Whether it’s stars, trees, or gingerbread men, let your creativity shine! Place the cutouts on a baking sheet lined with parchment paper.
Step 8: Bake the Cookies
Bake the cookies for 8-10 minutes, or until the edges are firm. Keep an eye on them; you want them to be just set but not overbaked. The smell will be heavenly, and your family will start gathering in the kitchen!
Step 9: Cool the Cookies
Once baked, let the cookies cool completely on a wire rack. This step is essential before decorating. If you try to ice them too soon, the icing will melt and slide right off. Patience is key here!
Step 10: Make the Royal Icing
To make the royal icing, mix the powdered sugar, meringue powder, and water until smooth. The consistency should be thick enough to hold its shape but still spreadable. You can adjust with a little more water if needed. This icing is what will make your cookies shine!
Step 11: Decorate the Cookies
Now comes the fun part—decorating! Use piping bags or a simple zip-top bag with a corner snipped off to apply the royal icing. Get creative with colors and designs. Let your inner artist shine! Once decorated, allow the icing to dry completely before storing.
Tips for Success
- Always measure your flour correctly; too much can lead to dry cookies.
- Chill the dough for at least an hour to enhance flavor and make rolling easier.
- Use a light touch when mixing; overmixing can toughen the cookies.
- Experiment with different cookie shapes for a fun presentation.
- Let the royal icing dry completely before stacking or storing your cookies.
Equipment Needed
- Mixing bowls: A set of various sizes is handy; you can use any large bowl you have.
- Whisk: Essential for mixing dry ingredients; a fork works in a pinch!
- Rolling pin: For rolling out the dough; a wine bottle can substitute if needed.
- Cookie cutters: Use festive shapes; if you don’t have any, a knife can cut shapes freehand.
- Baking sheets: Line with parchment paper; any flat baking tray will do.
Variations
- Gluten-Free Option: Substitute all-purpose flour with a gluten-free blend to make these cookies suitable for gluten-sensitive friends and family.
- Spice It Up: Add a pinch of cayenne pepper or nutmeg for an extra kick of flavor that will surprise your taste buds!
- Vegan Version: Replace the egg with a flaxseed egg (1 tablespoon ground flaxseed mixed with 2.5 tablespoons water) and use vegan butter for a plant-based treat.
- Chocolate Gingerbread: Mix in cocoa powder (about 1/4 cup) for a rich chocolate twist on the classic gingerbread flavor.
- Decorative Themes: Use seasonal cookie cutters and colored icing to create themed cookies for different holidays or events!
Serving Suggestions
- Pair your gingerbread cookies with a warm cup of spiced chai or hot cocoa for a cozy treat.
- Serve them on a festive platter, garnished with fresh cranberries or sprigs of rosemary for a beautiful presentation.
- Consider adding a side of cream cheese frosting for an extra indulgent dip!
FAQs about Gingerbread Cookies with Royal Icing
Can I make the dough ahead of time?
Absolutely! You can prepare the dough a day in advance. Just wrap it tightly in plastic wrap and store it in the refrigerator. This way, you can bake fresh Gingerbread Cookies with Royal Icing whenever you’re ready!
How do I store my gingerbread cookies?
To keep your cookies fresh, store them in an airtight container at room temperature. They can last up to a week, but I bet they won’t last that long once your family gets a whiff of them!
Can I freeze gingerbread cookies?
Yes, you can freeze them! Just make sure they are completely cooled and decorated. Place them in a single layer in a freezer-safe container. They’ll stay fresh for up to three months. Just thaw them at room temperature before serving.
What can I use instead of meringue powder for royal icing?
If you don’t have meringue powder, you can use pasteurized egg whites as a substitute. Just remember to adjust the water content to achieve the right consistency for your royal icing.
How can I make my royal icing colorful?
Adding food coloring to your royal icing is a fun way to get creative! Just a few drops will do the trick. Mix well until you achieve your desired shade, and let your imagination run wild with your cookie designs!
Final Thoughts
Baking Gingerbread Cookies with Royal Icing is more than just a recipe; it’s a cherished tradition that brings warmth and joy to our homes. The process of mixing, rolling, and decorating becomes a delightful family activity, creating memories that last a lifetime. Each bite of these spiced cookies, adorned with colorful icing, is a reminder of the love and care we put into our cooking. So, gather your loved ones, embrace the holiday spirit, and let these cookies be a sweet symbol of togetherness. Trust me, the smiles you’ll create are worth every moment spent in the kitchen!