
Introduction to Hot Chocolate Station
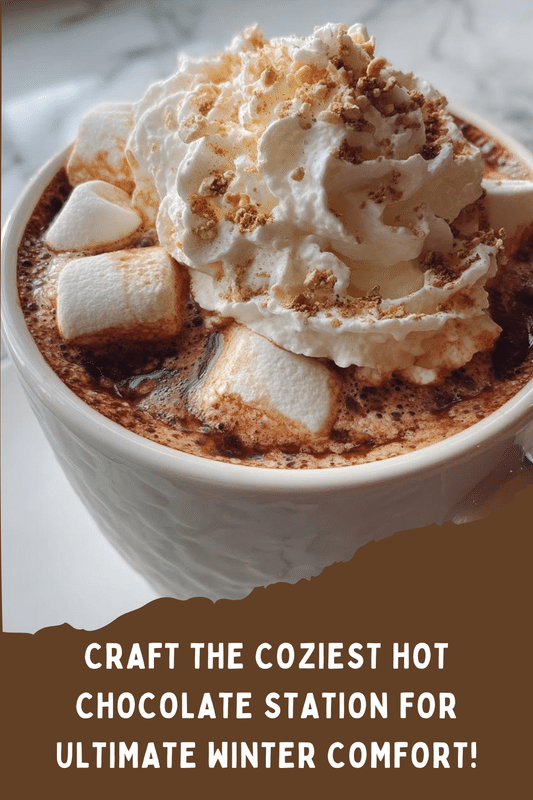
As the chilly winds start to blow, there’s nothing quite like a cozy hot chocolate station to warm the heart and soul. Picture this: a gathering of friends or family, laughter filling the air, and a delightful spread of toppings just waiting to be explored. This hot chocolate station is not just a drink; it’s an experience! It’s perfect for busy moms like me who want to impress loved ones without spending hours in the kitchen. With just a few simple steps, you can create a magical moment that everyone will cherish. Let’s dive into this delicious adventure!
PrintHot chocolate station ideas that will amaze your guests!
A creative and fun way to serve hot chocolate with various toppings and flavors to impress your guests.
- Prep Time: 15 minutes
- Cook Time: 10 minutes
- Total Time: 25 minutes
- Yield: 8 servings
- Category: Beverage
- Method: Stovetop
- Cuisine: American
- Diet: Vegetarian
Ingredients
- Milk (4 cups)
- Dark chocolate (1 cup, chopped)
- Whipped cream (2 cups)
- Marshmallows (1 cup)
- Cocoa powder (1/2 cup)
- Chocolate syrup (1/2 cup)
- Caramel sauce (1/2 cup)
- Crushed peppermint (1/2 cup)
- Sprinkles (1/2 cup)
- Flavored syrups (vanilla, hazelnut, etc.) (1/4 cup each)
Instructions
- Heat the milk in a saucepan over medium heat until warm.
- Add the chopped dark chocolate and stir until melted and smooth.
- In a separate bowl, mix cocoa powder with a little hot water to create a paste, then add to the chocolate mixture.
- Pour the hot chocolate into mugs.
- Set up a toppings station with whipped cream, marshmallows, chocolate syrup, caramel sauce, crushed peppermint, sprinkles, and flavored syrups.
- Invite guests to customize their hot chocolate with their favorite toppings.
Notes
- Use dairy-free milk for a vegan option.
- Offer a variety of chocolate types (milk, dark, white) for different flavor profiles.
- Consider adding a slow cooker to keep the hot chocolate warm throughout the event.
Why You’ll Love This Hot Chocolate Station
This hot chocolate station is a game-changer for busy days. It’s quick to set up, taking just 25 minutes from start to finish. Plus, it’s a crowd-pleaser! Everyone can customize their drink, making it a fun activity for all ages. The rich, creamy flavors combined with delightful toppings create a cozy atmosphere that warms hearts. Trust me, your guests will be raving about it long after the last sip!
Ingredients for Hot Chocolate Station
Creating a hot chocolate station is all about having fun with flavors and textures. Here’s what you’ll need:
- Milk: The base of your hot chocolate. You can use whole, skim, or even dairy-free options like almond or oat milk for a vegan twist.
- Dark Chocolate: This adds a rich, decadent flavor. Feel free to experiment with milk or white chocolate for different tastes.
- Whipped Cream: A fluffy topping that adds creaminess. You can use store-bought or whip your own for a personal touch.
- Marshmallows: These sweet little puffs are a classic addition. Try mini marshmallows or even flavored ones for a fun surprise.
- Cocoa Powder: This gives your hot chocolate a deep chocolate flavor. Opt for unsweetened for more control over sweetness.
- Chocolate Syrup: A drizzle of this syrup adds extra sweetness and a beautiful presentation. It’s also great for drizzling on mugs!
- Caramel Sauce: For those who love a sweet twist, caramel sauce adds a delightful richness. It pairs beautifully with chocolate.
- Crushed Peppermint: Perfect for a festive touch! This adds a refreshing minty flavor that’s especially nice during the holidays.
- Sprinkles: These colorful toppings bring joy and fun to your hot chocolate. Kids (and adults!) love them!
- Flavored Syrups: Vanilla, hazelnut, or even peppermint syrups can elevate your drink. They’re easy to find at grocery stores.
For exact measurements, check the bottom of the article where you can find everything listed for printing. Enjoy mixing and matching these ingredients to create your perfect hot chocolate station!
How to Make Hot Chocolate Station
Step 1: Heat the Milk
Start by pouring your milk into a saucepan. Heat it over medium heat until it’s warm but not boiling. Stir occasionally to prevent it from sticking to the bottom. This step is crucial because warm milk helps the chocolate melt smoothly, creating that rich, creamy base we all love.
Step 2: Melt the Chocolate
Once the milk is warm, add the chopped dark chocolate. Stir continuously until it melts completely and blends into the milk. The aroma of melting chocolate is simply heavenly! This is where the magic begins, transforming your hot chocolate into a luxurious treat.
Step 3: Prepare Cocoa Paste
In a separate bowl, mix the cocoa powder with a splash of hot water to create a smooth paste. This step helps to avoid clumps in your hot chocolate. Once it’s well combined, add this cocoa paste to the chocolate mixture. Stir until everything is perfectly blended. You’ll see the color deepen, and the flavor intensify!
Step 4: Combine and Serve
Now, it’s time to pour your delicious hot chocolate into mugs. I love using clear mugs to show off the beautiful layers of chocolate. This is where you can feel like a barista! If you’re serving a crowd, consider using a slow cooker to keep the hot chocolate warm throughout your gathering.
Step 5: Set Up the Toppings Station
Here comes the fun part! Set up a toppings station with all your delicious options. Arrange whipped cream, marshmallows, chocolate syrup, caramel sauce, crushed peppermint, sprinkles, and flavored syrups. Make it visually appealing! A colorful display will excite your guests and encourage them to get creative.
Step 6: Customize Your Hot Chocolate
Invite your guests to customize their hot chocolate just the way they like it. Whether they prefer a mountain of whipped cream or a drizzle of caramel, let them have fun! This interactive element makes your hot chocolate station a memorable experience. Plus, it’s a great way to bond over a shared love for this cozy drink!
Tips for Success
- Use a whisk to blend the chocolate and milk for a smoother texture.
- Keep the hot chocolate warm in a slow cooker for easy serving.
- Prepare toppings in advance to save time during the event.
- Encourage guests to mix flavors for unique combinations.
- Don’t forget to taste as you go! Adjust sweetness to your liking.
Equipment Needed
- Medium saucepan: Essential for heating milk. A small pot works too!
- Whisk: Perfect for blending ingredients smoothly. A spoon can do in a pinch.
- Mugs: Clear mugs showcase your creation beautifully. Any mug will do!
- Slow cooker: Keeps hot chocolate warm. A thermos is a great alternative.
Variations
- Vegan Option: Use almond, coconut, or oat milk instead of dairy milk for a delicious vegan hot chocolate.
- Spicy Kick: Add a pinch of cayenne pepper or cinnamon for a warm, spicy twist that will surprise your taste buds.
- Nutty Flavor: Incorporate hazelnut or almond flavored syrups for a nutty depth that pairs beautifully with chocolate.
- White Chocolate Delight: Swap dark chocolate for white chocolate for a sweeter, creamier version that’s perfect for a change.
- Decadent Mocha: Mix in a shot of espresso or strong coffee for a delightful mocha experience that coffee lovers will adore.
Serving Suggestions
- Pair your hot chocolate with freshly baked cookies for a delightful treat.
- Serve alongside a warm slice of banana bread or pumpkin loaf for a cozy vibe.
- Offer a selection of herbal teas for guests who prefer a lighter option.
- Use festive mugs or clear glass cups to enhance the presentation.
- Garnish with a cinnamon stick for an aromatic touch that looks beautiful!
FAQs about Hot Chocolate Station
Can I make the hot chocolate ahead of time?
Absolutely! You can prepare the hot chocolate in advance and keep it warm in a slow cooker. Just give it a good stir before serving to ensure everything is well mixed.
What are some fun toppings for a hot chocolate station?
Besides the classic whipped cream and marshmallows, consider adding crushed cookies, toffee bits, or even flavored whipped creams. The more, the merrier!
How can I make this hot chocolate station kid-friendly?
Keep it simple! Offer toppings like mini marshmallows, colorful sprinkles, and chocolate syrup. Kids love to customize their drinks, so let them get creative!
Can I use non-dairy milk for my hot chocolate station?
Yes, non-dairy milk like almond, soy, or oat milk works wonderfully. It’s a great option for those who are lactose intolerant or prefer a vegan choice.
What’s the best way to store leftover hot chocolate?
Store any leftover hot chocolate in an airtight container in the fridge. Reheat gently on the stovetop or in the microwave, adding a splash of milk if needed to restore creaminess.
Final Thoughts
Creating a hot chocolate station is more than just serving a drink; it’s about crafting memories. The joy of watching friends and family customize their mugs brings a warmth that lingers long after the last sip. I love how this simple setup transforms an ordinary gathering into a delightful experience filled with laughter and creativity. Whether it’s a chilly winter evening or a festive celebration, this hot chocolate station is sure to impress. So, gather your loved ones, unleash your inner barista, and enjoy the sweet moments that come with each delicious cup!