
Introduction to Marshmallow Rice Bubbles Halloween Brains
As the leaves turn and the air gets crisp, I find myself dreaming up spooky treats for Halloween. One of my absolute favorites is Marshmallow Rice Bubbles Halloween Brains. These delightful little creations are not only fun to make, but they also bring a smile to everyone’s face. Perfect for busy moms like us, this recipe is a quick solution for a festive treat that impresses without the fuss. Plus, who can resist the gooey goodness of marshmallows and the crunch of Rice Bubbles? Let’s dive into this deliciously spooky adventure together!
PrintMarshmallow Rice Bubbles Halloween Brains: A Treat to Savor!
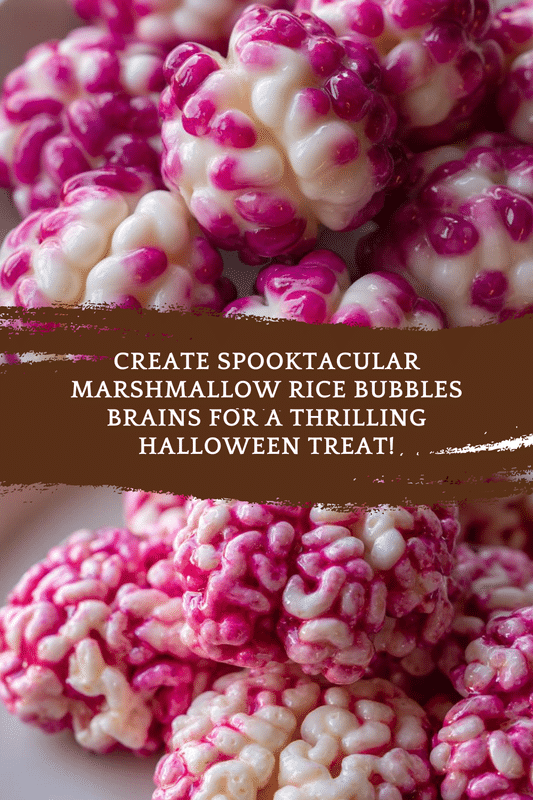
Delicious and spooky Marshmallow Rice Bubbles shaped like brains, perfect for Halloween celebrations.
- Prep Time: 15 minutes
- Cook Time: 10 minutes
- Total Time: 25 minutes
- Yield: 12 servings
- Category: Dessert
- Method: No-Bake
- Cuisine: American
- Diet: Vegetarian
Ingredients
- 4 cups Rice Bubbles
- 1 cup mini marshmallows
- 1/4 cup butter
- 1/2 teaspoon vanilla extract
- Red food coloring
- Chocolate syrup (for decoration)
Instructions
- In a large saucepan, melt the butter over low heat.
- Add the mini marshmallows and stir until completely melted.
- Remove from heat and stir in the vanilla extract and a few drops of red food coloring.
- Add the Rice Bubbles and mix until well coated.
- Grease a brain-shaped mold and pack the mixture into the mold.
- Let it cool and set for about 30 minutes.
- Once set, remove from the mold and drizzle with chocolate syrup for decoration.
Notes
- For a more intense color, add more red food coloring.
- Store in an airtight container to keep them fresh.
- These can be made a day in advance.
Why You’ll Love This Marshmallow Rice Bubbles Halloween Brains
These Marshmallow Rice Bubbles Halloween Brains are a lifesaver for busy days. They come together in just 25 minutes, making them a perfect last-minute treat. The combination of sweet marshmallows and crunchy Rice Bubbles creates a delightful texture that kids adore. Plus, they’re a fun way to get everyone involved in the kitchen. Trust me, these spooky snacks will be the highlight of your Halloween festivities!
Ingredients for Marshmallow Rice Bubbles Halloween Brains
Gathering the right ingredients is half the fun! Here’s what you’ll need to whip up these spooky treats:
- Rice Bubbles: The star of the show! These crispy little gems provide the perfect crunch and hold everything together.
- Mini Marshmallows: Sweet and gooey, they melt beautifully to create that delightful marshmallowy goodness.
- Butter: This adds richness and helps the marshmallows melt smoothly. You can use unsalted butter for better control over the sweetness.
- Vanilla Extract: A splash of this adds a warm, comforting flavor that complements the sweetness of the marshmallows.
- Red Food Coloring: For that eerie brain-like appearance! A few drops will give your treats a spooky twist. Feel free to adjust the amount for a deeper color.
- Chocolate Syrup: This is optional but highly recommended! Drizzling it on top adds a delicious finishing touch and makes them look even more appetizing.
For exact measurements, check the bottom of the article where you can find everything listed for easy printing. Happy cooking!
How to Make Marshmallow Rice Bubbles Halloween Brains
Now that we have our ingredients ready, let’s get to the fun part—making these spooky treats! Follow these simple steps, and you’ll have a batch of Marshmallow Rice Bubbles Halloween Brains in no time.
Step 1: Melt the Butter
Start by placing a large saucepan over low heat. Add the butter and let it melt slowly. Stir occasionally to ensure it doesn’t burn. The goal is to have it completely melted and bubbly, creating a rich base for our marshmallows.
Step 2: Add Mini Marshmallows
Once the butter is melted, it’s time to add the mini marshmallows. Pour them in and stir continuously. Keep stirring until the marshmallows are completely melted and smooth. This step is crucial for that gooey texture we all love!
Step 3: Mix in Vanilla and Food Coloring
Now, remove the saucepan from the heat. Stir in the vanilla extract for that warm flavor. Then, add a few drops of red food coloring. This is where the magic happens! Mix until the color is evenly distributed, giving your mixture a spooky brain-like hue.
Step 4: Combine with Rice Bubbles
Next, it’s time to add the Rice Bubbles. Gently fold them into the marshmallow mixture. Make sure every Rice Bubble is well coated. This step is like a dance—be gentle but thorough, ensuring that each piece gets its fair share of that sweet marshmallow goodness.
Step 5: Shape the Brains
Grab your brain-shaped mold and grease it lightly with butter or cooking spray. This will help the treats pop out easily later. Pack the Rice Bubble mixture into the mold, pressing down firmly to ensure they hold their shape. Don’t be shy—give it a good press!
Step 6: Cool and Set
Let your brain-shaped treats cool and set for about 30 minutes. This is the perfect time to clean up your kitchen or plan your Halloween party! Once they’re firm, they’ll be ready to come out of the mold.
Step 7: Decorate with Chocolate Syrup
Finally, it’s time for the finishing touch! Carefully remove the brains from the mold and place them on a serving platter. Drizzle chocolate syrup over the top for that extra flair. It adds a delicious contrast and makes them look even more appetizing!
Tips for Success
- Use fresh mini marshmallows for the best texture and flavor.
- Don’t rush the melting process; low heat is key to avoid burning.
- Grease your mold generously to ensure easy removal.
- For a fun twist, add sprinkles or edible glitter before the chocolate drizzle.
- Store leftovers in an airtight container to keep them fresh and chewy.
Equipment Needed
- Large saucepan: A non-stick option works best to prevent sticking.
- Wooden spoon: Perfect for stirring; a silicone spatula is a great alternative.
- Brain-shaped mold: If you don’t have one, use a muffin tin for fun shapes.
- Measuring cups: Essential for accurate ingredient portions.
Variations of Marshmallow Rice Bubbles Halloween Brains
- Chocolate Rice Bubbles: Swap regular Rice Bubbles for chocolate-flavored ones for an extra chocolatey treat.
- Nut Butter Addition: Stir in a tablespoon of peanut or almond butter for a nutty twist and added creaminess.
- Vegan Option: Use vegan butter and mini marshmallows to make these treats suitable for a plant-based diet.
- Colorful Brains: Experiment with different food coloring shades to create a rainbow of spooky brains!
- Spooky Sprinkles: Add Halloween-themed sprinkles or edible eyes for a fun and festive touch.
Serving Suggestions for Marshmallow Rice Bubbles Halloween Brains
- Pair these spooky treats with a glass of cold apple cider for a festive touch.
- Serve alongside a platter of fresh fruit for a colorful contrast.
- Display them on a Halloween-themed serving tray for added flair.
- Consider adding some spooky decorations, like fake spiders or cobwebs, to your presentation.
FAQs about Marshmallow Rice Bubbles Halloween Brains
Can I make Marshmallow Rice Bubbles Halloween Brains in advance?
Absolutely! These treats can be made a day in advance. Just store them in an airtight container to keep them fresh and chewy.
What can I use instead of a brain-shaped mold?
If you don’t have a brain-shaped mold, a muffin tin works perfectly! You can also shape them by hand into fun, spooky forms.
How do I store leftover Marshmallow Rice Bubbles Halloween Brains?
Keep any leftovers in an airtight container at room temperature. They’ll stay fresh for several days, but trust me, they won’t last long!
Can I use different colors of food coloring?
Of course! Feel free to experiment with different colors to create a variety of spooky brain treats. The more colorful, the better!
Are these treats suitable for kids with dietary restrictions?
Yes! You can easily make them vegan by using plant-based butter and marshmallows. Just check the labels to ensure they meet dietary needs.
Final Thoughts
Creating Marshmallow Rice Bubbles Halloween Brains is more than just making a treat; it’s about crafting memories with your loved ones. The joy of seeing their faces light up as they indulge in these spooky delights is priceless. This recipe is a wonderful way to bring everyone together, even on the busiest of days. Plus, the laughter and creativity that come with decorating these treats make it a fun family activity. So, roll up your sleeves, gather your ingredients, and let the Halloween spirit inspire you. Happy haunting and happy cooking!