
Introduction to Tombstone Marshmallow Pops
As the leaves turn and the air gets crisp, I find myself dreaming up fun treats for Halloween. One of my absolute favorites is Tombstone Marshmallow Pops. These delightful little snacks are not only a hit at parties, but they also bring a smile to my kids’ faces.
They’re quick to whip up, making them a perfect solution for busy days when you want to impress your loved ones without spending hours in the kitchen. Plus, who can resist a spooky dessert that’s as fun to make as it is to eat?
PrintTombstone Marshmallow Pops: A Spooktacular Treat!
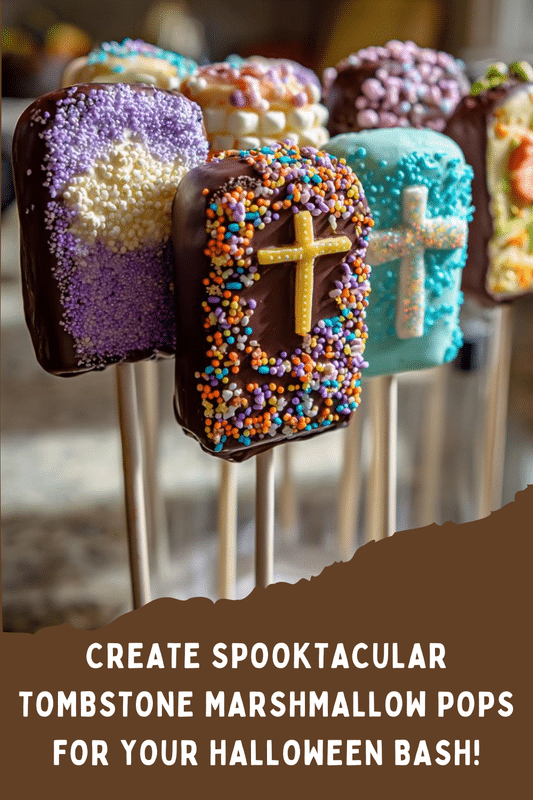
Tombstone Marshmallow Pops are a fun and spooky treat perfect for Halloween parties or gatherings. These delicious marshmallow pops are decorated to look like tombstones, making them a festive addition to any dessert table.
- Prep Time: 15 minutes
- Cook Time: 5 minutes
- Total Time: 20 minutes
- Yield: 10 pops
- Category: Dessert
- Method: No-bake
- Cuisine: American
- Diet: Vegetarian
Ingredients
- 10 large marshmallows
- 1 cup chocolate melting wafers
- 10 lollipop sticks
- Black icing
- Edible eyes (optional)
- Sprinkles (optional)
Instructions
- Insert a lollipop stick into each marshmallow.
- Melt the chocolate wafers according to package instructions.
- Dip each marshmallow into the melted chocolate, ensuring it is fully coated.
- Place the coated marshmallows on a baking sheet lined with parchment paper.
- Before the chocolate sets, use black icing to write ‘RIP’ or other spooky messages on each marshmallow.
- Add edible eyes or sprinkles for extra decoration if desired.
- Allow the chocolate to harden completely before serving.
Notes
- Store in a cool, dry place to prevent melting.
- These can be made a day in advance.
- Feel free to customize the decorations to fit your Halloween theme.
Why You’ll Love This Tombstone Marshmallow Pops
Tombstone Marshmallow Pops are a breeze to make, even on the busiest of days. With just a few ingredients and minimal prep time, you can create a spooky treat that delights both kids and adults alike.
Their rich chocolate coating and playful decorations make them irresistible. Plus, they’re a fantastic way to get the family involved in the kitchen, turning a simple dessert into a fun Halloween activity!
Ingredients for Tombstone Marshmallow Pops
Creating these Tombstone Marshmallow Pops is as simple as gathering a few key ingredients. Here’s what you’ll need:
- Large marshmallows: These are the stars of the show! Their fluffy texture makes for a delightful bite.
- Chocolate melting wafers: This is what gives our pops that rich, chocolatey coating. You can find these at most grocery stores or craft stores.
- Lollipop sticks: These provide the perfect handle for your pops. You can use regular lollipop sticks or even sturdy straws for a fun twist.
- Black icing: This is essential for adding spooky messages like “RIP.” You can buy it pre-made or whip up a quick batch at home.
- Edible eyes (optional): These little guys add a fun, creepy touch to your pops. They’re easy to find in the baking aisle.
- Sprinkles (optional): Use these to add a pop of color or extra flair. Choose Halloween-themed sprinkles for a festive touch!
For exact quantities, check the bottom of the article where you can find everything listed for easy printing. Feel free to get creative with your ingredients! You can swap out the chocolate for white chocolate or even use colored candy melts for a unique look.
How to Make Tombstone Marshmallow Pops
Now that you have your ingredients ready, let’s dive into the fun part—making these delightful Tombstone Marshmallow Pops! Follow these simple steps, and you’ll have a spooky treat in no time.
Step 1: Prepare the Marshmallows
Start by inserting a lollipop stick into each marshmallow. This is the base for your pops. Make sure to push the stick in about halfway, so it holds well. It’s like giving your marshmallow a little handle for all the fun to come!
Step 2: Melt the Chocolate
Next, melt the chocolate wafers according to the package instructions. I usually do this in a microwave-safe bowl, heating in short bursts. Stir until smooth. A silky chocolate coating is key for that perfect tombstone effect!
Step 3: Dip the Marshmallows
Now, dip each marshmallow into the melted chocolate, ensuring it is fully coated. Give it a little twist to let the excess chocolate drip off. This creates that deliciously rich layer we all love. It’s like wrapping your marshmallow in a cozy chocolate blanket!
Step 4: Set on Baking Sheet
Place the coated marshmallows on a baking sheet lined with parchment paper. This prevents sticking and makes cleanup a breeze. It’s like giving your pops a comfy place to rest while they cool!
Step 5: Decorate with Icing
Before the chocolate sets, grab your black icing and get creative! Write ‘RIP’ or other spooky messages on each marshmallow. This adds character and makes them look extra festive. It’s the perfect way to let your personality shine through!
Step 6: Add Final Touches
If you want to take it up a notch, add edible eyes or sprinkles for extra decoration. This enhances the spooky look and makes your pops even more fun. Think of it as giving your tombstones a little personality!
Step 7: Allow to Harden
Finally, allow the chocolate to harden completely before serving. This ensures they hold their shape and are ready for all the Halloween fun. You can pop them in the fridge for a quicker set if you’re in a hurry!
Tips for Success
- Use a microwave-safe bowl for melting chocolate to avoid burns.
- Let the chocolate cool slightly before dipping to prevent it from melting the marshmallows.
- Work quickly when decorating, as the chocolate sets fast!
- Experiment with different messages or designs to make each pop unique.
- Store your pops in a cool, dry place to keep them fresh and delicious.
Equipment Needed
- Microwave-safe bowl: For melting chocolate. A heatproof glass bowl works too.
- Baking sheet: To set your pops. A large plate can work in a pinch.
- Parchment paper: To prevent sticking. Wax paper is a good alternative.
- Spatula: For stirring melted chocolate. A spoon will do just fine!
Variations
- Chocolate Alternatives: Swap out the chocolate melting wafers for white chocolate or colored candy melts for a fun twist.
- Flavor Infusions: Add a splash of vanilla or almond extract to the melted chocolate for an extra layer of flavor.
- Gluten-Free Option: Ensure your chocolate wafers are gluten-free to accommodate dietary restrictions.
- Vegan Version: Use dairy-free chocolate melting wafers and skip the icing for a vegan-friendly treat.
- Nutty Crunch: Sprinkle crushed nuts or cookie crumbs on top of the chocolate before it sets for added texture.
Serving Suggestions
- Pair your Tombstone Marshmallow Pops with a spooky punch or hot apple cider for a festive drink.
- Display them on a Halloween-themed platter for an eye-catching centerpiece.
- Serve alongside other Halloween treats like ghost-shaped cookies or pumpkin cupcakes for a delightful dessert table.
FAQs about Tombstone Marshmallow Pops
Can I make Tombstone Marshmallow Pops in advance?
Absolutely! You can prepare these spooky treats a day in advance. Just store them in a cool, dry place to keep them fresh. This makes them a perfect option for busy moms like us who want to plan ahead!
What can I use instead of black icing?
If you don’t have black icing on hand, you can use melted chocolate or even colored icing. Just remember, the darker the color, the spookier the message!
How do I store leftover Tombstone Marshmallow Pops?
Store any leftovers in an airtight container at room temperature. This keeps them from getting sticky or melting. They’ll be ready for a sweet treat later!
Can I customize the decorations?
<pDefinitely! Feel free to get creative with your decorations. Use different colors of icing, add themed sprinkles, or even write fun messages. The sky’s the limit!
Are Tombstone Marshmallow Pops suitable for kids?
<pYes! These treats are perfect for kids. They’re fun to make and even more fun to eat. Just keep an eye on the little ones when they’re decorating with icing!
Final Thoughts
Making Tombstone Marshmallow Pops is more than just whipping up a treat; it’s about creating memories with your loved ones. I cherish the laughter and creativity that fills my kitchen as we decorate these spooky delights together.
Each pop is a little piece of joy, perfect for sharing at Halloween gatherings or simply enjoying at home. Plus, they’re a fantastic way to spark conversations and bring a festive spirit to any occasion. So, gather your family, roll up your sleeves, and dive into this fun culinary adventure. You’ll be glad you did!