

Introduction to Zombie Brain Cheesecake Bites
As a busy mom, I know how challenging it can be to whip up something fun and festive, especially around Halloween. That’s why I absolutely adore these Zombie Brain Cheesecake Bites! They’re not just a treat; they’re a delightful way to bring a little spooky fun to your family gatherings or Halloween parties. Plus, they’re no-bake, which means less time in the kitchen and more time enjoying the festivities. With their creamy texture and playful presentation, these bites are sure to impress your loved ones and make you the star of the show!
PrintZombie Brain Cheesecake Bites: A Spooktacular Treat!
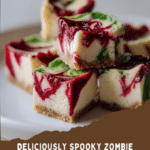
Zombie Brain Cheesecake Bites are a fun and spooky dessert perfect for Halloween parties or themed events. These bite-sized treats are creamy, delicious, and decorated to look like creepy brains.
- Prep Time: 20 minutes
- Cook Time: 0 minutes
- Total Time: 1 hour 20 minutes
- Yield: 12 bites
- Category: Dessert
- Method: No-Bake
- Cuisine: American
- Diet: Vegetarian
Ingredients
- 8 oz cream cheese, softened
- 1/2 cup powdered sugar
- 1 tsp vanilla extract
- 1 cup whipped cream
- 1/2 cup graham cracker crumbs
- Red food coloring
- Green food coloring
- Chocolate syrup (for drizzling)
Instructions
- In a mixing bowl, beat the softened cream cheese until smooth.
- Add powdered sugar and vanilla extract, mixing until well combined.
- Fold in the whipped cream gently until the mixture is light and fluffy.
- Divide the mixture into two bowls. In one bowl, add red food coloring to create a pink color, and in the other, add green food coloring.
- Using a spoon, scoop out the pink cheesecake mixture and shape it into small brain-like forms.
- Place the cheesecake bites on a serving platter and drizzle with chocolate syrup for a creepy effect.
- Chill in the refrigerator for at least 1 hour before serving.
Notes
- For a more intense color, adjust the amount of food coloring as desired.
- These bites can be made a day in advance and stored in the refrigerator.
- Consider using edible glitter for an extra spooky touch.
Why You’ll Love This Zombie Brain Cheesecake Bites
These Zombie Brain Cheesecake Bites are a game-changer for busy moms like us! They’re incredibly easy to make, taking just 20 minutes of prep time. The creamy, dreamy flavor will have everyone coming back for more. Plus, they’re a hit with kids and adults alike, making them perfect for any Halloween gathering. You’ll love how they add a fun twist to your dessert table without the fuss!
Ingredients for Zombie Brain Cheesecake Bites
Gathering the right ingredients is key to making these delightful Zombie Brain Cheesecake Bites. Here’s what you’ll need:
- Cream Cheese: The base of our cheesecake bites, it provides that rich, creamy texture we all love.
- Powdered Sugar: This sweetener gives the bites their delightful sweetness without the graininess of granulated sugar.
- Vanilla Extract: A splash of this adds a warm, comforting flavor that complements the cream cheese beautifully.
- Whipped Cream: Light and airy, it helps create a fluffy texture that makes these bites irresistible.
- Graham Cracker Crumbs: These add a crunchy element, reminiscent of traditional cheesecake crusts, enhancing the overall experience.
- Red Food Coloring: This is essential for achieving that spooky pink hue, making the bites look like creepy brains.
- Green Food Coloring: A touch of green adds to the eerie effect, giving the bites a fun, Halloween twist.
- Chocolate Syrup: Drizzling this on top not only adds flavor but also enhances the creepy appearance of the bites.
For those looking to get creative, consider adding edible glitter for an extra spooky touch! You can find all these ingredients at your local grocery store, and the exact quantities are listed at the bottom of the article for easy printing.
How to Make Zombie Brain Cheesecake Bites
Now that we have our ingredients ready, let’s dive into the fun part—making these Zombie Brain Cheesecake Bites! Follow these simple steps, and you’ll have a spooky treat that’s sure to impress.
Step 1: Prepare the Cream Cheese Mixture
Start by beating the softened cream cheese in a mixing bowl until it’s smooth and creamy. This is the foundation of our cheesecake bites, so take your time here. Once it’s nice and fluffy, add in the powdered sugar and vanilla extract. Mix until everything is well combined. The aroma of vanilla will make your kitchen feel cozy!
Step 2: Fold in the Whipped Cream
Next, gently fold in the whipped cream. This step is crucial for keeping the mixture light and airy. Use a spatula and a gentle hand to combine the whipped cream with the cream cheese mixture. You want to maintain that fluffy texture, so avoid over-mixing. Think of it as a dance—slow and graceful!
Step 3: Color the Mixture
Now, it’s time to add some color! Divide the mixture into two bowls. In one bowl, add a few drops of red food coloring to create a spooky pink hue. In the other bowl, add green food coloring. Mix each bowl until you achieve your desired shades. The vibrant colors will make your Zombie Brain Cheesecake Bites look extra creepy!
Step 4: Shape the Cheesecake Bites
Using a spoon, scoop out the pink cheesecake mixture and shape it into small brain-like forms. Don’t worry about making them perfect; a little imperfection adds to the charm! Place each shaped bite on a serving platter. You’ll be amazed at how quickly they start to resemble creepy little brains!
Step 5: Drizzle with Chocolate Syrup
For the final touch, drizzle chocolate syrup over the cheesecake bites. This not only adds a delicious flavor but also enhances the creepy effect. Let your creativity shine here—swirl it around for a fun design. Your guests will love the spooky presentation!
Step 6: Chill Before Serving
Finally, pop the platter in the refrigerator for at least one hour. Chilling is essential for the best texture and flavor. It allows the bites to firm up, making them easier to serve. Plus, the anticipation will make them even more enjoyable when it’s time to dig in!
Tips for Success
- Make sure your cream cheese is at room temperature for easy mixing.
- Use gel food coloring for more vibrant hues without altering the texture.
- Don’t rush the chilling process; it’s key for the best flavor and texture.
- Get the kids involved in shaping the bites; it’s a fun activity!
- Store leftovers in an airtight container in the fridge for up to three days.
Equipment Needed
- Mixing Bowl: A large bowl for combining ingredients. A glass or metal bowl works well.
- Electric Mixer: For beating the cream cheese. A whisk can be used, but it requires more effort.
- Spatula: Essential for folding in whipped cream and shaping the bites.
- Spoon: For scooping and shaping the cheesecake mixture.
- Serving Platter: To display your spooky creations. Any large plate will do!
Variations
- Chocolate Cheesecake Bites: Swap out some cream cheese for chocolate cream cheese for a rich twist.
- Gluten-Free Option: Use gluten-free graham cracker crumbs to make these bites suitable for gluten-sensitive guests.
- Fruit Flavored: Add a splash of fruit puree, like raspberry or strawberry, for a fruity flavor and vibrant color.
- Vegan Version: Substitute cream cheese with a vegan alternative and use coconut whipped cream for a dairy-free treat.
- Nutty Crunch: Mix in crushed nuts or sprinkles for added texture and a fun surprise in every bite.
Serving Suggestions
- Pair these Zombie Brain Cheesecake Bites with spooky-themed drinks like a witch’s brew punch or black lemonade.
- Serve on a Halloween-themed platter for an eye-catching display.
- Consider adding gummy worms or candy eyeballs for extra fun!
- For a complete dessert table, include other Halloween treats like ghost cookies or pumpkin cupcakes.
FAQs about Zombie Brain Cheesecake Bites
Can I make Zombie Brain Cheesecake Bites in advance?
Absolutely! These spooky treats can be made a day ahead. Just store them in the refrigerator until you’re ready to serve. This makes them a perfect option for busy moms planning a Halloween party!
How do I store leftovers?
Keep any leftover Zombie Brain Cheesecake Bites in an airtight container in the fridge. They’ll stay fresh for up to three days, but I doubt they’ll last that long!
Can I use different colors for the cheesecake bites?
Of course! Feel free to get creative with your food coloring. You can use purple, orange, or even blue to match your Halloween theme. The more colorful, the spookier!
Are these cheesecake bites suitable for kids?
Yes! These Zombie Brain Cheesecake Bites are kid-friendly and a fun way to get them involved in Halloween festivities. Just keep an eye on the food coloring if you have any picky eaters!
What can I serve with these cheesecake bites?
Pair them with themed drinks like a spooky punch or serve alongside other Halloween treats. They make a great addition to any dessert table, adding a fun and creepy flair!
Final Thoughts
Creating these Zombie Brain Cheesecake Bites is more than just making a dessert; it’s about crafting memories with your loved ones. The joy on your kids’ faces as they help shape the bites is priceless. Plus, the laughter and excitement they bring to your Halloween gatherings are simply unmatched. These treats are a delightful blend of fun and flavor, making them a must-have for any spooky celebration. So, roll up your sleeves, gather your ingredients, and let the Halloween spirit inspire your kitchen adventures. Trust me, these bites will be the highlight of your festive spread!